
1. Introduction
Welcome to the BELLA 6 Qt Slim Air Fryer experience. This appliance is designed to provide a convenient and efficient way to prepare a variety of meals with less oil. Its slim profile is crafted to maximize vertical space, making it suitable for any kitchen size, while offering a generous 6-quart capacity. This manual provides essential information for safe and effective use, maintenance, and troubleshooting of your new air fryer.
2. Important Safety Instructions
When using electrical appliances, basic safety precautions should always be followed to reduce the risk of fire, electric shock, and injury to persons, including the following:
- Read all instructions before operating the appliance.
- Do not touch hot surfaces. Use handles or knobs.
- To protect against electric shock, do not immerse cord, plugs, or appliance in water or other liquid.
- Close supervision is necessary when any appliance is used by or near children.
- Unplug from outlet when not in use and before cleaning. Allow to cool before putting on or taking off parts.
- Do not operate any appliance with a damaged cord or plug, or after the appliance malfunctions or has been damaged in any manner.
- The use of accessory attachments not recommended by the appliance manufacturer may cause injuries.
- Do not use outdoors.
- Do not let cord hang over edge of table or counter, or touch hot surfaces.
- Do not place on or near a hot gas or electric burner, or in a heated oven.
- Extreme caution must be used when moving an appliance containing hot oil or other hot liquids.
- To disconnect, turn any control to “off”, then remove plug from wall outlet.
- Do not use appliance for other than intended use.
- Ensure the appliance is placed on a stable, level, heat-resistant surface.
- Do not block any ventilation openings.
3. Product Overview
The BELLA 6 Qt Slim Air Fryer is designed for efficient and convenient cooking. Below are its main components and key features:
Components:
- Main Unit with Digital Control Panel
- Removable Cooking Basket with Cool-Touch Handle
- Removable Crisping Tray (EverGood™ Ceramic Nonstick)
Key Features:
- Slim Design: Maximizes counter space with a tall, narrow profile.
- EverGood™ Ceramic Nonstick Coating: Ensures easy food release and cleaning, free from PFAS, PFOA, PTFE, lead, or cadmium.
- XL Basket Capacity: Holds up to 5 lbs of food, ideal for family meals.
- Digital Controls: Intuitive touch interface for temperature and time adjustments.
- 6 Preset Cooking Options: Air Fry, Bake, Roast, Broil, Reheat, Dehydrate.
- Powerful Performance: 1750 watts of power with circular heat technology for fast, even cooking.
- 60-Minute Auto Shut-off: With an audible tone for safety and convenience.

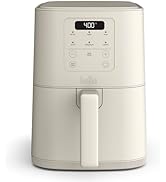
Figure 3.1: The BELLA 6 Qt Slim Air Fryer features a sleek, compact design in an Oatmilk finish, ideal for modern kitchens. The digital control panel is visible on the front.

Figure 3.2: The digital control panel displays temperature and time, with touch buttons for Air Fry, Bake, Roast, Broil, Dehydrate, Reheat, and time/temperature adjustments.
4. Setup
Before using your BELLA 6 Qt Slim Air Fryer for the first time, please follow these steps:
- Unpacking: Carefully remove all packaging materials, labels, and stickers from the appliance.
- Initial Cleaning: Wash the cooking basket and crisping tray with warm, soapy water. Rinse thoroughly and dry completely. Wipe the exterior of the air fryer with a damp cloth.
- Placement: Place the air fryer on a stable, level, heat-resistant surface, ensuring adequate space (at least 6 inches) around the back and sides for proper air circulation. Do not place it directly under cabinets.
- Power Connection: Plug the power cord into a 120V AC electrical outlet.

Figure 4.1: The air fryer with its basket partially removed, showing the spacious interior and the removable crisping tray, designed for easy loading and unloading of food.
5. Operating Instructions
Follow these steps to operate your BELLA 6 Qt Slim Air Fryer:
5.1 Powering On/Off
- Plug the air fryer into a power outlet. The display will illuminate briefly.
- Press the Power button (
 ) to turn the appliance on. The default settings will appear.
 - Press and hold the Power button to turn the appliance off.
5.2 Pre-heating
For best results, pre-heating is recommended for most recipes:
- With the empty basket and crisping tray inserted, turn on the air fryer.
- Set the desired temperature and time (e.g., 350°F for 5 minutes).
- Press Start/Stop to begin pre-heating.
5.3 Using Presets
The air fryer comes with 6 convenient preset cooking options:
- Air Fry: Ideal for crispy foods like fries, chicken wings, and vegetables.
- Bake: Suitable for cakes, muffins, and other baked goods.
- Roast: Perfect for meats and larger vegetables.
- Broil: For browning and crisping the top layer of food.
- Dehydrate: For making dried fruits, jerky, or vegetable crisps.
- Reheat: To warm up leftovers while maintaining texture.
To use a preset, simply press the corresponding button on the control panel. The appliance will automatically set the recommended time and temperature for that function.

Figure 5.1: This image illustrates the versatility of the air fryer, highlighting its six preset cooking functions: Air Fry, Bake, Roast, Broil, Reheat, and Dehydrate, each with a corresponding food example.
5.4 Adjusting Time and Temperature
- After selecting a preset or manual mode, press the Time/Temp button to toggle between adjusting time and temperature.
- Use the +/- buttons to increase or decrease the time or temperature. The maximum temperature is 400°F and the maximum time is 60 minutes.
5.5 Cooking Process
- Place your food in the cooking basket, ensuring not to overfill. For optimal results, food should be in a single layer or spread out.
- Slide the cooking basket firmly back into the air fryer until it clicks into place.
- Press Start/Stop to begin cooking.
- During cooking, you may need to shake or flip food for even crisping. The cool-touch handle allows for safe removal of the basket.
- The 60-minute auto shut-off timer with an audible tone will signal when cooking is complete.

Figure 5.2: A view inside the air fryer basket, showing salmon and asparagus arranged for cooking, demonstrating the appliance's capacity for family-sized meals.
6. Cleaning and Maintenance
Proper cleaning and maintenance will extend the life of your air fryer:
- Always Unplug: Ensure the air fryer is unplugged from the power outlet and completely cooled down before cleaning.
- Basket and Crisping Tray: The basket and crisping tray feature EverGood™ Ceramic Nonstick Coating for easy cleaning. While hand washing with warm, soapy water is recommended to preserve the coating, both components are designed to be dishwasher safe for convenience. Avoid using abrasive cleaning tools or harsh chemicals.
- Exterior: Wipe the exterior of the air fryer with a damp cloth. Do not immerse the main unit in water or any other liquid.
- Interior: If necessary, wipe the interior of the appliance with a damp cloth. Ensure all parts are dry before reassembling or storing.
- Storage: Store the cleaned and dried air fryer in a cool, dry place. Utilize the cord wrap feature for tidy storage.

Figure 6.1: The image demonstrates the ease of cleaning the air fryer's basket, featuring the EverGood™ Ceramic Nonstick Coating for quick food release and simple wipe-down maintenance.
7. Troubleshooting
If you encounter any issues with your air fryer, refer to the following common problems and solutions:
| Problem | Possible Cause | Solution |
|---|---|---|
| Appliance does not turn on. | Not plugged in; Power button not pressed. | Ensure the power cord is securely plugged into a working outlet. Press the Power button. |
| Food not cooking evenly. | Basket is overcrowded; Food not shaken/flipped. | Cook in smaller batches. Shake or flip food halfway through cooking. |
| White smoke coming from appliance. | Grease from previous use; Fatty food cooking. | Clean the basket and crisping tray thoroughly after each use. Remove excess fat from food. |
| Food not crispy. | Not enough oil (if applicable); Temperature too low; Cooking time too short. | Lightly spray food with oil. Increase temperature or cooking time. |
8. Specifications
Detailed specifications for your BELLA 6 Qt Slim Air Fryer:
| Feature | Detail |
|---|---|
| Model Number | 35233 |
| Capacity | 6 Quarts (5 lb food capacity) |
| Color | Oatmilk |
| Dimensions (D x W x H) | 15.31" x 9.09" x 10.9" |
| Material | Aluminum, Ceramic |
| Wattage | 1750 Watts |
| Voltage | 120 Volts |
| Max Temperature | 400°F |
| Control Method | Touch |
| Special Features | Automatic Shut-Off, Temperature Control, EverGood™ Ceramic Nonstick Coating |
| UPC | 829486352331 |

Figure 8.1: This diagram provides the precise measurements of the air fryer, emphasizing its slim profile designed to save counter space while offering a generous 6-quart capacity.
9. Warranty and Support
Your BELLA 6 Qt Slim Air Fryer comes with a 2-year warranty, ensuring quality and performance. For any questions, technical support, or warranty claims, please contact BELLA customer service.
Customer Support: Please refer to the contact information provided on the BELLA official website or your product packaging for the most up-to-date support details.


