1. Introduction
This manual provides detailed instructions for the installation, operation, and maintenance of your Xigmatek Aqua V AIR Arctic Mid-Tower PC Case. Please read this manual thoroughly before beginning any installation to ensure proper setup and safe operation. Retain this manual for future reference.
2. Safety Information
Observe the following safety precautions during installation and operation:
- Always disconnect the power supply from the wall outlet before installing or removing any components.
- Wear an anti-static wrist strap to prevent electrostatic discharge (ESD) damage to sensitive components.
- Handle components carefully. Avoid touching pins or circuit boards directly.
- Ensure proper ventilation around the PC case to prevent overheating.
- Keep small parts and tools away from children.
- Do not attempt to modify the case or its components, as this may void your warranty and pose safety risks.
3. Package Contents
Verify that all items are present in the package:
- Xigmatek Aqua V AIR Arctic Mid-Tower PC Case
- Accessory kit (screws, standoffs, cable ties)
- User Manual (this document)
If any items are missing or damaged, contact your retailer or Xigmatek support.
4. Product Overview
The Xigmatek Aqua V AIR Arctic is a mid-tower PC case designed for high-performance gaming configurations. It features tempered glass panels for component visibility and optimized airflow with pre-installed ARGB fans.

Figure 4.1: Front-left view of the Xigmatek Aqua V AIR Arctic PC case, showcasing the tempered glass front and side panels, and the pre-installed ARGB fans.

Figure 4.2: Rear view of the PC case, showing the I/O shield cutout, expansion slots, and rear fan mount.
Figure 4.3: Top-down angled view, highlighting the top mesh panel for additional cooling and the internal layout.
5. Setup and Installation
Follow these steps to install your PC components into the Xigmatek Aqua V AIR Arctic case.
5.1. Preparing the Case
- Place the case on a flat, stable surface.
- Remove the tempered glass side panel by unscrewing the thumb screws at the rear and carefully sliding it off. Place it on a soft, non-abrasive surface to prevent scratches.
- Remove the opposite steel side panel by unscrewing the thumb screws and sliding it off.
5.2. Motherboard Installation
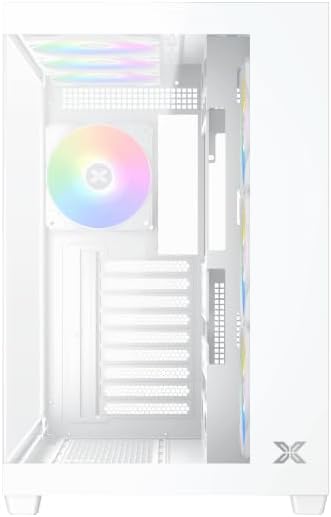
Figure 5.1: Interior view of the case, illustrating the motherboard mounting area and cable routing cutouts.
- Install the I/O shield into the cutout at the rear of the case.
- Align your motherboard with the pre-installed standoffs. Ensure the standoffs match your motherboard's form factor (ATX, Micro ATX).
- Secure the motherboard using the provided screws from the accessory kit. Do not overtighten.
5.3. Power Supply Unit (PSU) Installation
- Locate the PSU mounting bracket at the bottom rear of the case.
- Slide your PSU into the designated compartment from the rear of the case.
- Secure the PSU to the case using the screws provided with your power supply.
5.4. Storage Drive Installation
The case supports multiple storage drives:
- 2.5" SSDs: Mount directly to the SSD trays located behind the motherboard tray. Secure with screws.
- 3.5" HDDs: Install into the drive cage located beneath the PSU shroud. Slide the drive into the tray and secure with screws.
5.5. Graphics Card (GPU) and Expansion Card Installation
- Remove the necessary expansion slot covers at the rear of the case.
- Insert your graphics card or other expansion cards into the appropriate PCIe slots on the motherboard.
- Secure the cards with the provided screws.
5.6. Cable Management

Figure 5.2: View behind the motherboard tray, illustrating the ample space and tie-down points for effective cable management.
Utilize the cable routing cutouts and tie-down points behind the motherboard tray to organize cables. This improves airflow and aesthetics.
- Connect all necessary power cables from the PSU to the motherboard, GPU, and storage drives.
- Connect front panel cables (USB, audio, power/reset switches, LED indicators) to the corresponding headers on your motherboard. Refer to your motherboard manual for specific header locations.
- Connect the ARGB fan cables to the integrated fan controller or directly to your motherboard's ARGB headers if available.
5.7. Fan and Radiator Support
The Xigmatek Aqua V AIR Arctic comes with 7 pre-installed 120mm ARGB fans. Additional cooling options are available:
- Front: Supports up to 3 x 120mm or 2 x 140mm fans / 240mm, 280mm, 360mm radiators.
- Top: Supports up to 3 x 120mm or 2 x 140mm fans / 240mm, 280mm, 360mm radiators.
- Rear: Supports 1 x 120mm fan.
- Bottom: Supports up to 3 x 120mm fans.
Ensure proper fan orientation for optimal airflow (intake at front/bottom, exhaust at rear/top).
6. Operating
Once all components are installed and cables are connected, replace the side panels. Connect your monitor, keyboard, mouse, and power cable. Press the power button on the front panel to start your system.
The pre-installed ARGB fans can be controlled via the integrated controller (if present) or through compatible motherboard software, allowing customization of lighting effects and fan speeds.
7. Maintenance
Regular maintenance helps ensure optimal performance and longevity of your PC components.
- Dust Cleaning: Periodically clean dust filters (top, front, bottom) to maintain good airflow. Use compressed air to remove dust from inside the case and components.
- Exterior Cleaning: Wipe the exterior surfaces with a soft, damp cloth. Avoid abrasive cleaners or solvents.
- Cable Management Check: Occasionally check cable routing to ensure no cables are obstructing fans or airflow.
8. Troubleshooting
If you encounter issues, refer to the following common troubleshooting steps:
- System not powering on:
- Ensure the PSU is switched on and properly connected to the wall outlet.
- Verify all power cables (24-pin ATX, 8-pin CPU, PCIe, SATA) are securely connected.
- Check front panel power switch connections to the motherboard.
- No display output:
- Ensure the monitor cable is connected to the graphics card (not the motherboard I/O if using a dedicated GPU).
- Reseat the graphics card and RAM modules.
- Fans not spinning or ARGB not working:
- Check fan power connections to the motherboard or fan controller.
- Verify ARGB connections to the controller or motherboard headers.
- Ensure any fan control software or BIOS settings are correctly configured.
For more complex issues, consult your component manuals or contact Xigmatek technical support.
9. Specifications
| Feature | Detail |
|---|---|
| Model Name | Aqua V AIR Arctic |
| Model Number | EN45837 |
| Case Type | Mid-Tower |
| Motherboard Compatibility | ATX, Micro ATX |
| Material | Steel Alloy, Tempered Glass |
| Color | White |
| Pre-installed Fans | 7 x 120mm ARGB Fans |
| Max GPU Length | 410 mm |
| USB Ports | 3 |
| Weight | 8.8 Kilograms |
10. Warranty and Support
Xigmatek products are manufactured to high quality standards. For warranty information, please refer to the warranty card included with your product or visit the official Xigmatek website. For technical support or inquiries, please contact Xigmatek customer service through their official channels.
Official Website: www.xigmatek.com


