1. Introduction
Thank you for choosing the FOTING Electric Pressure Washer. This manual provides essential information for the safe and efficient operation, assembly, maintenance, and troubleshooting of your pressure washer. Please read this manual thoroughly before first use and retain it for future reference.
2. Important Safety Information
WARNING: Read all safety warnings and instructions. Failure to follow the warnings and instructions may result in electric shock, fire, and/or serious injury.
- Always wear appropriate personal protective equipment, including safety glasses, hearing protection, and protective footwear.
- Ensure the power cord and plug are in good condition. Do not use if damaged.
- Connect the pressure washer only to a grounded outlet.
- Never point the spray gun at people, animals, or electrical equipment.
- Keep children and pets away from the operating area.
- Always engage the safety lock on the spray gun when not actively spraying.
- Do not operate the pressure washer in the rain or wet conditions.
- Before performing any maintenance or cleaning, always disconnect the power supply.

Figure 2.1: Safety Lock on Spray Gun. The safety lock prevents accidental activation of the spray gun. Always engage it when the unit is not in use.
3. Product Components
Familiarize yourself with the parts of your FOTING Electric Pressure Washer:

Figure 3.1: Main Unit and Accessories. This image displays the pressure washer unit, spray gun, high-pressure hose, power cord, various nozzles, detergent tank, and water inlet filter.
- Pressure Washer Main Unit
- High-Pressure Spray Gun
- High-Pressure Hose (23 FT)
- Power Cord (35 FT)
- Quick-Connect Nozzles (0°, 15°, 25°, 40°)
- Detergent Tank
- Water Inlet Filter
- Hose Reel
- Wheels for portability

Figure 3.2: Key Features. This image highlights the cable storage space, child safety switch on the spray gun, stable foot support for the unit, and dedicated storage for nozzles and the detergent sprayer.
4. Specifications
| Feature | Value |
|---|---|
| Model Number | FT-KLC-T3-BL |
| Maximum Pressure | 4500 PSI |
| Maximum Flow Rate | 3.2 GPM |
| Rated Voltage | 120V/60Hz |
| Hose Length | 23 Feet |
| Power Cord Length | 35 Feet |
| Product Dimensions | 41.9 x 31 x 42.9 cm |
| Weight | 9.78 kg |
| Certifications | EPA, TSS, UL, CE, RoHS |
| Water Protection | IPX5 |

Figure 4.1: Product Specifications Overview. This image summarizes the key performance and physical specifications of the pressure washer.
5. Setup and Assembly
Follow these steps to assemble and prepare your pressure washer for use:
- Mounting Handle: Secure the handle to the main unit using the provided swivel screws.
- Mounting Bracket: Attach any necessary mounting brackets for accessories.
- Connecting Nozzle: Select the desired quick-connect nozzle and firmly attach it to the spray gun.
- Install Water Outlet Pipe: Connect the high-pressure hose to the water outlet on the pressure washer unit.
- Install Water Inlet Pipe: Connect your garden hose to the water inlet on the pressure washer. Ensure the water inlet filter is properly installed to prevent debris from entering the pump.
- Rotary Switch: Ensure the rotary switch is in the OFF position before connecting to power.

Figure 5.1: Assembly Steps. This image illustrates the six primary steps for assembling the pressure washer components.
5.1 Water Supply Connection
Your pressure washer supports three methods for water intake:
- Faucet Self-Priming: Direct connection to a standard garden faucet.
- Bucket Self-Priming: Drawing water from a bucket using the included filter and hose.
- Pool Self-Priming: Drawing water directly from a pool using the included filter and hose.
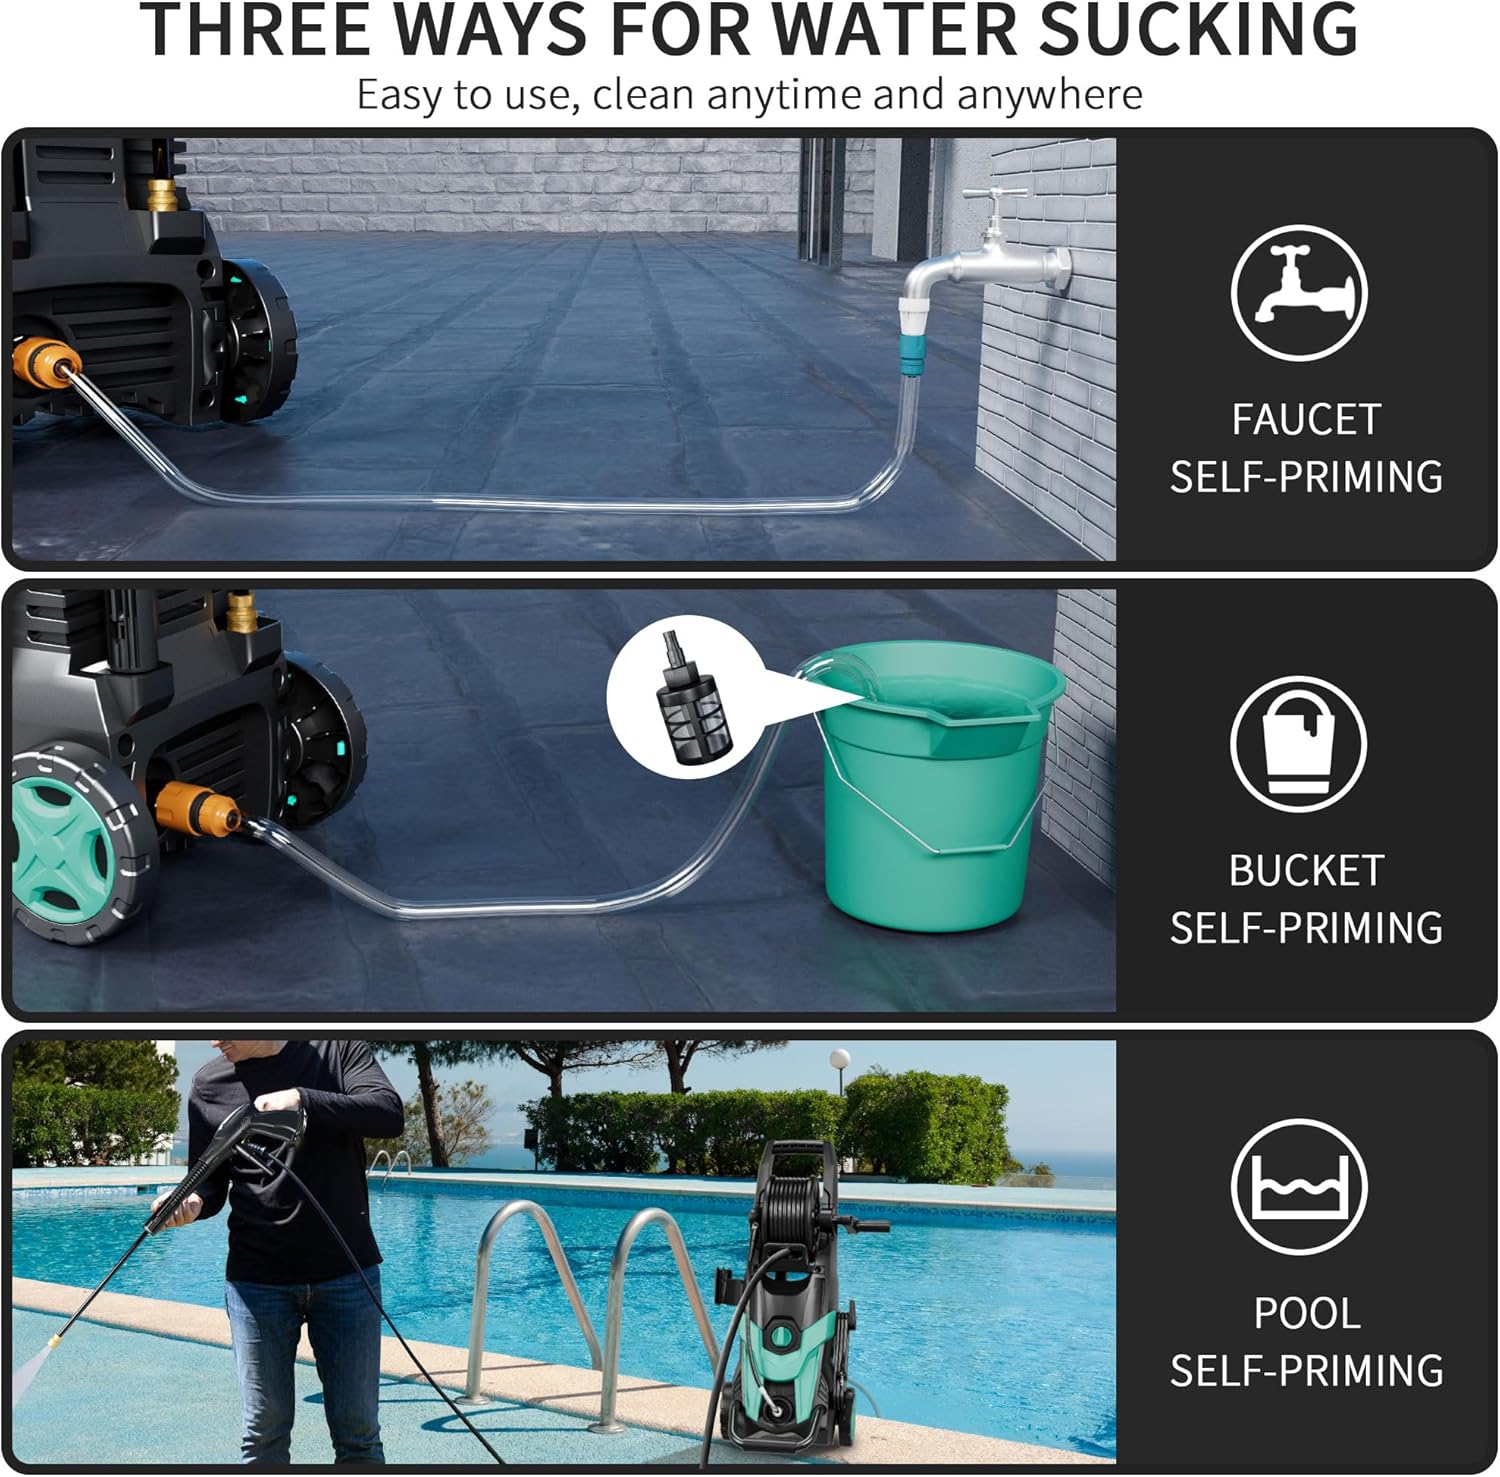
Figure 5.2: Water Sourcing Methods. This diagram demonstrates connecting the pressure washer to a faucet, drawing water from a bucket, or drawing water from a pool.
5.2 Inlet Hose and Filter
The inlet hose filter is crucial for protecting the pump from impurities. Ensure it is clean and properly installed before each use.

Figure 5.3: Inlet Hose and Filter Assembly. This diagram details the components of the water inlet filter, which helps remove impurities from the water supply.
6. Operating Instructions
6.1 Starting the Pressure Washer
- Ensure all connections (water inlet, high-pressure hose, spray gun) are secure.
- Turn on the water supply completely.
- Squeeze the trigger on the spray gun to purge air from the system until a steady stream of water emerges.
- Plug the power cord into a grounded electrical outlet.
- Turn the rotary switch on the pressure washer to the "ON" position.
- Release the safety lock on the spray gun and begin cleaning.
6.2 Nozzle Selection
The pressure washer includes four quick-connect nozzles, each designed for specific cleaning tasks:
- 0° (Red) Nozzle: For concentrated, powerful blasting on stubborn stains. Use with caution on delicate surfaces.
- 15° (Yellow) Nozzle: For focused washing, ideal for removing mud and sand stains.
- 25° (Green) Nozzle: A versatile nozzle for general cleaning tasks.
- 40° (White) Nozzle: For uniform spraying, suitable for sensitive materials and wider coverage.

Figure 6.1: Nozzle Application Guide. This image illustrates the different quick-connect nozzles and their suggested applications for various surfaces and cleaning needs.

Figure 6.2: Quick Connect Nozzle Types. This image provides a visual guide to the four quick-connect nozzles and their specific spray patterns and uses.
6.3 Using the Detergent Tank
For enhanced cleaning, attach the detergent tank and fill it with an appropriate pressure washer-safe cleaning solution. The detergent will be applied at low pressure. After applying detergent, switch to a high-pressure nozzle to rinse the surface thoroughly.

Figure 6.3: Foam Application. This image shows the pressure washer being used with the detergent tank to create foam for cleaning a vehicle.
7. Maintenance
Regular maintenance ensures optimal performance and extends the life of your pressure washer.
- Clean Nozzles: Regularly check and clean nozzles for blockages. Use the included nozzle cleaning tool if necessary.
- Inspect Hoses: Check high-pressure and garden hoses for kinks, cuts, or leaks before each use. Replace damaged hoses immediately.
- Clean Water Inlet Filter: Remove and clean the water inlet filter after every few uses or if water flow is reduced.
- Drain Water: After each use, disconnect the water supply and run the pressure washer for a few seconds to drain any remaining water from the pump and hoses. This is especially important before storing in freezing temperatures.
- Store Properly: Store the pressure washer in a dry, protected area. Use the integrated hose reel and cable storage for neat organization.
8. Troubleshooting
If you encounter issues with your pressure washer, refer to the following common problems and solutions:
| Problem | Possible Cause | Solution |
|---|---|---|
| Motor does not start | Power cord not plugged in; circuit breaker tripped; ON/OFF switch in OFF position. | Check power connection; reset circuit breaker; turn ON/OFF switch to ON. |
| No water pressure or low pressure | Water supply off or restricted; clogged water inlet filter; air in pump; incorrect nozzle. | Ensure water supply is fully open; clean filter; purge air by squeezing trigger; select appropriate nozzle. |
| Water leaks | Loose connections; damaged O-rings or seals; cracked hose. | Tighten all connections; inspect and replace O-rings/seals; replace damaged hoses. |
| Motor stops during operation | Overheating (thermal overload protection); power supply interruption. | Allow motor to cool down; check power supply. |
9. Warranty and Customer Support
FOTING provides a 3-year after-sales service for this product. For warranty claims, technical support, or replacement parts, please contact FOTING customer service through your original purchase platform or visit the official FOTING website.
Please have your model number (FT-KLC-T3-BL) and purchase date available when contacting support.


