1. Introduction
Thank you for choosing the INGCO CAGLI27153 20V Cordless Angle Grinder 115mm. This manual provides essential information for the safe and effective operation, maintenance, and troubleshooting of your new tool. Please read these instructions carefully before use and keep them for future reference.
This angle grinder is designed for cutting, grinding, and polishing various materials using appropriate discs. It features a powerful brushless motor and a 115mm disc diameter, operating at up to 9000 RPM.

Important Note: This product is a bare unit. Battery and charger are not included and must be purchased separately. It is compatible with INGCO 20V lithium-ion batteries.
2. General Safety Instructions
Always follow basic safety precautions to reduce the risk of fire, electric shock, and personal injury. Keep this manual for future reference.
2.1 Work Area Safety
- Keep the work area clean and well-lit. Cluttered or dark areas invite accidents.
- Do not operate power tools in explosive atmospheres, such as in the presence of flammable liquids, gases, or dust. Power tools create sparks which may ignite the dust or fumes.
- Keep children and bystanders away while operating a power tool. Distractions can cause you to lose control.
2.2 Electrical Safety
- Power tool plugs must match the outlet. Never modify the plug in any way.
- Do not expose power tools to rain or wet conditions. Water entering a power tool will increase the risk of electric shock.
2.3 Personal Safety
- Always wear eye protection. Use a face shield or safety goggles.
- Wear hearing protection when operating the tool for extended periods.
- Dress properly. Do not wear loose clothing or jewelry. Keep your hair and clothing away from moving parts.
- Stay alert, watch what you are doing, and use common sense when operating a power tool.
- Avoid accidental starting. Ensure the switch is in the off-position before connecting to a battery pack, picking up or carrying the tool.
2.4 Power Tool Use and Care
- Do not force the power tool. Use the correct power tool for your application.
- Do not use the power tool if the switch does not turn it on and off.
- Disconnect the battery pack from the power tool before making any adjustments, changing accessories, or storing power tools.
- Store idle power tools out of the reach of children and do not allow persons unfamiliar with the power tool or these instructions to operate the power tool.
- Maintain power tools and accessories. Check for misalignment or binding of moving parts, breakage of parts, and any other condition that may affect the power tool’s operation.
2.5 Angle Grinder Specific Safety Warnings
- The guard must be securely attached and positioned for maximum safety, so the least amount of wheel is exposed towards the operator.
- Always use the correct wheel type for the application.
- Do not use damaged wheels. Inspect wheels for chips, cracks, or excessive wear before each use.
- Always hold the tool firmly with both hands during operation.
- Keep hands away from the rotating disc.
- Be aware of sparks and flying debris. Ensure no flammable materials are nearby.
- Do not use cutting discs for grinding operations.
- Do not use grinding discs for cutting operations.
3. Product Overview
Familiarize yourself with the components of your INGCO CAGLI27153 angle grinder.

Figure 1: INGCO CAGLI27153 Cordless Angle Grinder. Key components include the main body, side handle, disc guard, spindle, and power switch.
3.1 Key Components
- Main Body: Houses the brushless motor and battery connection.
- Side Handle: Provides additional grip and control during operation. Can be mounted on either side.
- Disc Guard: Protects the user from sparks, debris, and accidental contact with the rotating disc.
- Spindle Lock Button: Used to lock the spindle for easy disc changes.
- Power Switch: Activates and deactivates the tool.
- Battery Port: For connecting the INGCO 20V lithium-ion battery.
3.2 Specifications
| Feature | Specification |
|---|---|
| Model Number | CAGLI27153 |
| Voltage | 20 Volts |
| Wattage | 1000 watts |
| Disc Diameter | 115mm |
| Maximum Rotational Speed | 9000 RPM |
| Motor Type | Brushless |
| Item Weight | 1.9 Kilograms |
| Included Components | 1x angle grinder, 1x wrench |
| Power Source | Battery Powered (20V Li-ion) |

Figure 2: Model comparison chart (CAGLI27153 is part of this series, though not explicitly listed in this specific image, it represents the product line).
4. Setup
Before operating the angle grinder, ensure it is properly assembled and configured for your task.
4.1 Attaching the Side Handle
- The side handle can be screwed into either the left or right side of the gear housing.
- Choose the position that provides the best control and comfort for your application.
- Tighten the handle securely by hand.
4.2 Adjusting the Disc Guard
- Loosen the guard clamping screw (if applicable, some guards are tool-free adjustable).
- Rotate the guard to a position that offers maximum protection from sparks and debris, ensuring the least amount of the disc is exposed towards you.
- Tighten the clamping screw firmly to secure the guard in place. Never operate the grinder without the disc guard properly installed.
4.3 Installing/Changing Grinding/Cutting Discs
- Ensure the battery pack is removed from the tool.
- Press and hold the spindle lock button.
- Using the provided wrench, loosen the outer flange nut by turning it counter-clockwise.
- Remove the outer flange nut and the old disc (if applicable).
- Place the new grinding or cutting disc onto the spindle, ensuring it sits flush against the inner flange. The disc's label should face outwards.
- Replace the outer flange nut and tighten it securely with the wrench while holding the spindle lock button. Do not overtighten.
- Release the spindle lock button.
4.4 Installing the Battery Pack
- Ensure the battery pack is fully charged.
- Align the battery pack with the battery port on the tool.
- Slide the battery pack into the port until it clicks securely into place.
- To remove, press the battery release button and slide the battery pack out.
5. Operating Instructions
Follow these guidelines for safe and effective operation of your angle grinder.
5.1 Powering On/Off
- To turn on: Slide the power switch to the "ON" position.
- To turn off: Slide the power switch to the "OFF" position.
- Allow the disc to reach full speed before making contact with the workpiece.
5.2 Grinding and Cutting Techniques
Always wear appropriate personal protective equipment (PPE), including safety glasses, hearing protection, gloves, and a dust mask.

Figure 3: Angle grinder in use for cutting metal. Ensure proper grip and safety gear.
- Grinding: Hold the grinder at an angle of approximately 15-30 degrees to the workpiece. Apply moderate pressure and move the tool smoothly across the surface.
- Cutting: Hold the grinder perpendicular (90 degrees) to the workpiece. Allow the disc to do the work; do not force it. Make shallow passes rather than trying to cut through thick material in one go.
- Ensure the workpiece is securely clamped to prevent movement during operation.
- Avoid applying excessive pressure, as this can damage the disc, motor, or cause kickback.
- Be mindful of the direction of sparks and debris.
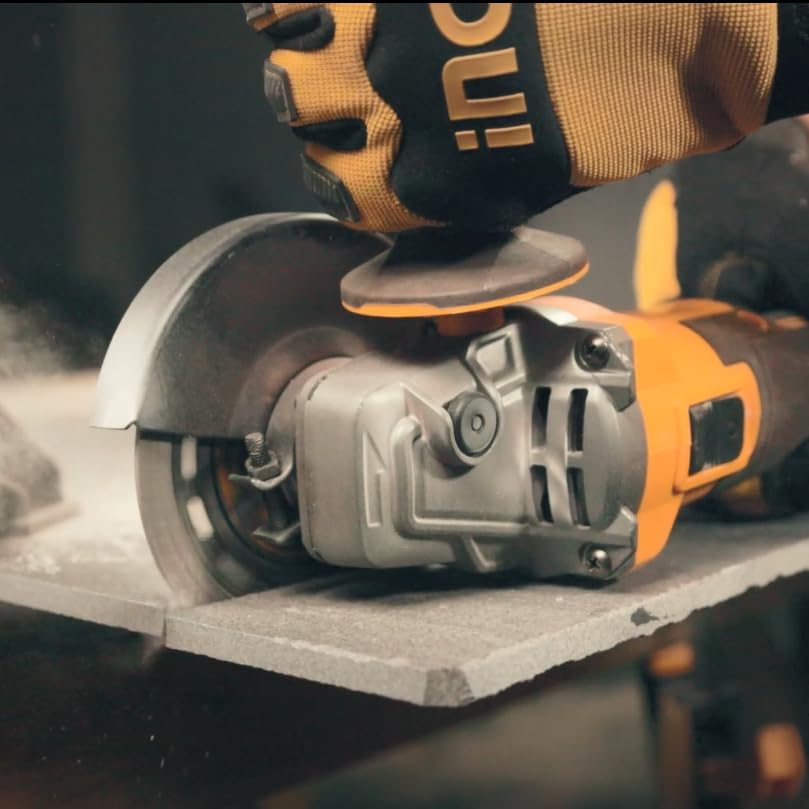
Figure 4: Angle grinder used for cutting tile. Note the dust generated, requiring appropriate respiratory protection.

Figure 5: Detailed view of sparks during metal cutting. Always direct sparks away from yourself and others.
6. Maintenance
Regular maintenance ensures the longevity and safe operation of your angle grinder.
6.1 Cleaning
- Always remove the battery pack before cleaning.
- Clean the ventilation openings regularly to prevent overheating. Use a soft brush or compressed air.
- Wipe the tool's exterior with a damp cloth. Do not use harsh chemicals or abrasive cleaners.
- Keep the side handle and grip areas clean and free of grease or oil.
6.2 Disc Inspection and Replacement
- Before each use, inspect the grinding or cutting disc for damage, cracks, or excessive wear. Replace any damaged discs immediately.
- Ensure the disc's maximum RPM rating is equal to or greater than the grinder's maximum RPM (9000 RPM).
- Refer to Section 4.3 for instructions on changing discs.
6.3 Storage
- Store the tool in a dry, secure place out of reach of children.
- Remove the battery pack before storing for extended periods.
- Protect the tool from direct sunlight and extreme temperatures.
7. Troubleshooting
This section addresses common issues you might encounter with your angle grinder.
| Problem | Possible Cause | Solution |
|---|---|---|
| Tool does not start | Battery not inserted correctly Battery discharged Power switch in OFF position | Ensure battery is fully seated Charge the battery pack Slide switch to ON position |
| Reduced power or speed | Battery low Overloading the tool Disc worn or incorrect type | Recharge battery Reduce pressure; allow tool to work at its own pace Replace disc; ensure correct type for material |
| Excessive vibration | Damaged or unbalanced disc Flange nuts not tightened Spindle bent | Replace disc Ensure flange nuts are securely tightened Contact customer support for repair |
| Tool overheats | Blocked ventilation slots Continuous heavy use | Clean ventilation slots Allow tool to cool down; reduce workload |
If you encounter problems not listed here or if the suggested solutions do not resolve the issue, please contact INGCO customer support.
8. Warranty and Support
INGCO products are manufactured to high-quality standards and are guaranteed against manufacturing defects. Specific warranty terms and conditions may vary by region and retailer.
8.1 Warranty Information
Please retain your proof of purchase (receipt) for any warranty claims. The warranty typically covers defects in materials and workmanship under normal use. It does not cover damage caused by misuse, abuse, unauthorized repairs, or normal wear and tear.
For detailed warranty information, please refer to the warranty card included with your product or visit the official INGCO website for your region.
8.2 Customer Support
For technical assistance, spare parts, or service inquiries, please contact your local INGCO dealer or customer service center. You can usually find contact information on the INGCO official website or on the product packaging.
When contacting support, please have your product model number (CAGLI27153) and serial number (if applicable) ready.


