
1. Introduction
Thank you for choosing the SAMA V40 Mid Tower ATX Case. This manual provides detailed instructions for the proper installation, operation, and maintenance of your new PC case. Please read this manual thoroughly before beginning assembly to ensure correct setup and optimal performance.
The SAMA V40 is designed for high-performance PC builds, featuring a dual-chamber layout, panoramic tempered glass panels, and efficient vertical airflow. It comes with six pre-installed 120mm ARGB PWM fans to provide excellent cooling and aesthetic customization.
2. Key Features
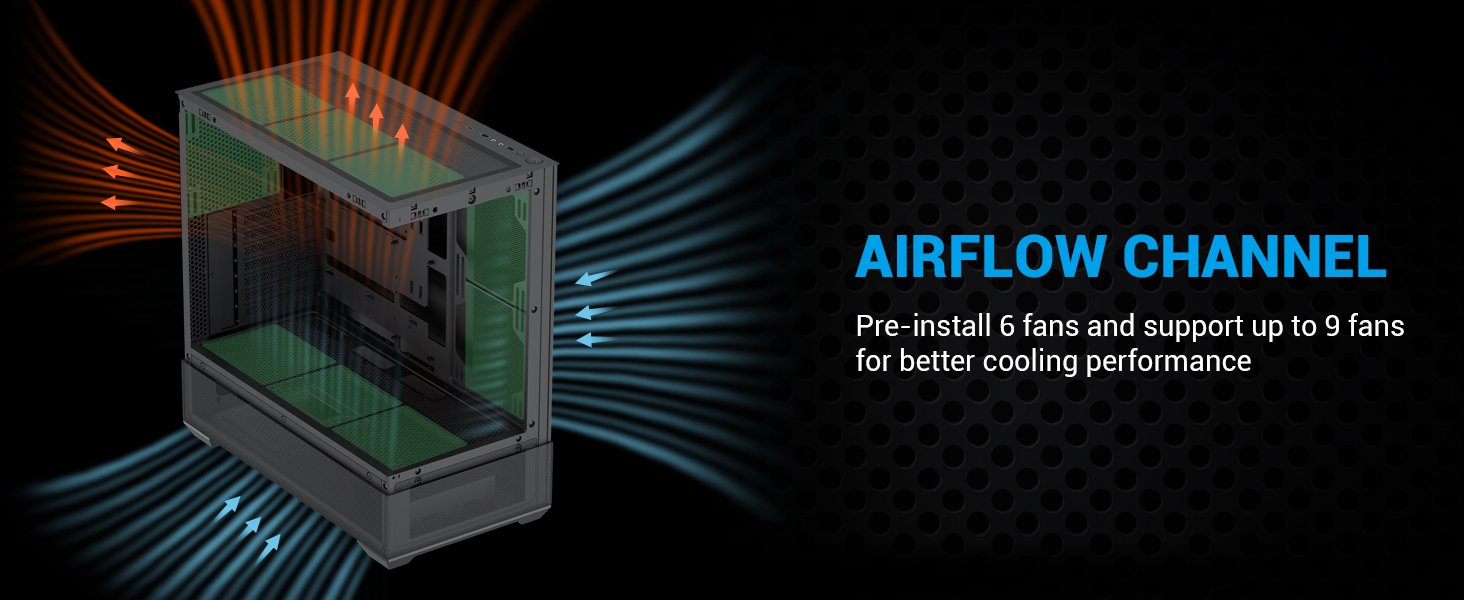
- Efficient Cooling: Six pre-installed 120mm ARGB PWM fans (3 bottom, 2 side, 1 rear) with support for up to 9 fans and 360mm water cooling on top.
- Panoramic Tempered Glass: Dual 270° tempered glass panels for an unobstructed view of internal components.
- Spacious Interior: Supports ATX, Micro-ATX, and ITX motherboards, GPUs up to 410mm, and CPU coolers up to 181mm.
- Enhanced Vertical Airflow: Dual-chamber design optimizes airflow from bottom to top for superior thermal performance.
- Modern I/O Panel: Includes 1x USB 3.1 Type-C, 2x USB 3.0 ports, and HD audio jacks for convenient connectivity.
- Flexible Storage: Accommodates up to 3x 3.5" HDDs or 3x 2.5" SSDs.
- 7 Expansion Slots: Provides ample space for multi-GPU configurations and expansion cards.
3. Technical Specifications
| Feature | Specification |
|---|---|
| Model Name | V40 |
| Case Type | Mid Tower |
| Dimensions (LxWxH) | 17.72 x 9.25 x 17.72 inches (453 x 235 x 450 mm) |
| Motherboard Compatibility | ATX, Micro ATX, Mini ITX |
| Pre-installed Fans | 6x 120mm ARGB PWM Fans (3 bottom, 2 side, 1 rear) |
| Max Fan Support | Up to 9x 120mm fans |
| Radiator Support | Up to 360mm (top) |
| Max GPU Length | 410mm |
| Max CPU Cooler Height | 181mm |
| Drive Bays | 3x 3.5" HDD, 3x 2.5" SSD |
| Expansion Slots | 7 |
| Front I/O Ports | 1x USB 3.1 Type-C, 2x USB 3.0, HD Audio |
| Materials | ABS, Alloy Steel, Tempered Glass |
| Color | Black |
4. Package Contents
Please verify that all items are present in your package:
- SAMA V40 Mid Tower ATX Case
- 6x 120mm ARGB PWM Fans (pre-installed)
- Accessory Box (screws, zip ties, standoffs, fan/ARGB hub)
- User Manual
5. Setup Guide
5.1. Preparing the Case
Before installing components, carefully remove the tempered glass side panels. These panels are typically secured with thumbscrews at the rear of the case and can be gently pulled open or lifted off once unscrewed. Exercise caution to prevent damage to the glass.

5.2. Motherboard Installation
Install the necessary standoffs for your motherboard form factor (ATX, Micro-ATX, or ITX). Carefully place your motherboard into the case, aligning it with the standoffs and the I/O shield opening. Secure the motherboard with screws.
5.3. Fan and Cooling Installation
The SAMA V40 comes with six 120mm ARGB PWM fans pre-installed (three at the bottom, two on the side, and one at the rear). Additional fans can be installed to further enhance cooling. The case supports up to a 360mm radiator on the top panel.

5.4. Drive Installation
The SAMA V40 offers flexible storage options. Install your 3.5" HDDs and 2.5" SSDs into the designated drive bays. Refer to the diagram for bay locations and capacity.

5.5. Power Supply Installation
Install your ATX power supply into its designated compartment, typically located at the front-bottom of the case in the dual-chamber design. Secure it with screws from the rear of the case.
5.6. Front Panel I/O Connections
Connect the front panel cables (USB 3.1 Type-C, USB 3.0, HD Audio, Power, Reset, LED) to the corresponding headers on your motherboard. Consult your motherboard manual for exact header locations. The SAMA V40 features a unified front panel connector for easier installation.

6. Operating Your PC Case
6.1. Powering On
Once all components are securely installed and connected, close the side panels. Connect your power supply to a wall outlet and flip the PSU's power switch to the 'on' position. Press the power button on the case's front I/O panel to start your system.
6.2. Fan and ARGB Control
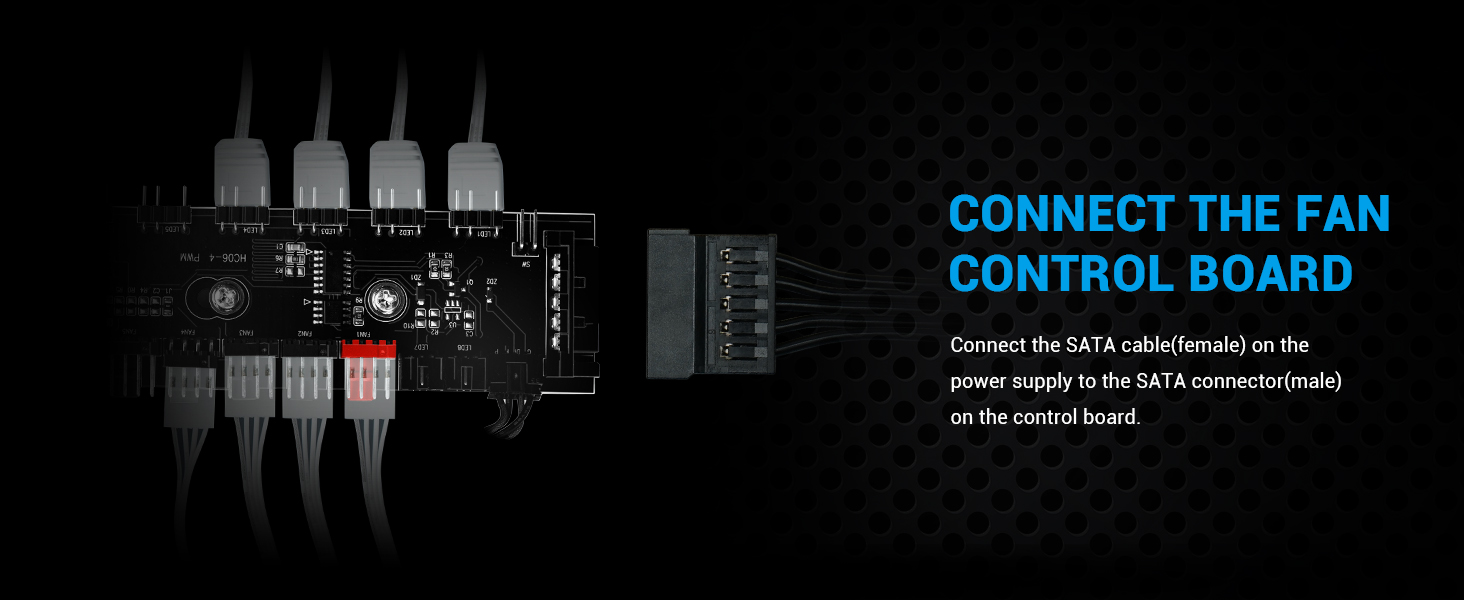
The pre-installed ARGB PWM fans can be controlled via your motherboard's fan control software (if supported) or through the integrated fan/ARGB hub. The hub allows for synchronization of lighting effects and adjustment of fan speeds. Refer to your motherboard's software for advanced customization options.
7. Maintenance
Regular maintenance helps ensure optimal performance and longevity of your PC components.
- Dust Filters: The SAMA V40 includes magnetic dust filters. Periodically remove and clean these filters to maintain optimal airflow and prevent dust buildup inside the case.
- Case Cleaning: Use a soft, dry cloth to wipe down the exterior of the case and tempered glass panels. For stubborn smudges on glass, a mild glass cleaner can be used, applied to the cloth first, not directly to the glass.
- Internal Dust: Every few months, or as needed, open the case and use compressed air to gently remove dust from fans, heatsinks, and other components.
8. Troubleshooting
If you encounter issues with your SAMA V40 case, consider the following common solutions:
- No Power: Ensure the power supply is properly connected to the wall and the PSU switch is on. Verify all motherboard power cables (24-pin ATX, 8-pin CPU) are securely seated. Check front panel power button connection to the motherboard.
- Fans Not Spinning/ARGB Not Lighting: Confirm the fan/ARGB hub is receiving SATA power from the PSU. Ensure fan and ARGB cables are correctly connected to the hub and/or motherboard headers. Check motherboard software for fan speed and lighting settings.
- USB Ports Not Working: Verify the USB 3.0 and USB 3.1 Type-C cables from the front panel are correctly plugged into their respective motherboard headers.
- Audio Jacks Not Working: Ensure the HD Audio cable from the front panel is correctly connected to the motherboard's audio header.
For further assistance, please refer to your motherboard manual or contact SAMA customer support.
9. Warranty and Support
SAMA products are manufactured to high-quality standards. For information regarding warranty coverage, terms, and conditions, please visit the official SAMA website or contact your local retailer. Technical support can be accessed through the SAMA official support channels, typically found on their website.
SAMA Official Store: Visit SAMA Store on Amazon

