Introduction
This manual provides detailed instructions for the setup, operation, and maintenance of your MakerHawk ESP32 LoRa V3 Development Board with N30 Protective Case and 1100mAh Battery. This device features an ESP32-S3FN8 dual-core processor, integrated WiFi, LoRa, and Bluetooth capabilities, and a 0.96-inch 128x64 dot matrix OLED display. It is designed for various IoT applications, supporting development environments like Arduino and Meshtastic.

Image: Overview of the MakerHawk N30 devices highlighting key functions, development environments, features, and application scenarios.
What's in the Box
Your package includes the following components:
- 2 x ESP32 LoRa V3 Development Boards
- 2 x 1100mAh Batteries
- 2 x N30 Protective Cases
- 2 x 915MHz Antennas
- Necessary connection cables and accessories

Image: Detailed view of the package contents for the 2-pack MakerHawk N30 devices.
Setup and Installation
Follow these steps to assemble your ESP32 LoRa V3 Development Board into the N30 protective case:
- Prepare the Case: Gently pry open the N30 protective case. If it is too tight, use a small, non-metallic tool to assist.
- Install Battery: Secure the 1100mAh battery inside the case using the provided double-sided adhesive foam to isolate and fix it. Ensure the battery wires are positioned correctly.
- Insert Development Board: Carefully insert the ESP32 LoRa V3 development board into the case, aligning the USB-C port and buttons with their respective cutouts.
- Connect Antenna: Connect the 915MHz antenna to the U.FL interface on the board. Route the antenna cable as needed and tighten the antenna screws.
- Close the Case: Close the lid of the protective case, ensuring all components are securely in place and no wires are pinched.
- Apply Screen Protector: Attach the transparent screen protector over the OLED display window.

Image: Visual guide demonstrating the assembly process of the development board, battery, and antenna into the protective case.
Video: This video demonstrates the assembly of the N30 Protective Case for the ESP32 LoRa V3 Board, including the antenna and battery installation.
Operating Instructions
Powering On and Initial Configuration
To power on the device, ensure the battery is connected and charged, or connect it via the USB-C port. The OLED display will show boot information. For initial setup and flashing firmware (e.g., Meshtastic), connect the device to a computer using a USB-C cable. The integrated CP2102 USB-to-serial chip facilitates easy programming and debugging.
Connectivity
The ESP32 LoRa V3 board supports multiple communication protocols:
- LoRa: For long-range, low-power communication between devices.
- WiFi: For standard internet connectivity and local network communication.
- Bluetooth: For short-range wireless communication, often used for connecting to mobile applications.

Image: Diagram explaining the communication methods (LoRa, Bluetooth, WiFi) between MakerHawk N30 devices, mobile phones, and computers.
Meshtastic Integration
The device is compatible with the Meshtastic network, allowing for off-grid, decentralized communication. You can flash Meshtastic firmware onto the board and use it with the Meshtastic mobile app or web interface.
Video: This video provides an overview of the ESP32 LoRa V3 Development Board with its 915MHz antenna, demonstrating its features and potential applications.
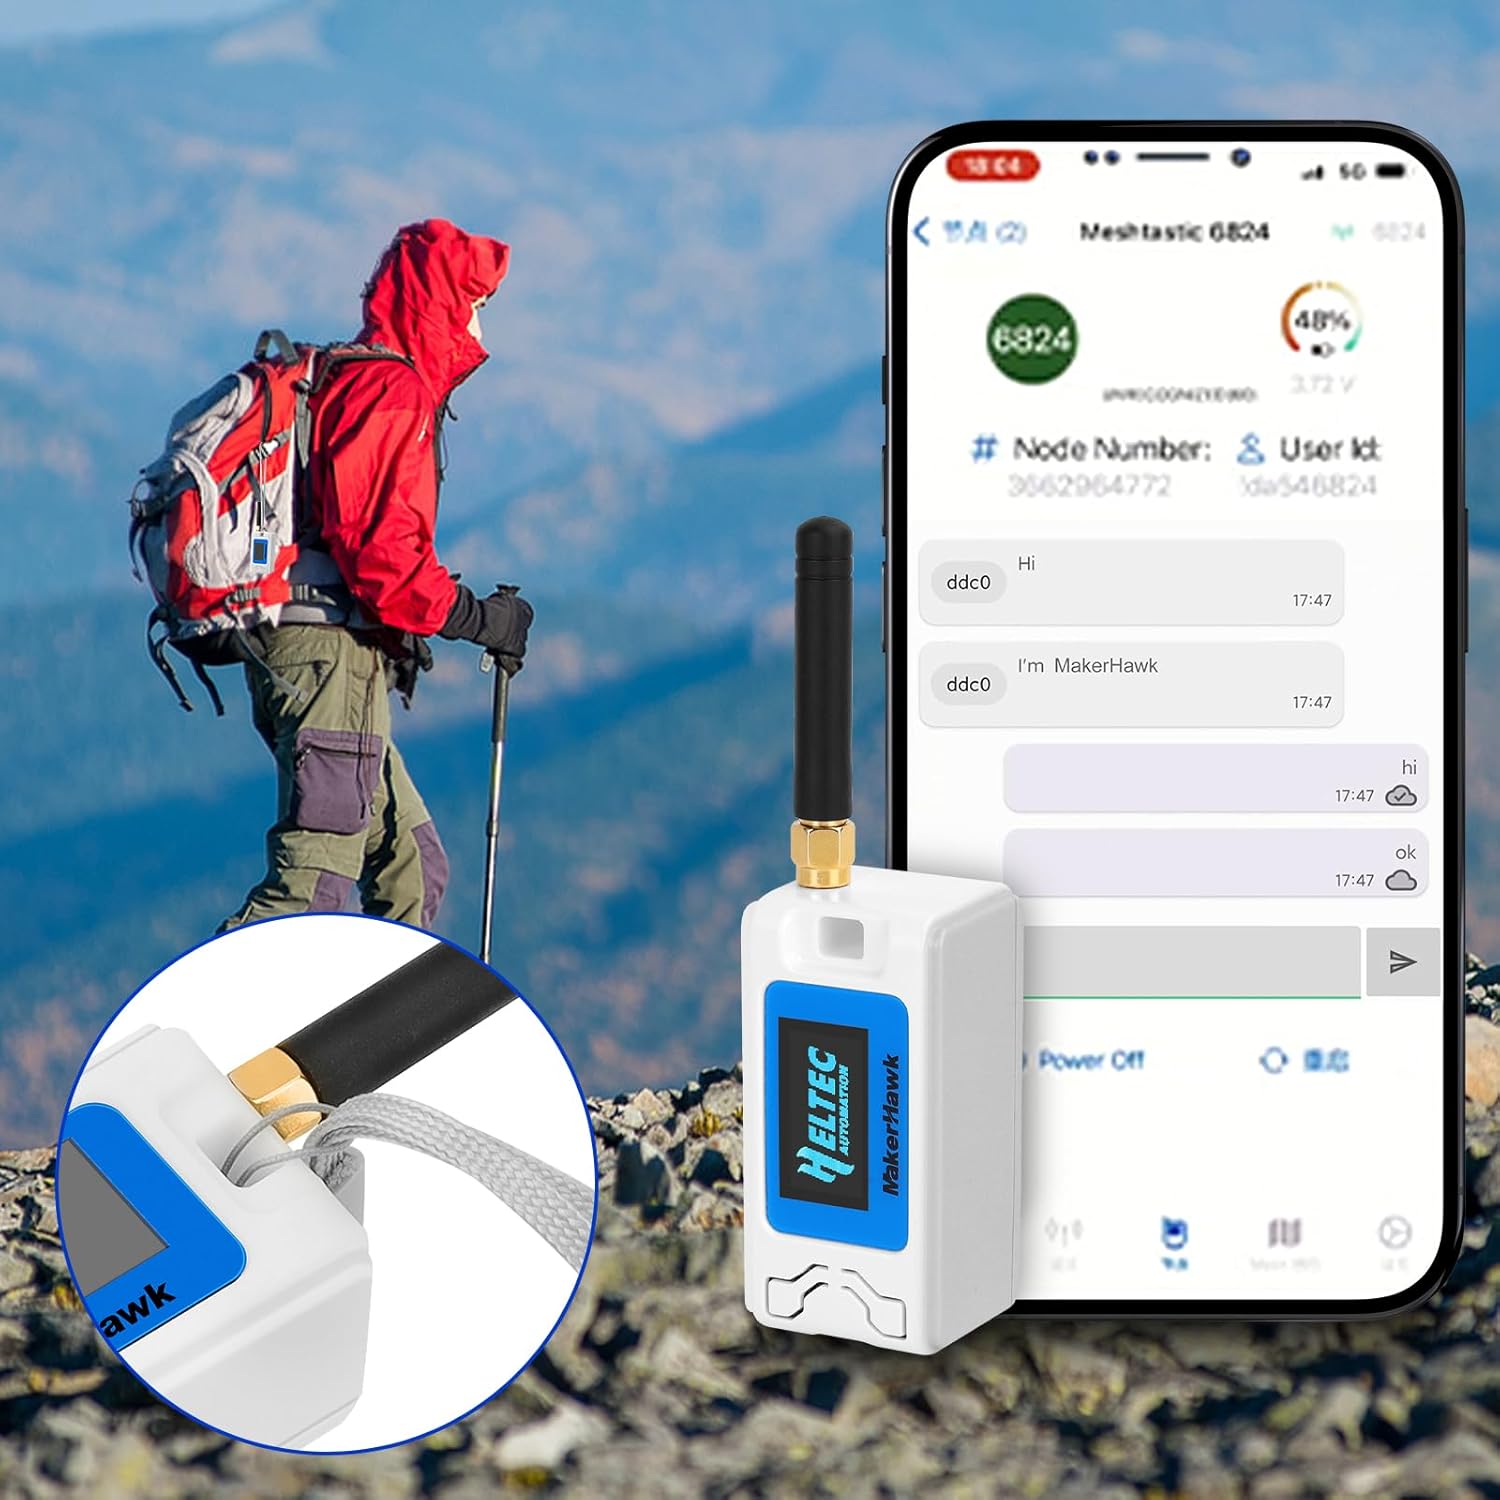
Image: Example of the MakerHawk N30 device in use during outdoor activities, displaying its screen and the Meshtastic app on a smartphone.
Specifications
| Feature | Detail |
|---|---|
| Processor | ESP32-S3FN8 Dual-Core (up to 240 MHz) |
| Connectivity | Wi-Fi (802.11ac), LoRa (SX1262, 915MHz), Bluetooth, USB-C |
| Display | 0.96-inch 128x64 dot matrix OLED |
| Battery | 1100mAh LiPo (with charge/discharge management, overcharge protection) |
| USB-to-Serial Chip | CP2102 |
| Operating System Support | Linux (for development environment) |
| Dimensions (Package) | 6.1 x 5.35 x 1.34 inches |
| Item Weight | 5.6 ounces |

Image: Pinout diagram for the ESP32 LoRa V3 Development Board, useful for advanced users and developers.
Maintenance
To ensure the longevity and optimal performance of your device:
- Keep the device clean and free from dust and moisture.
- Avoid exposing the device to extreme temperatures or direct sunlight.
- Handle the antenna and USB-C port with care to prevent damage.
- Regularly check for firmware updates from the official Meshtastic or Heltec Automation websites to benefit from new features and bug fixes.
Troubleshooting
If you encounter issues with your device, consider the following common solutions:
- Device not powering on: Ensure the battery is properly connected and charged, or try connecting via USB-C to a reliable power source.
- Connection issues (LoRa/WiFi/Bluetooth): Verify that antennas are securely attached. Check firmware settings for correct frequency and network configurations. Ensure no physical obstructions are blocking signals.
- Firmware flashing problems: Confirm that the correct drivers (e.g., CP2102) are installed on your computer. Try a different USB-C cable or port. Ensure the device is in bootloader mode if required by the flashing tool.
- OLED display not working: Check for physical damage. If recently assembled, ensure the display ribbon cable is properly seated.
For more advanced troubleshooting or specific error codes, refer to the official documentation for the ESP32 LoRa V3 board and the Meshtastic project.
Warranty and Support
For warranty information and technical support, please refer to the manufacturer's official website or contact MakerHawk customer service directly. Keep your purchase receipt as proof of purchase.


