
1. Introduction
The GZLMMY YM519 is a multi-language OBD2 diagnostic scanner designed for comprehensive vehicle health assessment. This device supports nine standard OBDII/EOBD protocols, enabling users to read and clear engine fault codes, view freeze frame data, check I/M readiness, access vehicle information, and monitor real-time data streams. Additionally, it features advanced functions such as oxygen sensor tests, on-board monitor tests (Mode 6), component tests (Mode 8), and detailed vehicle battery analysis, including voltage reading, monitoring, and life assessment. Its plug-and-play design ensures ease of use for both professional mechanics and home users.
2. Setup
2.1 Connecting the Scanner
The YM519 scanner operates on a plug-and-play principle, requiring no external batteries or chargers. It draws power directly from your vehicle's OBDII data connector.
- Ensure your vehicle's ignition is turned off.
- Locate the 16-pin Data Link Connector (DLC) in your vehicle. This port is typically found under the dashboard on the driver's side. Refer to the image below for common locations.
- Firmly plug the YM519 scanner's OBDII connector into the vehicle's DLC.
- Turn the vehicle's ignition to the 'ON' position (do not start the engine). The scanner will power on automatically.

Figure 2.1: Common OBD2 Interface Positions. Most cars have the OBD2 interface in positions A or B, while others may be in C, D, or E.
3. Operating Instructions
The YM519 scanner features an intuitive interface with a 2.8-inch high-resolution TFT color display and responsive silicone buttons for easy navigation.

Figure 3.1: Product Parameters and Button Description. This image highlights the 2.8-inch color screen, DTC indicator, pending DTC indicator, EXIT button, F1 button, Left button, OK button, DOWN button, UP button, BAT button, Right button, F2 button, and the OBD II Connector.
3.1 Main Menu Navigation
Upon powering on, the device displays a main menu with various diagnostic options. Use the UP, DOWN, LEFT, and RIGHT buttons to navigate through the menu, and the OK button to confirm selections. The EXIT button returns to the previous screen.

Figure 3.2: OBDII 10 Mode Diagnosis Menu. This image illustrates the diagnostic menu options available on the YM519 scanner.
3.2 Key Diagnostic Functions
- Read Codes: Retrieves Diagnostic Trouble Codes (DTCs) from the vehicle's computer.
- Erase Codes: Clears DTCs from the vehicle's computer and turns off the Malfunction Indicator Lamp (MIL). (Ensure the engine is off before clearing codes.)

Figure 3.3: Engine Code Erase Function. This image demonstrates the process of clearing an engine fault code using the YM519 scanner, showing the engine warning light disappearing from the dashboard.
- View Freeze Frame: Displays a snapshot of the vehicle's operating conditions at the time a fault code was set.
- I/M Readiness: Checks the status of emission-related monitors to determine if they have run and completed their diagnostic testing.
- Vehicle Information: Retrieves the Vehicle Identification Number (VIN), Calibration ID (CALID), and Calibration Verification Number (CVN).
- Live Data Stream: Displays real-time data parameters from the vehicle's sensors in both numerical and graphical formats.
- O2 Sensor Test: Retrieves O2 sensor monitor test results for the most recently completed tests from the vehicle's on-board computer.
- On-Board Monitor Test (Mode 6): Retrieves test results for emission-related powertrain components and systems that are not continuously monitored.
- Component Test (Mode 8): Initiates a test of the EVAP system (fuel vapor emission leak test).
- Battery Test: Accesses functions to read, monitor, and assess the vehicle's battery voltage and overall life.

Figure 3.4: Diagnostic Vehicle Information and One-Click Clear. This image illustrates how to navigate the diagnostic menu and clear vehicle information, showing the effect on the car's dashboard display.
3.3 Shortcut Keys (F1/F2)
The YM519 scanner includes programmable shortcut keys, F1 and F2. You can assign frequently used diagnostic functions to these keys via the 'Settings' menu for quick access.
3.4 Language Settings
The device supports 13 languages: Chinese, English, Korean, Japanese, Russian, Polish, Portuguese, Finnish, Italian, French, Spanish, Dutch, and German. To change the language, navigate to the 'Settings' menu and select your preferred language.
4. Maintenance
4.1 Cleaning the Device
To maintain the scanner's performance and appearance, wipe the device with a soft, damp cloth. Avoid using abrasive cleaners or solvents that could damage the screen or casing.
4.2 Storage
Store the YM519 scanner in its protective TPU case when not in use. This case is designed to be durable and shock-resistant, protecting the device from external impacts and keeping it in optimal condition. Store in a dry environment, away from extreme temperatures.

Figure 4.1: Design Features. This image showcases the new UI, the durable TPU protective case, and the comfortable, non-slip silicone buttons of the YM519 scanner.
5. Troubleshooting
5.1 Device Not Powering On
- Ensure the OBDII connector is securely plugged into the vehicle's DLC.
- Verify the vehicle's ignition is in the 'ON' position.
- Check the vehicle's fuse for the OBDII port (refer to your vehicle's owner's manual).
5.2 Communication Error
- Confirm the vehicle is OBDII compliant (most vehicles from 1996 onwards).
- Ensure the ignition is 'ON' and the engine is off.
- Try connecting the scanner to a different OBDII compliant vehicle to rule out a vehicle-specific issue.
5.3 Engine Warning Light Remains On After Clearing Codes
If the engine warning light persists after clearing codes, it indicates that the underlying fault has not been resolved. The code will reappear if the issue is still present. Address the root cause of the fault before attempting to clear codes again.

Figure 5.1: Engine Faults Problem. This image highlights the potential consequences of an unaddressed engine light, including serious environmental pollution, increased fuel consumption, increased engine temperature, engine oil burning, and increased engine noise.
6. Specifications
| Feature | Specification |
|---|---|
| Model | YM519 |
| Brand | GZLMMY |
| Display | 2.8-inch TFT Color Screen |
| Material | ABS Plastic |
| Color | Black |
| Automotive Fit Type | Universal Fit |
| Assembly Required | No |
| Supported Protocols | SAE J1850 PWM (41.6 kBaud), SAE J1850 VPW (10.4 kBaud), ISO9141-2 (5 Baud init, 10.4 kBaud), ISO14230-4 KWP (5 Baud init, 10.4 kBaud), ISO14230-4 KWP (fast init, 10.4 kBaud), ISO15765-4 CAN (11-bit ID, 500 kbaud), ISO15765-4 CAN (29-bit ID, 500 kbaud), ISO15765-4 CAN (11-bit ID, 250 kbaud), ISO15765-4 CAN (29-bit ID, 251 kbaud) |
| Supported Languages | Chinese, English, Korean, Japanese, Russian, Polish, Portuguese, Finnish, Italian, French, Spanish, Dutch, German (13 languages) |
| Dimensions | 14.50cm (5.70in) x 8.50cm (3.34in) x 2.10cm (0.82in) (Scanner body excluding cable) |
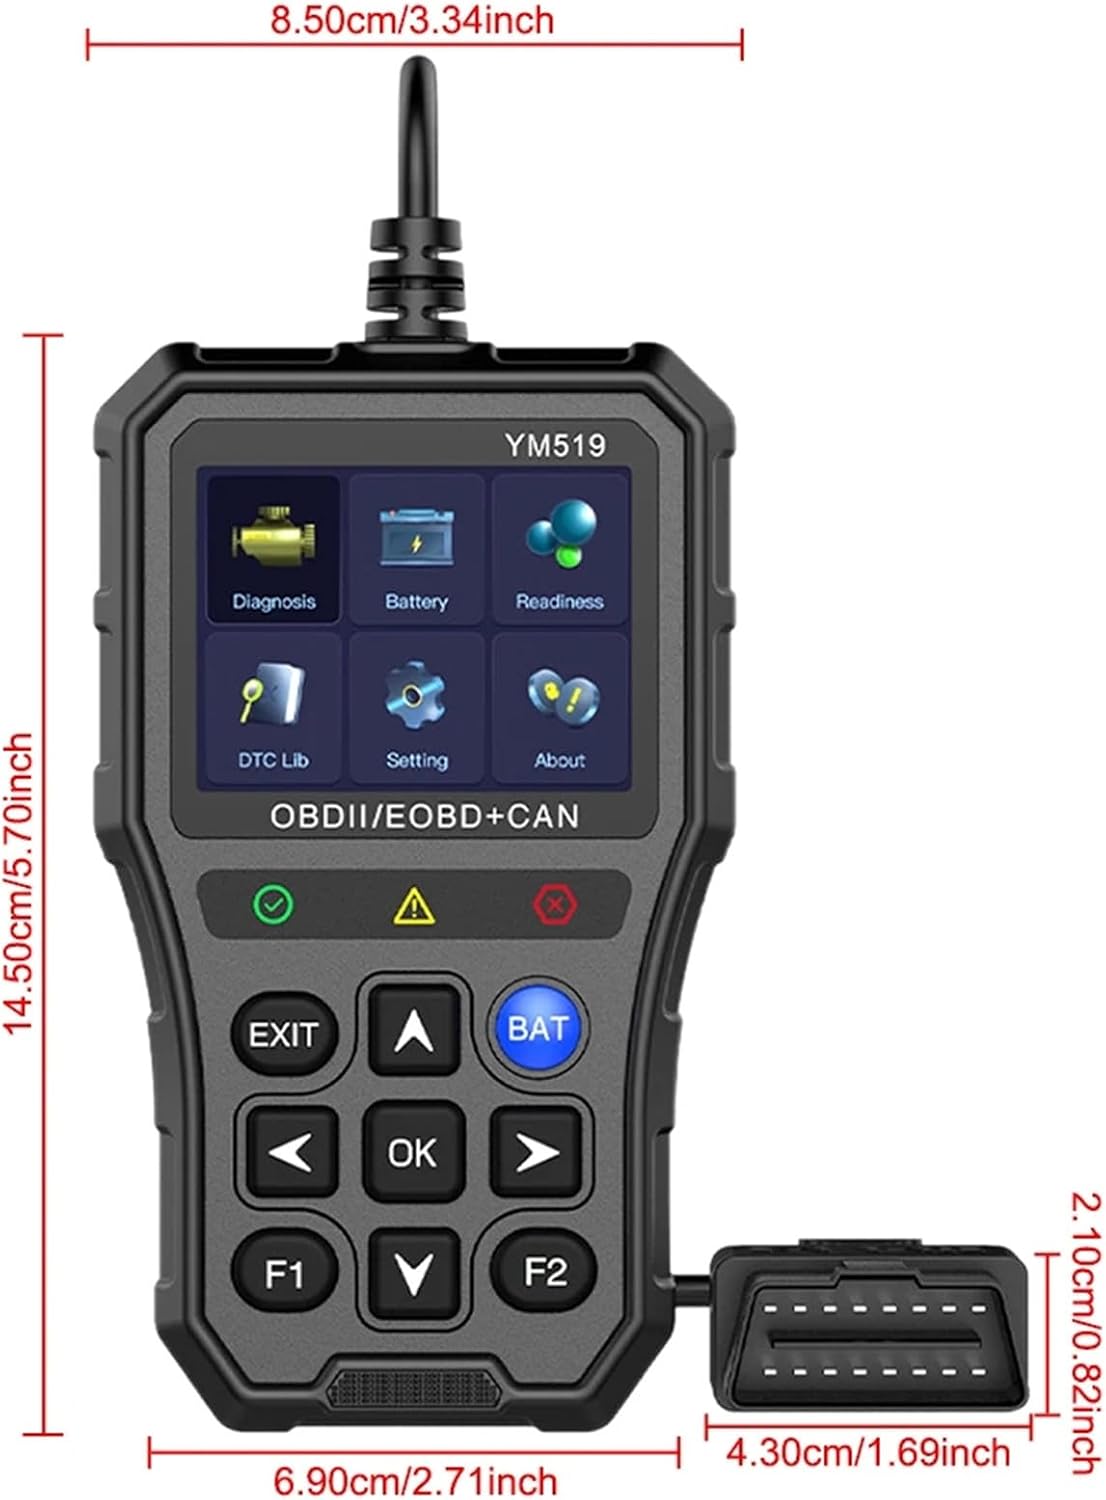
Figure 6.1: Product Dimensions. This image provides a visual representation of the scanner's measurements.
7. Warranty Information
Specific warranty details for the GZLMMY YM519 scanner are not provided in this manual. Please refer to the warranty card included with your product or contact the seller/manufacturer directly for information regarding warranty coverage and terms.
8. Support
For technical assistance, troubleshooting, or any questions regarding the GZLMMY YM519 OBD2 Diagnostic Scanner, please contact the seller or manufacturer through their official support channels. Keep your purchase receipt and product model number (YM519) ready when seeking support.