1. Introduction
This manual provides detailed instructions for the installation, operation, and maintenance of your WOOCARTY WF703 3-Camera Wireless RV Backup System. This system is designed to enhance safety during reversing and driving by providing clear, real-time video feeds from multiple cameras to a 7-inch 1080P touch screen monitor. It features a robust 2.4GHz wireless transmission, IP69K waterproof cameras with IR night vision, and flexible installation options for various commercial vehicles, including RVs, motorhomes, trucks, and trailers.

Figure 1.1: WOOCARTY WF703 3-Camera Wireless RV Backup System components.
2. Package Contents
Verify that all items listed below are included in your package. If any components are missing or damaged, please contact WOOCARTY customer service.
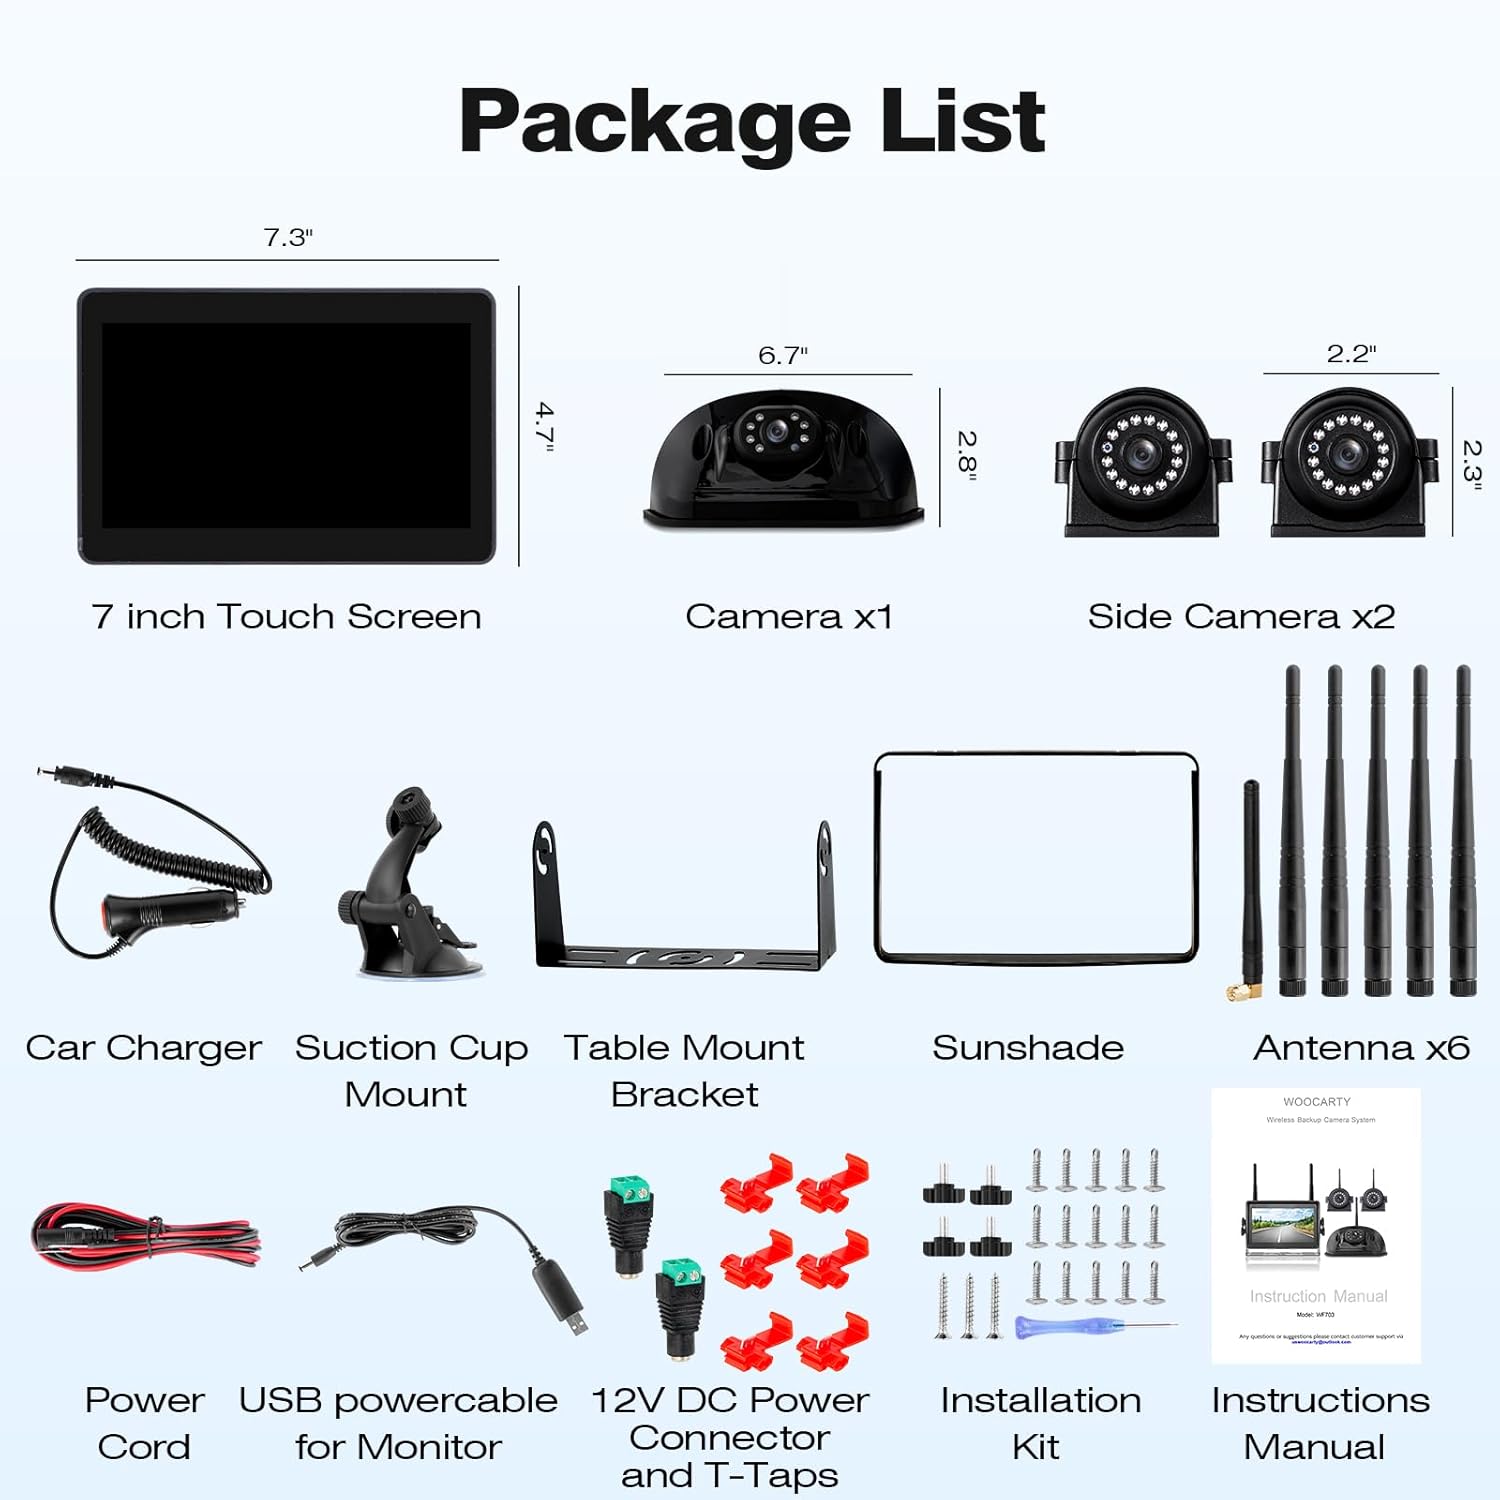
Figure 2.1: Detailed list of package contents.
- 7-inch 1080P Touch Screen Monitor (x1)
- Rear Camera (x1)
- Side Cameras (x2)
- Car Charger (x1)
- Suction Cup Mount (x1)
- Table Mount Bracket (x1)
- Sunshade (x1)
- Antennas (x6)
- Power Cord (x1)
- USB Power Cable for Monitor (x1)
- 12V DC Power Connector and T-Taps (x1 set)
- Installation Kit (screws, etc.)
- Instruction Manual (this document)
3. Setup and Installation
3.1 Camera Installation
The WOOCARTY WF703 system offers flexible installation for various vehicle types. The cameras are designed for wireless signal transmission to the monitor, but each device requires a power connection.
For Furrion Pre-Wired RVs:
- Remove the existing Furrion mount.
- Our wireless camera is designed to fit perfectly into the Furrion pre-wired plug and utilize the same mounting holes. No additional drilling is required.
For Vehicles Without Pre-Wired Setups:
- Secure the cameras using the provided screws in suitable locations on your vehicle.
- Connect the cameras to a 12-24V DC power source. For side cameras, tapping into side marker lights is a common method. Ensure proper sealing with RV sealant after mounting to prevent water leaks.

Figure 3.1: Camera and monitor power connection options.
3.2 Monitor Installation
The monitor can be installed using either the table stand or the suction cup bracket for customized placement within your vehicle's cabin.
- Connect the monitor to power using either the included USB power cable or the 12V car charger.
- Attach the antennas to the monitor for optimal wireless signal reception.
3.3 System Overview and Placement
The system includes one rear camera and two side cameras to provide comprehensive coverage and reduce blind spots, enhancing driving safety.

Figure 3.2: Recommended camera placement for blind spot reduction.
4. Operating Instructions
4.1 Powering On and Initial Display
Once the monitor and cameras are powered, the system will automatically connect. The 7-inch 1080P touch screen provides a clear display for safe maneuvering.

Figure 4.1: The 7-inch HD 1080P touch screen monitor in operation.
4.2 Display Modes and Switching Views
The monitor supports multiple display modes, including full screen for individual cameras and various split-screen options for simultaneous viewing of up to four camera feeds.
- Cycling Views: After selecting your preferred split-screen mode (e.g., Split 1-3) and exiting the settings menu, swipe horizontally from right to left on the screen to cycle through available display options: CAM1 → CAM2 → CAM3 → CAM4 → Split 1-3.
- Setting Split Screen: To set up a split screen, first navigate to a single camera view. Then, locate the mode button to access screen layout options and select your desired configuration.

Figure 4.2: Available multiple display modes for the monitor.
4.3 Advanced Features
- Parking Guidelines: Adjustable parking guidelines can be enabled and customized on the monitor to assist with reversing maneuvers.
- Image Flipping: Each camera's feed can be individually mirrored or flipped (horizontal/vertical) through the settings menu to correct orientation as needed.
- Loop Recording: The system supports loop recording functionality with an SD card (up to 128GB, not included). When the SD card is full, older footage is automatically overwritten.

Figure 4.3: Loop recording and video playback feature.

Figure 4.4: Touch screen interface with parking guidelines and image flip options.
5. Maintenance
5.1 Camera Care
The cameras are IP69K-certified waterproof, designed to withstand harsh environmental conditions. However, regular cleaning of the camera lenses is recommended to ensure clear visibility.
- Gently wipe the camera lenses with a soft, damp cloth to remove dirt, dust, or water spots.
- Avoid using abrasive cleaners or solvents that could damage the lens or housing.
- Periodically check the camera mounts and wiring connections for security and integrity.

Figure 5.1: Durable waterproof camera design.
5.2 Monitor Care
- Clean the monitor screen with a soft, lint-free cloth. For stubborn smudges, a screen cleaner designed for electronics can be used.
- Avoid exposing the monitor to extreme temperatures or direct sunlight for prolonged periods.
6. Troubleshooting
6.1 Correcting an Upside-Down Monitor Menu
If the monitor menu appears upside down after a system reset, follow these steps to correct the orientation:
- Press and hold the Setup button for 3 seconds.
- Once the settings menu appears, choose the Rotation option.
- Four orientation modes are available:
- Mode 1: Left-side flip
- Mode 2: Right-side flip
- Mode 3: Up-side flip
- Mode 4: Down-side flip
- Select Mode 3. Changes will apply automatically after you exit the menu.
For visual instructions, contact WOOCARTY customer service for a step-by-step video guide.
6.2 Signal Interference (GMC/Chevrolet/Ford Owners)
Newer GM vehicles (GMC/Chevrolet/Ford) may use Pulse Width Modulation (PWM) power signals, which can interfere with video transmission, leading to flickering, signal loss, or freezing.
- Recommendation: For optimal performance, install a Furrion 7-way adapter or a 12V PWM filter (both sold separately) to regulate the power supply.
- Verification: Consult your vehicle's owner's manual or dealer regarding "PWM tail lights" to confirm if your vehicle utilizes PWM power signals.
- Note: Most non-GM vehicles do not require this solution.
6.3 General Signal Issues
The system features stable 2.4GHz wireless transmission. If you experience signal issues:
- Ensure all antennas are securely attached to both the cameras and the monitor.
- Verify that all cameras and the monitor are receiving adequate power.
- Minimize physical obstructions between the cameras and the monitor.
7. Specifications
| Feature | Detail |
|---|---|
| Brand | WOOCARTY |
| Model | WF703 |
| Screen Size | 7 Inches |
| Display Technology | LCD |
| Resolution | 1080P HD |
| Wireless Transmission | 2.4GHz Digital Signal |
| Transmission Range (Open Area) | Up to 330ft (100m) |
| Transmission Range (On Vehicle) | Within 164ft (50m) |
| Waterproof Rating | IP69K |
| Night Vision | 7 High-Power Infrared LEDs |
| Optical Sensor Technology | Infrared |
| Optical Sensor Size | 1/3 inch |
| Loop Recording Support | Up to 128GB SD card (not included) |
| Product Dimensions (Monitor) | 7.2"L x 0.98"W x 4.72"H |
| Item Weight | 5.35 pounds |
8. Warranty and Support
For warranty information, technical assistance, or to request a step-by-step video guide for specific functions, please contact WOOCARTY customer service. Our team is available to provide support and address any questions you may have regarding your WF703 backup system.
Please refer to the contact information provided with your product packaging or visit the official WOOCARTY website for the most up-to-date support details.