1. Introduction
Thank you for purchasing the Pxodyda A10 High Brightness Projector. This manual provides essential information for safe operation, optimal performance, and proper maintenance of your device. Please read it thoroughly before use and retain it for future reference.
Safety Information
- Do not look directly into the projector lens when the lamp is on.
- Ensure proper ventilation around the projector to prevent overheating.
- Keep the projector away from water, moisture, and extreme temperatures.
- Use only the power adapter provided with the device.
- Do not attempt to disassemble or repair the projector yourself. Contact customer support for assistance.
2. What's in the Box
Verify that all items are present in the packaging:
- Pxodyda A10 Projector
- HDMI Cable
- Power Cord
- Remote Control
- User Manual (this document)
3. Product Overview
Familiarize yourself with the projector's physical components and connection ports.
Front View

Figure 3.1: Front view of the Pxodyda A10 Projector.
Top View and Controls

Figure 3.2: Top view with integrated control panel.
Rear View and Ports
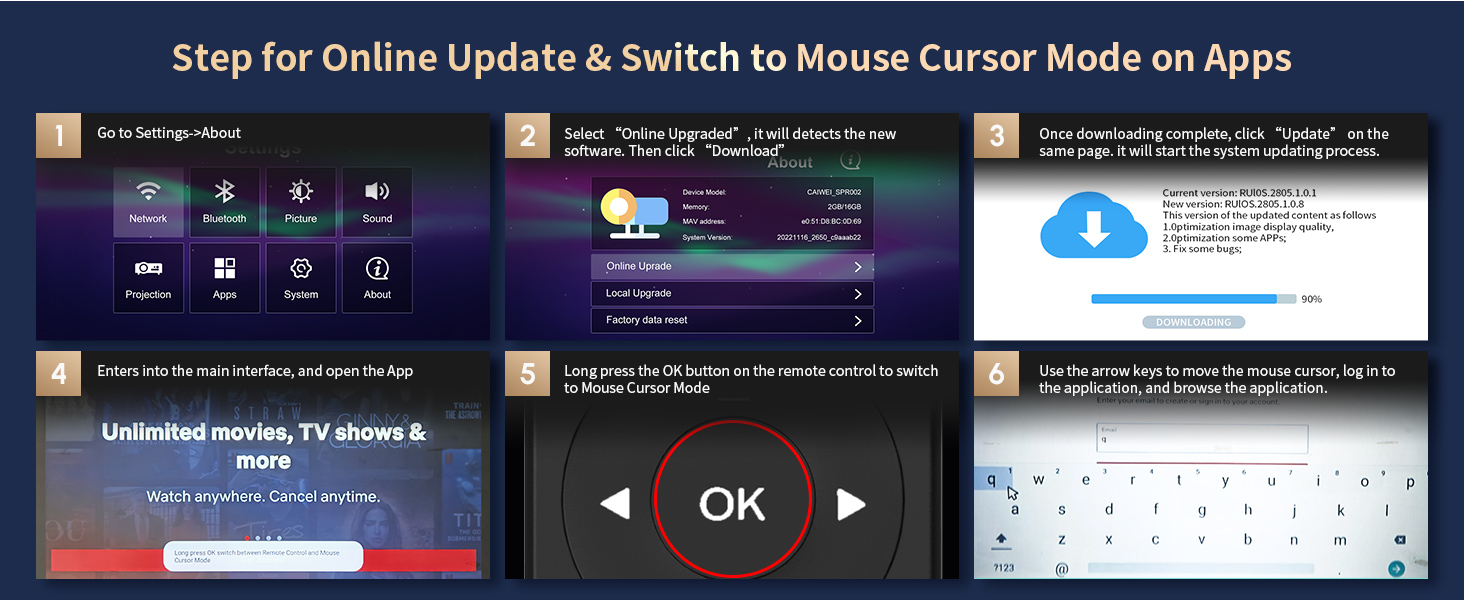
Figure 3.3: Rear view displaying connectivity options.
4. Setup
4.1 Placement
Place the projector on a stable, flat surface. Ensure there is adequate space around the projector for ventilation. The projector can be ceiling-mounted or placed on a tripod using the M4 screw holes on the bottom.

Figure 4.1: Flexible placement and keystone correction.
4.2 Power Connection
Connect the power cord to the projector's power input and then to a power outlet. The power indicator light will illuminate.
Video 4.1: Demonstrates connecting the power and initial setup steps.
4.3 Focus and Keystone Correction
Adjust the focus ring near the lens until the image is clear. Use the 4D and quick vertical/horizontal keystone correction features to achieve a perfectly rectangular image, even if the projector is not perfectly aligned with the screen.
Video 4.2: Guide on manual focus, keystone, and zoom adjustments.
5. Operating Instructions
5.1 Smart Android TV
The Pxodyda A10 features a Smart Android TV system with 2+32G memory. Navigate the interface using the remote control to access pre-installed apps like Prime Video, YouTube, and Hulu.

Figure 5.1: Smart Android TV interface with streaming apps.
5.2 Wireless Connectivity (WiFi6 & Bluetooth 5.2)
Connect to your home network via advanced WiFi6 for faster streaming. The projector also supports two-way Bluetooth 5.2, allowing connection to Bluetooth speakers, mice, or earphones, or functioning as a Bluetooth speaker itself.

Figure 5.2: Wireless screen sharing capabilities.
Figure 5.3: Two-way Bluetooth functionality.
5.3 Input Sources
The projector supports multiple input sources:
- HDMI: Connect laptops, gaming consoles (PS5, Switch), Blu-ray players, or TV sticks.
- USB: Play media directly from USB drives.
- AV: Connect older devices like DVD players.
- RJ45 LAN: For stable wired network connectivity.
6. Features and Technologies
6.1 High Brightness for Daylight Viewing
With 1800 ANSI lumens and TS-LED Brighten technology, the Pxodyda A10 delivers visuals that are 2X brighter than standard projectors, allowing for clear viewing even in well-lit indoor environments. (*Not recommended for use outdoors in strong daylight.)
Video 6.1: Demonstrates 4K projection in indoor daytime conditions with lights on and off.

Figure 6.1: Projector performance in a bright room.
6.2 4K Support & HDR10+
The native 1080P projector decodes 4K Ultra HD content, providing stunning 4K HDR picture quality with enhanced clarity and detail. With a 16000:1 contrast ratio, HDR10+, and DCI-P3 96% wide color gamut, it delivers realistic and vibrant colors.

Figure 6.2: 4K UHD Clarity and brightness.

Figure 6.3: Realistic clarity and color with HDR10+ and DCI-P3.
6.3 Immersive Audio
Equipped with professional-grade stereo speakers and dual diaphragms, the projector provides a cinema-level sound experience, eliminating the need for external speakers in many scenarios.

Figure 6.4: Powerful stereo sound for an immersive experience.
6.4 Superior Eye Comfort
Unlike traditional screens, the LED projector uses reflected light, reducing glare and eye strain. The large projection size allows for comfortable viewing from a distance, and adjustable settings further enhance eye comfort.

Figure 6.5: Eye comfort features.
6.5 Low Input Lag Gaming
The projector is designed for gaming with low input lag (4.2ms~8ms), WiFi6, and HDMI2.1 support, ensuring a smooth and responsive gaming experience.

Figure 6.6: Optimized for gaming with low input lag.
7. Connectivity
The Pxodyda A10 offers versatile connectivity options to integrate with various devices.
- HDMI (x2): For high-definition video and audio input from devices like laptops, gaming consoles, and TV boxes.
- USB (x2): For playing media files directly from USB drives or connecting USB peripherals.
- Audio (3.5mm Jack): For connecting external speakers or headphones.
- RJ45 LAN Port: For a stable wired internet connection.
- AV Port: For connecting older devices with composite video and stereo audio output.
8. Maintenance
8.1 Cleaning the Lens
Use a soft, lint-free cloth specifically designed for optical lenses to gently wipe the projector lens. Avoid using abrasive cleaners or excessive force.
8.2 Dust Prevention (Sealed Optical Engine)
The Pxodyda A10 features a self-developed fully sealed optical engine and an efficient air filtration system. This design helps to filter dust, improve cooling, and prevent black spots, ensuring consistent image quality and a longer lifespan.

Figure 8.1: Sealed optical engine for dust prevention.
8.3 Firmware Updates
Regularly check for and install firmware updates to ensure optimal performance and access to new features. Updates can typically be found in the system settings under 'About' or 'Online Upgrade'.
Figure 8.2: Steps for online updates and mouse cursor mode.
9. Troubleshooting
If you encounter issues, refer to the following common problems and solutions:
| Problem | Possible Cause | Solution |
|---|---|---|
| No image displayed | Power not connected, input source incorrect, lens cap on. | Check power, select correct input, remove lens cap. |
| Image is blurry | Focus not adjusted, projector too far/close. | Adjust focus ring, reposition projector. |
| Image is distorted (trapezoid shape) | Keystone correction needed. | Use keystone correction settings. |
| No sound | Volume too low, external audio device not connected, incorrect audio output. | Increase volume, check audio connections, select correct audio output. |
| Remote control not working | Batteries low/dead, obstruction, remote out of range. | Replace batteries, remove obstructions, ensure line of sight. |
10. Specifications
Detailed technical specifications for the Pxodyda A10 Projector:
- Brand Name: Pxodyda
- Item Model Number: A10
- Item Weight: 8.24 pounds
- Product Dimensions: 9.33 x 5.31 x 12.4 inches
- Color Name: Grey
- Display Resolution: 1920 x 1080 (Native 1080P, 4K Support)
- Brightness: 1800 ANSI Lumens
- Contrast Ratio: 16000:1
- HDR Support: HDR10+
- Color Gamut: DCI-P3 96%
- Wireless Connectivity: WiFi 6 (2.4G/5G WiFi), Bluetooth 5.2
- Operating System: Smart Android TV with Apps
- Memory: 2GB RAM + 32GB ROM
- Input Lag: 4.2ms~8ms (for gaming)
- Connectivity Technology: 3.5mm Jack, Ethernet (RJ45), HDMI (x2), USB (x2), AV
- Special Features: 1800ANSI Ultra Bright, 4K Decoding HDR10+, WiFi 6, 2.4G/5G WiFi, Android TV Apps, Bluetooth 5.2, HiFi Speaker, Lan Port, 4D/Quick Keystone, Digital Zoom, Ceiling Mountable, Sealed Optical Engine, Low Noise.
- Recommended Uses: Home Cinema, Outdoor Movie, Video Gaming, Live Concert
11. Warranty and Support
Pxodyda is committed to providing high-quality products and customer satisfaction.
- 30-Day No-Reason Return & Refund: If you are not satisfied with your purchase, you may return it within 30 days for a full refund.
- 12-Month Warranty: The projector is covered by a 12-month warranty against manufacturing defects.
- Lifetime Tech Support: Pxodyda offers lifetime technical support for your product.
For customer service and technical support, please contact us at: aftmg06@126.com

Figure 11.1: Warranty and support details.


