1. Introduction
This manual provides detailed instructions for the safe and proper installation, operation, and maintenance of your Perlegear Long Arm Full Motion TV Wall Mount, Model PGXLF02. Please read all instructions carefully before beginning installation and keep this manual for future reference.

Image 1: Perlegear Long Arm Full Motion TV Wall Mount, Model PGXLF02.
2. Safety Information
- Weight Capacity: Do not exceed the maximum weight capacity of 150 lbs (68 kg).
- TV Size: This mount is designed for TVs between 42 and 90 inches.
- Wall Type: Install only on wood studs (8"/12"/16"/24" spacing), solid concrete, or brick walls. Do not install on drywall alone.
- Professional Assistance: If you are unsure about the installation process or wall type, consult a qualified professional.
- Tools: Handle all tools with care to prevent injury.
- Assembly: Two people are recommended for safe installation, especially when lifting the TV.
3. Setup & Installation
3.1. Tools Required
The following tools are required for installation. Some are included, others are not.
- Not Included: Electric Drill, Pencil, Phillips Screwdriver, Tape Measure, 1/2" (13mm) Socket Wrench.
- For Wood Stud Walls: Stud Finder, Awl, 7/32" (5.5mm) Wood Drill Bit.
- For Solid Concrete/Brick: Hammer, 3/8" (10mm) Concrete Drill Bit.
- Included: Bubble Level, Allen Key.
3.2. TV and Wall Compatibility
Ensure your TV and wall are compatible with this mount before proceeding.
- TV Size: Compatible with most flat or curved 42"–90" TVs.
- Weight Capacity: Supports TVs up to 150 lbs (68 kg).
- VESA Patterns: Supports VESA patterns from 200x100mm to 800x400mm.
- Wall Types: Suitable for 8"/12"/16"/24" wood studs, solid concrete, or brick walls. Do not install on drywall alone.

Image 2: Compatibility details for wall types, TV sizes, and VESA patterns.

Image 3: Visual guide for checking TV and wall compatibility, including VESA patterns and wall plate dimensions.
3.3. Step-by-Step Installation
The Perlegear TV mount features a pre-assembled design for easier installation. Follow these general steps:
- Attach TV Brackets to the TV: Select the appropriate bolts and spacers for your TV type (flat back, curved back, or TVs with mounting restrictions). Secure the TV brackets to the back of your TV.
- Mount Arm Assembly / Wall Plate on the Wall: Locate your wall studs (for wood stud installation) or mark drill points (for solid concrete/brick). Use the provided drilling template and bubble level to ensure accurate placement. Drill pilot holes and securely fasten the wall plate to the wall using the appropriate lag bolts and washers. Verify the wall plate is securely attached by pulling down on it.
- Hang the TV: Carefully lift the TV with the attached brackets and hook them onto the wall plate. Secure the TV to the mount using the safety locks.

Image 4: Overview of the 3-step installation process: attach TV brackets, mount wall plate, and hang TV.
3.4. Installation Video Guide
For a visual guide on the installation process, please refer to the official video below:
Video 1: Perlegear Long Arm Full Motion TV Mount Installation Guide. This video demonstrates the complete installation process for the PGXLF02 series TV mount, including tool gathering, attaching TV brackets, mounting the wall plate, and securing the TV.
4. Operation & Adjustments
Your Perlegear TV mount offers various adjustments for optimal viewing comfort.
4.1. Extension and Retraction
The long arm extends up to 40 inches (101.6 cm) for closer viewing and retracts to 3.55 inches (9 cm) to save space. This allows for flexible positioning and multi-zone viewing.

Image 5: Demonstrates the mount's extension capability, bringing the TV closer for viewing or retracting it to save space.
4.2. Swivel Adjustment
The mount allows for a ±90° swivel, enabling you to adjust the TV's angle for viewing from different positions in a room, including corner installations.
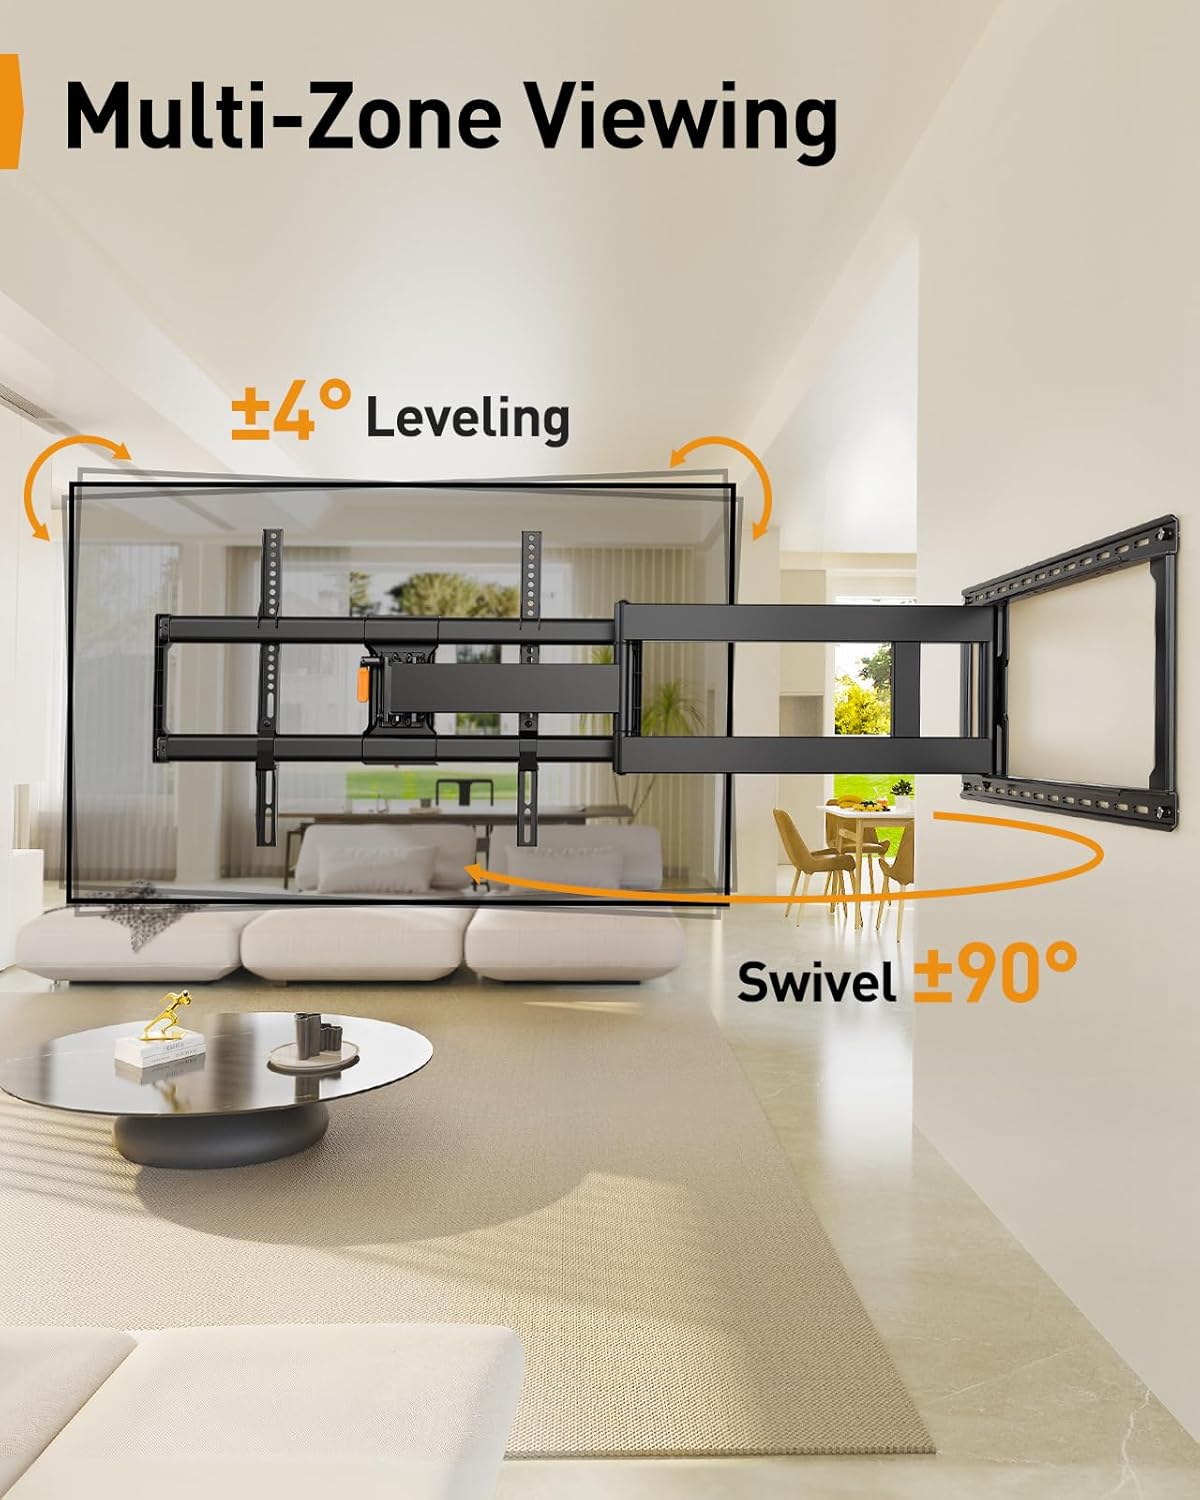
Image 6: Illustrates the multi-zone viewing capability with swivel and leveling adjustments.

Image 7: Shows the mount's suitability for corner installations, allowing for wide swivel angles.
4.3. Tilt Adjustment
Adjust the TV tilt from +5° to -12° to reduce glare and achieve your preferred viewing angle. The mount features a tool-free tilt adjustment mechanism.

Image 8: Highlights the tool-free tilt adjustment feature for quick and easy angle changes.
4.4. Leveling Adjustment
After installation, you can make a ±3° leveling adjustment to ensure your TV is perfectly horizontal.
4.5. Cable Management
Route your cables along the mount arms and secure them with the provided cable ties to maintain a neat and organized appearance.
4.6. Motion Demonstration Video
Observe the full range of motion and adjustment capabilities of the mount in the video below:
Video 2: Long Arm TV Mount for Cross-Zone Viewing Experience. This video showcases the mount's long extension, swivel, and tilt features, demonstrating how it enables flexible viewing from various angles and locations.
5. Maintenance
Regular maintenance helps ensure the longevity and safe operation of your TV mount.
- Cleaning: Wipe the mount with a soft, dry cloth to remove dust. Avoid abrasive cleaners or solvents.
- Periodic Checks: Periodically check all screws and bolts to ensure they remain tight. Re-tighten if necessary.
- Moving Parts: The articulating arms are designed for smooth movement. If movement becomes stiff, ensure no cables are snagged and check for any obstructions. Do not apply lubricants unless specifically recommended by the manufacturer.
6. Troubleshooting
If you encounter issues with your TV mount, refer to these common solutions:
- TV Not Level: Use the ±3° leveling adjustment feature. If still not level, slightly loosen the bolts on the leveling mechanism, adjust, and then retighten.
- Difficulty Tilting: If the tilt is too stiff or won't hold, slightly loosen the bolt on one side of the tilt mechanism, adjust, and then retighten both bolts. If it won't hold, fully tighten the bolt on the other side.
- Mount Feels Loose: Re-check all wall plate lag bolts and TV bracket screws to ensure they are securely tightened.
- Limited Movement: Ensure no cables are obstructing the articulating arms. Check for any physical obstructions around the mount.
7. Specifications
| Feature | Specification |
|---|---|
| Brand | Perlegear |
| Model | PGXLF02 |
| TV Size Compatibility | 42-90 inches |
| Maximum Load Capacity | 150 lbs (68 kg) |
| VESA Compatibility | 200x100mm to 800x400mm |
| Wall Plate Dimensions | 14.6 inches (width) x 28.07 inches (length) |
| Wall Stud Spacing | 8"/12"/16"/24" |
| Extension from Wall | 3.55 inches (retracted) to 40 inches (extended) |
| Swivel Angle | ±90° |
| Tilt Angle | +5° / -12° |
| Leveling Adjustment | ±3° |
| Material | Alloy Steel |
| Color | Black |
| Item Weight | 29.3 pounds |

Image 9: Detailed view of the mount's construction, highlighting features for maximum stability and flexibility, such as thicker arms and an arm reinforcement bar.
8. Warranty & Support
This product is designed for durability and reliability. While specific warranty details are not provided in this manual, Perlegear typically offers product support for its customers.
For any questions, technical assistance, or to inquire about warranty information, please contact the Perlegear support team directly.
Support Email: support@perlegear.com


