1. Introduction
Thank you for choosing the SUSTEAS Panini Press and Electric Indoor Grill, Model SLG5019. This versatile appliance is designed for preparing a variety of grilled foods, from sandwiches and paninis to meats and vegetables. Please read this manual thoroughly before first use to ensure safe and efficient operation.
2. Important Safety Instructions
- Read all instructions before operating the appliance.
- Do not touch hot surfaces. Use handles or knobs.
- To protect against electrical hazards, do not immerse cord, plugs, or the appliance in water or other liquid.
- Close supervision is necessary when any appliance is used by or near children.
- Unplug from outlet when not in use and before cleaning. Allow to cool before putting on or taking off parts, and before cleaning the appliance.
- Do not operate any appliance with a damaged cord or plug, or after the appliance malfunctions or has been damaged in any manner.
- The use of accessory attachments not recommended by the appliance manufacturer may cause injuries.
- Do not use outdoors.
- Do not let cord hang over edge of table or counter, or touch hot surfaces.
- Do not place on or near a hot gas or electric burner, or in a heated oven.
- Extreme caution must be used when moving an appliance containing hot oil or other hot liquids.
- Always attach plug to appliance first, then plug cord into the wall outlet. To disconnect, turn any control to "off", then remove plug from wall outlet.
- Do not use appliance for other than intended use.
3. Product Overview
The SUSTEAS Panini Press and Electric Indoor Grill is designed for ease of use and versatility. It features non-stick grill plates, adjustable temperature and timer controls, and a floating hinge for even cooking.

Image 3.1: The SUSTEAS Panini Press and Electric Indoor Grill in use, showing its compact design and grilling capabilities.
Components:
- Grill Plates: Upper and lower non-stick plates for cooking.
- Temperature Control Knob: Adjusts heating temperature from 0°C to 200°C.
- Timer Control Knob: Sets cooking time from 0 to 60 minutes.
- Indicator Lights: Red light indicates preheating, green light indicates preheating completion.
- Handle: Heat-insulated handle for safe opening and closing.
- Drip Tray: Removable tray to collect excess grease.
- Floating Hinge: Automatically adjusts to the thickness of food for even pressure.

Image 3.2: Detailed view of the temperature and timer controls, along with the preheating and ready indicator lights.
4. Setup
- Unpack: Carefully remove the appliance and all accessories from the packaging. Retain packaging for future storage or transport.
- Remove Packaging Materials: Ensure all protective films, stickers, and packaging inserts are removed from the grill plates and exterior.
- Initial Cleaning: Before first use, wipe the grill plates with a damp cloth or sponge. Dry thoroughly. Wipe the exterior with a damp cloth.
- Placement: Place the appliance on a stable, heat-resistant, and dry surface, away from walls or other heat-sensitive objects to allow for proper ventilation.
- Drip Tray Installation: Ensure the removable drip tray is correctly inserted into its slot at the front of the appliance.
5. Operating Instructions
5.1. Preheating the Grill
- Plug the appliance into a 120V~60Hz power outlet.
- Turn both the Temperature Control Knob and the Timer Control Knob to your desired settings. The red indicator light will illuminate, signaling that the appliance is preheating.
- Allow the grill to preheat until the green indicator light illuminates, indicating that the target temperature has been reached and the grill is ready for use.
5.2. Cooking with the Grill
The grill offers two primary cooking configurations:
- Closed Position (105°): Ideal for paninis, sandwiches, and pressing foods. The floating hinge ensures even pressure on varying food thicknesses.
- Open Position (180°): For flat grilling, allowing you to use both grill plates simultaneously for larger quantities or different food types, similar to an open BBQ grill.
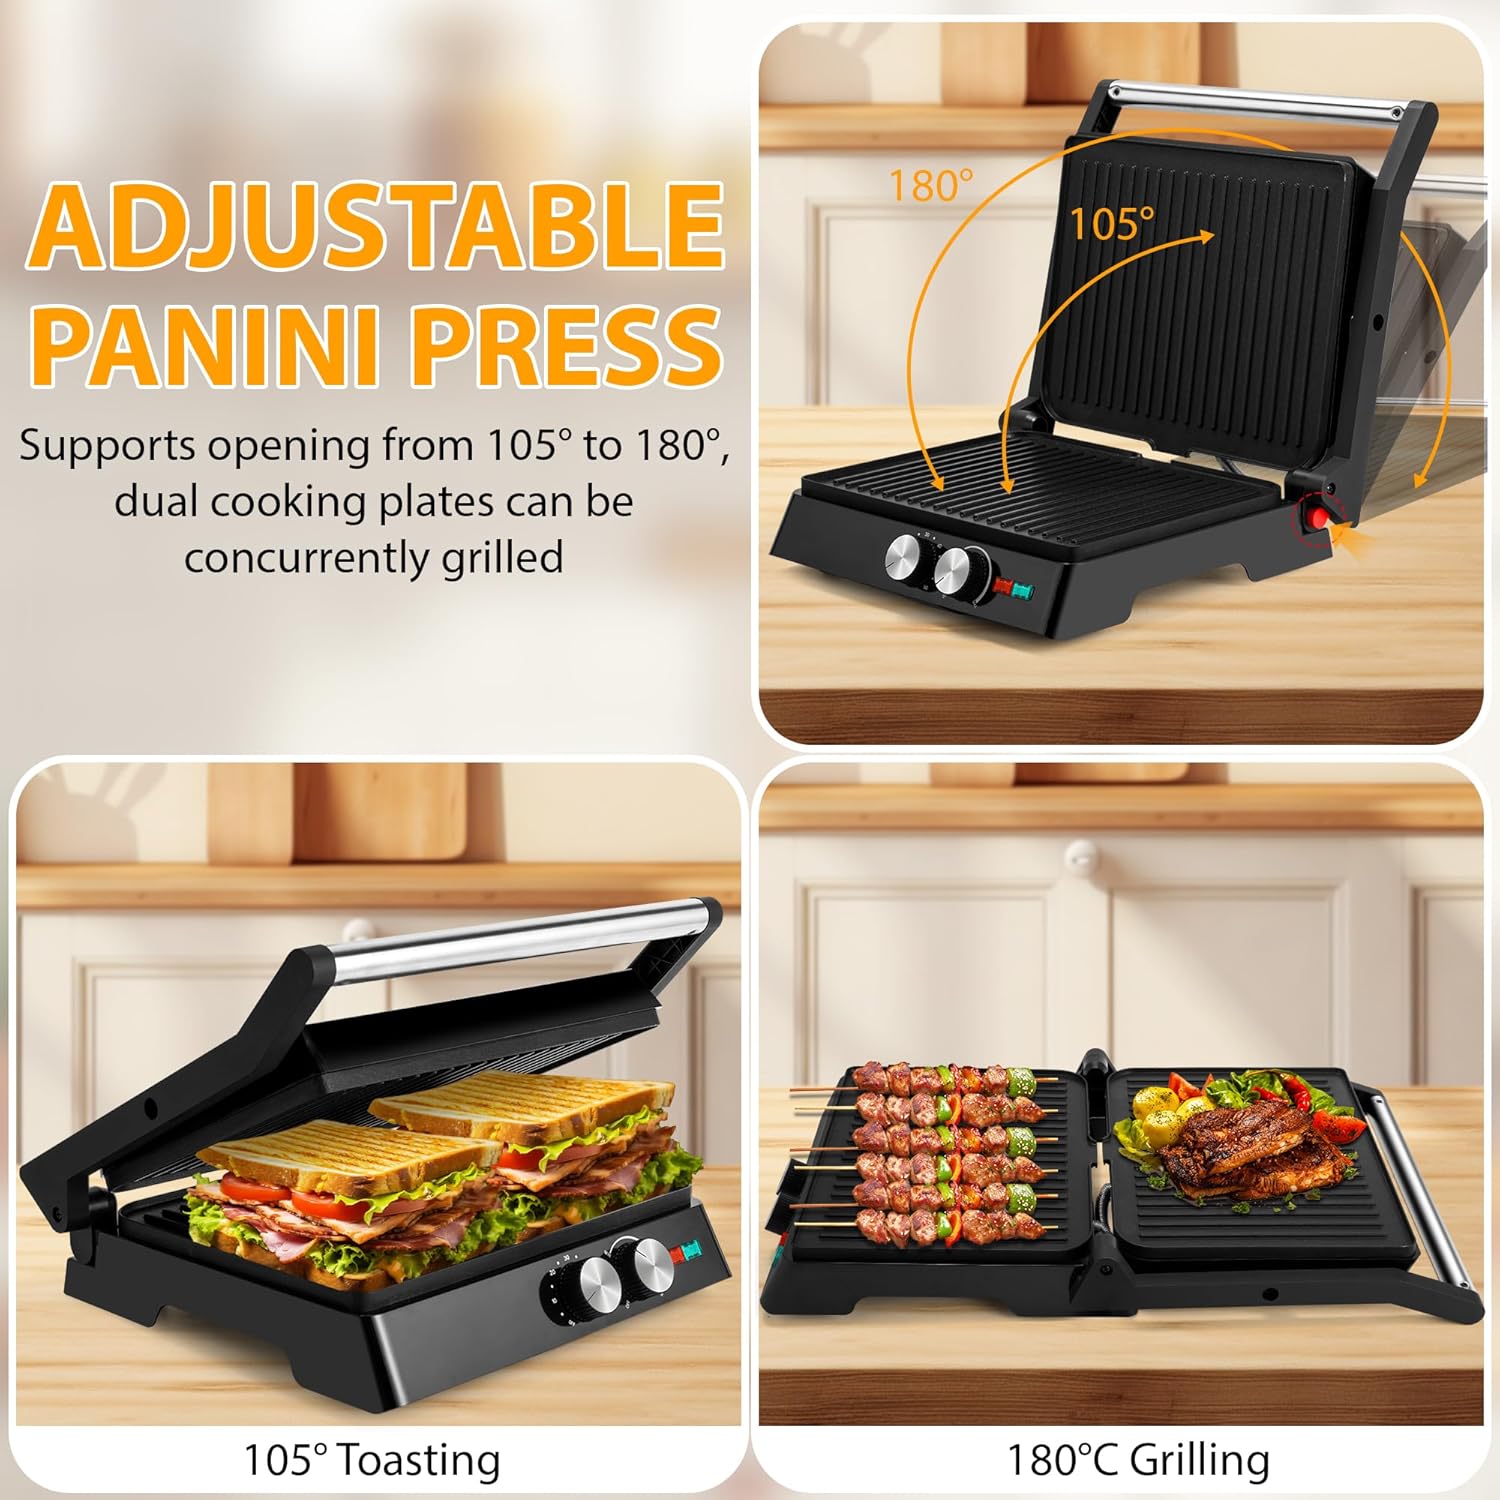
Image 5.1: The panini press demonstrating its ability to open at 105 degrees for sandwiches and 180 degrees for open grilling.
- Once preheated (green light on), carefully place your food onto the lower grill plate. For best results and to prevent sticking, a small amount of cooking oil or butter can be applied to the plates before placing food.
- Close the upper grill plate (for paninis/sandwiches) or open it to 180° (for flat grilling).
- Monitor the cooking process. The timer will count down and emit a beep when finished.
- Use heat-resistant utensils to remove food from the grill. Avoid metal utensils that can scratch the non-stick coating.
- After cooking, turn both control knobs to the "OFF" position and unplug the appliance.
5.3. Dual-Zone Temperature Difference
This appliance utilizes a dual-zone temperature difference technology. The upper plate's actual temperature is set slightly lower than the lower plate's. This design helps to quickly lock in meat juices, achieving a crispy exterior and tender interior, while preventing both sides from burning. Note that individual temperature control for each zone is not available.
Video 5.2: A demonstration of the SUSTEAS Panini Press in action, showcasing its grilling capabilities for various foods.
Video 5.3: An overview of the Panini Press, highlighting its features and ease of use for different cooking needs.
6. Maintenance and Cleaning
Regular cleaning ensures the longevity and optimal performance of your appliance.
- Cool Down: Always unplug the appliance and allow it to cool completely before cleaning.
- Empty Drip Tray: Remove the drip tray and discard any collected grease. Wash the drip tray with warm, soapy water and dry thoroughly.
- Clean Grill Plates: Wipe the non-stick grill plates with a soft, damp cloth or sponge. For stubborn food residue, you may use a small amount of mild dish soap. Avoid abrasive cleaners, scouring pads, or metal utensils, as these can damage the non-stick coating.
- Clean Exterior: Wipe the exterior of the appliance with a damp cloth. Do not immerse the appliance in water or any other liquid.
- Storage: Once clean and dry, the appliance can be stored in a cool, dry place. Its compact design allows for vertical storage to save space.

Image 6.1: Demonstrating the ease of cleaning the non-stick grill plates with a simple wipe.

Image 6.2: The removable drip tray for easy collection and disposal of excess grease.
7. Troubleshooting
| Problem | Possible Cause | Solution |
|---|---|---|
| Appliance does not heat up. | Not plugged in, or temperature/timer knobs not set. | Ensure the appliance is securely plugged into a working outlet. Turn both the temperature and timer knobs to desired settings. |
| Food sticks to grill plates. | Insufficient preheating, or no oil/butter applied. | Allow the grill to fully preheat until the green indicator light illuminates. Apply a thin layer of cooking oil or butter to the plates before placing food. |
| Uneven cooking. | Food not evenly distributed, or insufficient preheating. | Ensure food is spread evenly across the grill plates. Allow the grill to fully preheat. The floating hinge should adjust for thickness. |
| Excessive smoke. | Excess grease or food residue on plates. | Ensure plates are clean before use. Use the drip tray to collect excess grease. Reduce the amount of oil/butter if necessary. |
8. Specifications
- Brand: SUSTEAS
- Model Number: SLG5019
- Power: 1400 Watts
- Voltage: 120 Volts
- Frequency: 60Hz
- Material: Non-Stick Coating
- Color: Black
- Product Dimensions: 13.62"D x 4.61"W x 12.44"H
- Item Weight: 7.61 Pounds
- Special Features: Adjustable angle (105°/180°), Adjustable time (0-60 min), Non-Stick Coating, Temperature Control (0-200°C)
- Included Components: Oil Tray
9. Warranty and Support
For warranty information, please refer to the documentation included with your purchase or contact the retailer. For product support or inquiries, please visit the official SUSTEAS store or contact their customer service.
Visit the SUSTEAS Store on Amazon.