1. Introduction
Thank you for choosing the Bear Baby Bottle Warmer Y-H12-H5M7. This device is designed to simplify feeding routines by providing multiple functions for warming milk, formula, and baby food. Please read this manual thoroughly before use to ensure proper operation and safety.
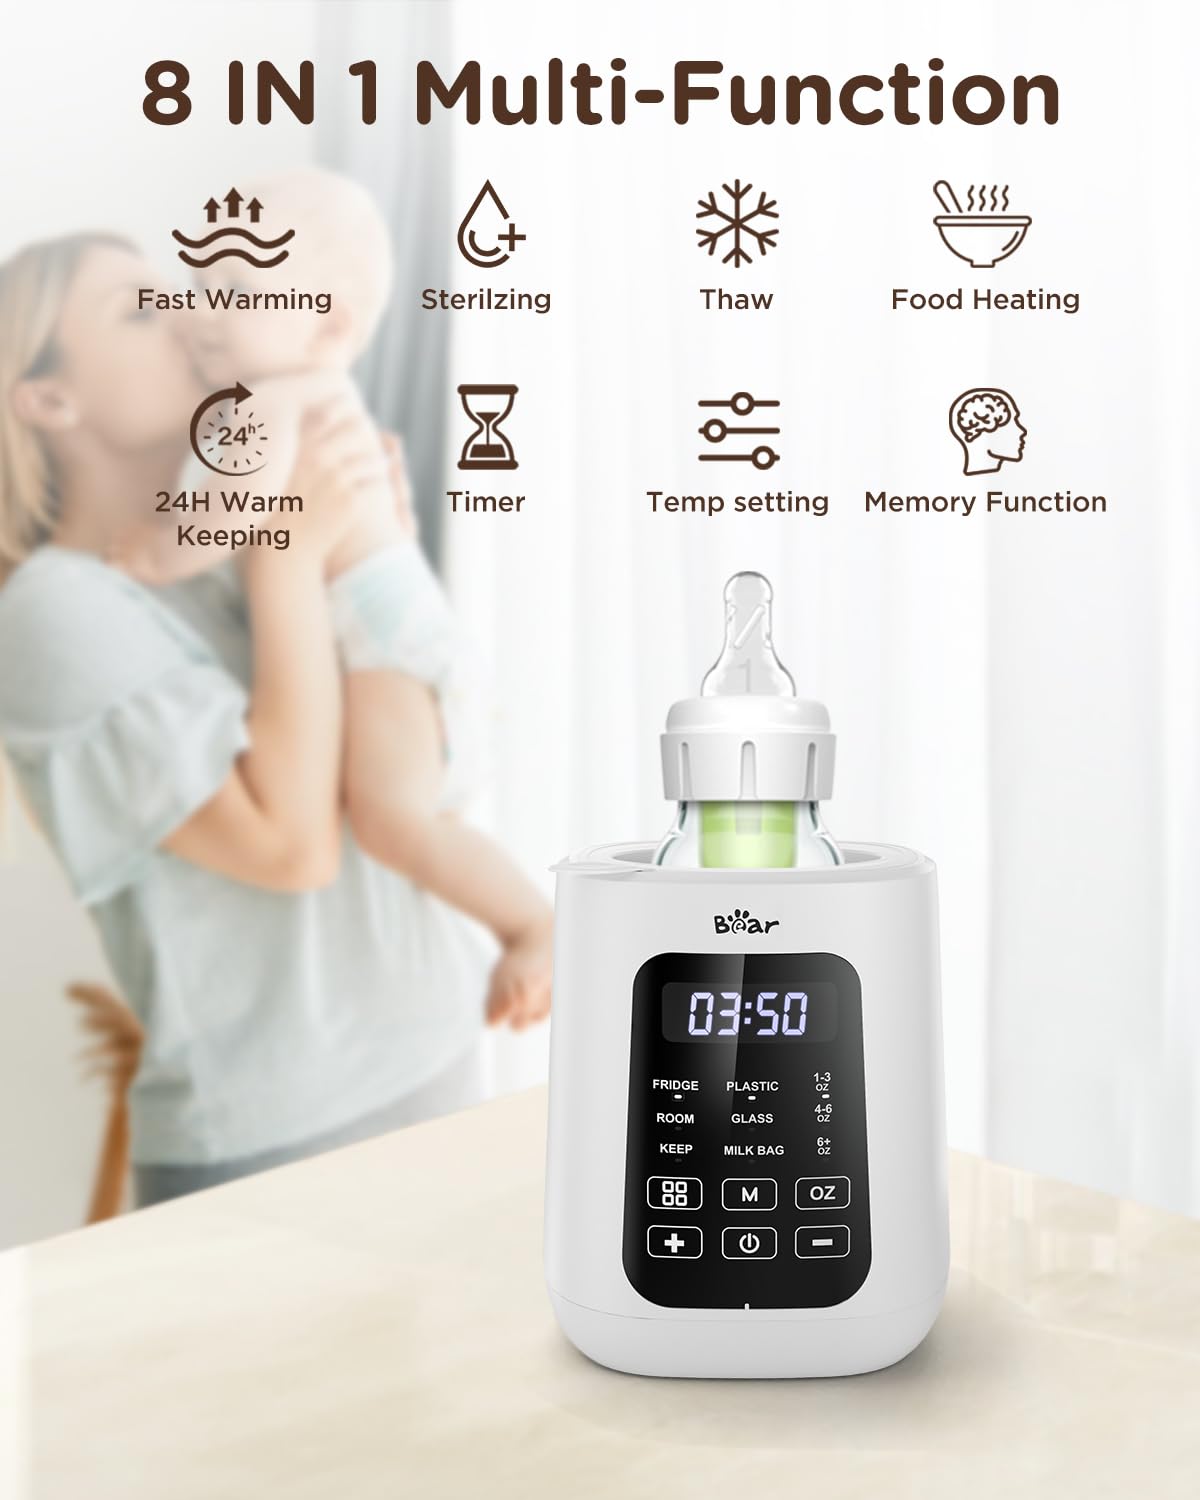
Image 1.1: The Bear Baby Bottle Warmer highlighting its 8-in-1 multi-function capabilities, including fast warming, sterilizing, thawing, food heating, 24-hour warm keeping, timer, temperature setting, and memory function.
2. Safety Information
To prevent injury or damage, always follow these basic safety precautions:
- Do not immerse the unit, cord, or plug in water or other liquids.
- Always supervise the device when in use, especially around children.
- Ensure the voltage specified on the appliance matches your local power supply.
- Unplug the appliance when not in use and before cleaning.
- Do not operate any appliance with a damaged cord or plug.
- This bottle warmer requires a power outlet and is not wireless or battery-operated.
The Bear Baby Bottle Warmer includes safety features:
- Anti-dry Burning Protection: The unit is designed to prevent operation without sufficient water, reducing the risk of damage.
- Automatic Shut-Off: The device will automatically turn off after completing a warming cycle or if it detects an issue, preventing overheating.
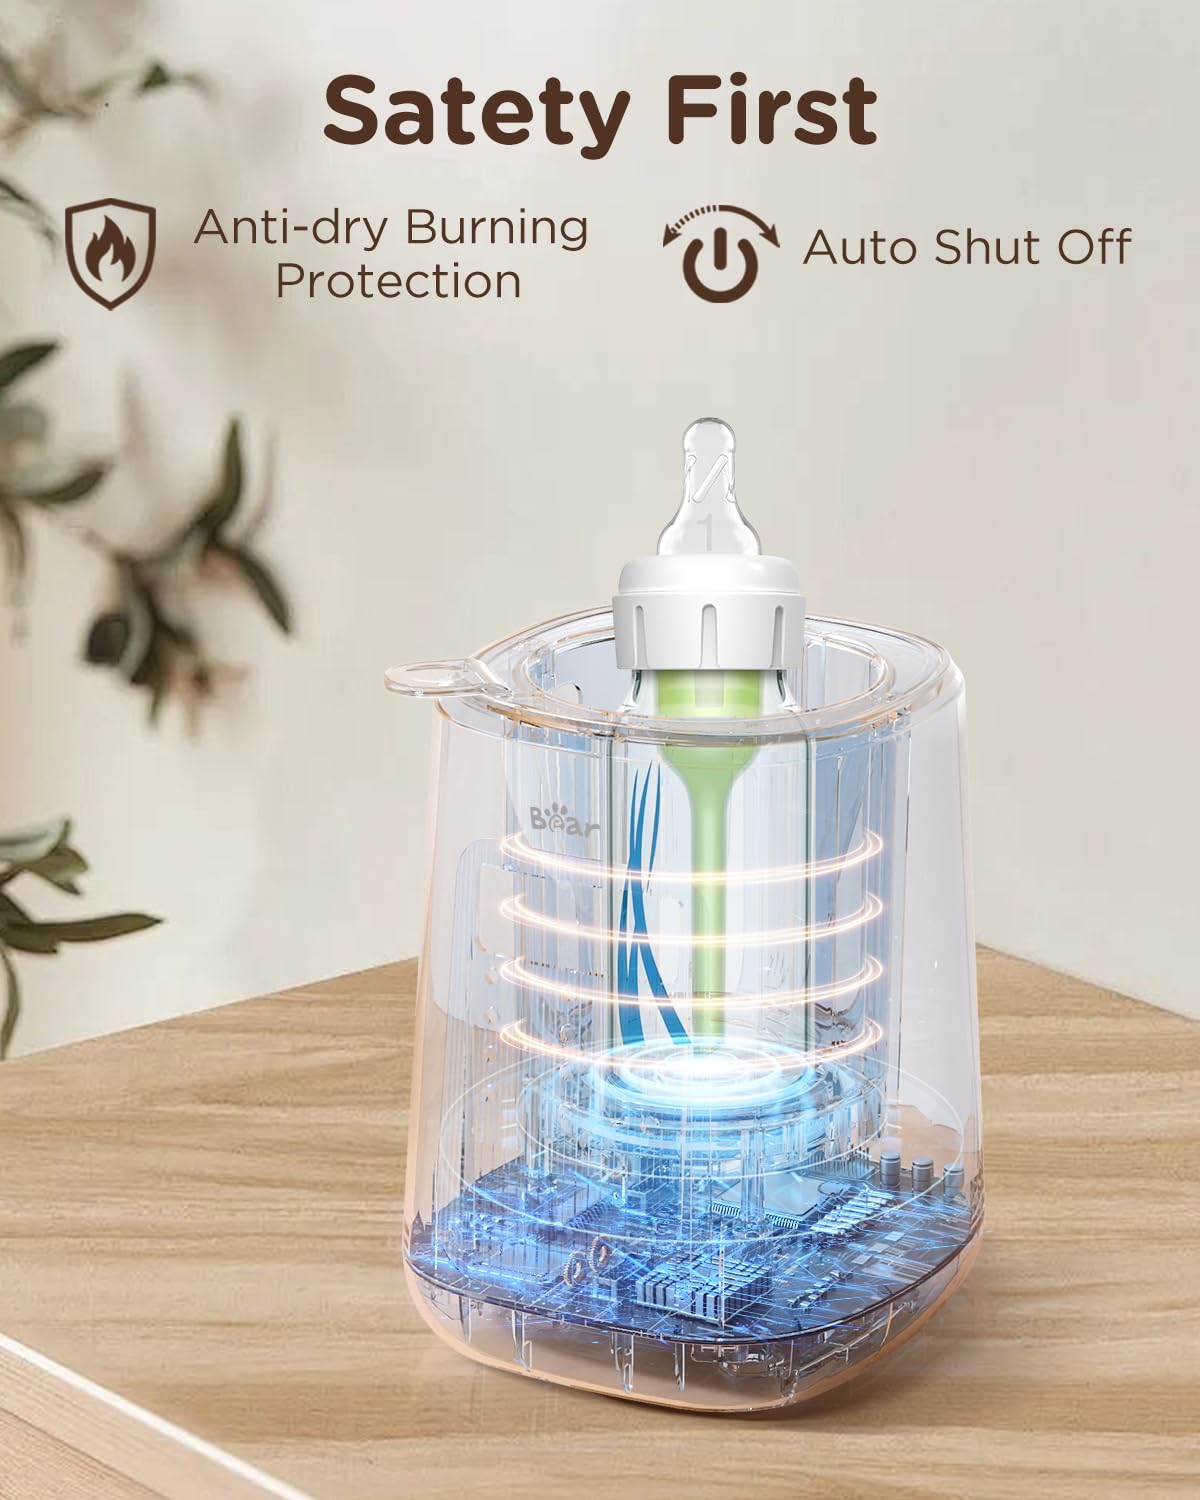
Image 2.1: An illustration of the internal components of the bottle warmer, emphasizing the anti-dry burning protection and automatic shut-off mechanisms for user safety.
3. Product Overview
3.1 Components
- Main Warmer Unit
- Bottle Lifting Basket
- Lid
3.2 Control Panel
The control panel features a digital display and touch buttons for various functions:
- Display Screen: Shows time, temperature, and selected modes.
- Power Button: Turns the unit on/off.
- Mode Button (M): Selects warming modes (e.g., Fridge, Room, Keep Warm, Milk Bag).
- Material Button: Selects bottle material (Plastic, Glass).
- Capacity Button (OZ): Selects milk volume (1-3 oz, 4-6 oz, 6+ oz).
- +/- Buttons: Adjusts time or temperature settings.

Image 3.1: The Bear Baby Bottle Warmer, illustrating its compact design, digital display, and intuitive control buttons for easy operation.
3.3 Compatibility
The warmer is designed to fit most baby bottles, breastmilk bags, and baby food jars. It accommodates various bottle materials including glass, plastic, and silicone.

Image 3.2: The bottle warmer displayed alongside different sizes and types of baby bottles, breastmilk storage bags, and baby food jars, highlighting its universal fit.
4. Setup
- Unpack: Remove all packaging materials and ensure all components are present.
- Clean: Before first use, wipe the exterior of the warmer with a damp cloth. Wash the bottle lifting basket and lid with warm soapy water, then rinse thoroughly.
- Placement: Place the warmer on a stable, flat, heat-resistant surface, away from direct sunlight or heat sources.
- Add Water: Pour clean water into the warming chamber. The water level should be between the MIN and MAX marks, or sufficient to cover the milk level in the bottle.
- Connect Power: Plug the power cord into a suitable electrical outlet.
5. Operating Instructions
5.1 General Operation
- Place the bottle or food jar into the lifting basket, then lower it into the warming chamber.
- Press the Power button to turn on the unit.
- Select the desired function using the Mode (M), Material, and Capacity (OZ) buttons.
- Adjust the time or temperature using the +/- buttons if needed.
- The unit will begin the warming process.
- Once complete, the unit will beep and/or automatically shut off. Carefully remove the bottle using the lifting basket.
- Always test the temperature of the milk or food before feeding by placing a few drops on your wrist.
Image 5.1: Close-up of the bottle warmer's control panel, illustrating the various buttons for setting time, temperature, bottle material, and milk volume.
5.2 Fast Warming
This mode quickly warms milk or formula to feeding temperature, typically within 3 minutes, depending on volume and initial temperature.
- Select the 'Fridge' or 'Room' mode based on the milk's initial temperature.
- Choose the bottle material (Plastic/Glass) and milk volume (1-3 oz, 4-6 oz, 6+ oz).
- The unit will automatically set a recommended warming time. You can adjust this manually using the +/- buttons.

Image 5.2: The bottle warmer in action, demonstrating the fast warming process with an internal view of the heating mechanism and a visual indicator for 3-minute warming.
5.3 24H Keep Warm
This function maintains milk at a consistent, pre-set temperature for up to 24 hours, ideal for bedside feeding.
- Select the 'Keep Warm' mode.
- Adjust the desired target temperature using the +/- buttons.
- The warmer will heat the milk to the set temperature and maintain it.
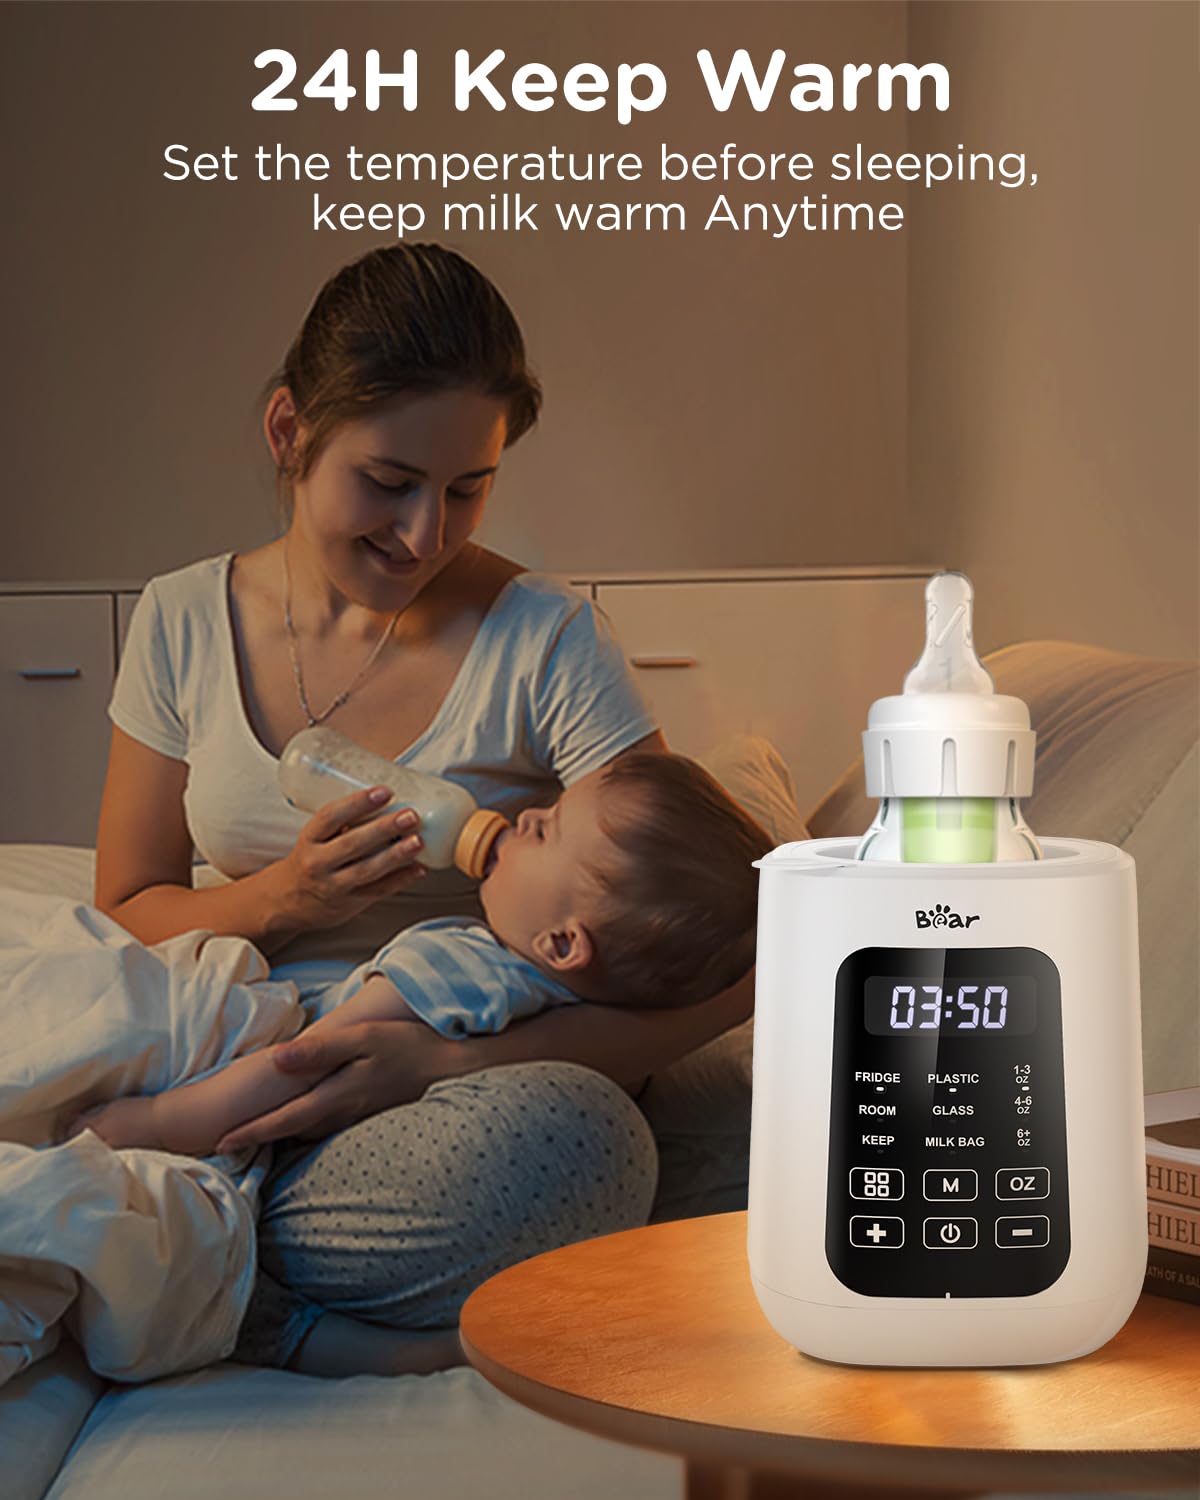
Image 5.3: The bottle warmer positioned on a bedside table, depicting its utility for maintaining milk warmth for 24 hours, facilitating convenient night feedings.
5.4 Thawing
Gently thaws frozen breast milk bags or formula using a water bath, preserving nutrients.
- Select the 'Milk Bag' mode.
- Place the frozen breast milk bag into the warming chamber.
- The unit will thaw the milk at a safe, controlled temperature.
5.5 Food Heating
Heats baby food jars to an ideal temperature.
- Place the baby food jar into the warming chamber.
- Select the appropriate mode for food heating (refer to display for specific icon/text).
- Adjust time/temperature as needed.
5.6 Sterilizing
This function can be used for sterilizing small items like pacifiers or bottle nipples.
- Place the items to be sterilized into the lifting basket.
- Add water to the chamber, ensuring it covers the items.
- Select the 'Sterilize' mode (refer to display for specific icon/text).
6. Maintenance and Cleaning
6.1 Daily Cleaning
- Unplug the warmer and allow it to cool completely.
- Empty any remaining water from the warming chamber.
- Wipe the interior and exterior of the unit with a damp cloth. Do not use abrasive cleaners.
- Wash the lifting basket and lid with warm soapy water and rinse thoroughly.
6.2 Descaling
Mineral deposits (limescale) can build up in the warming chamber over time. Descale regularly to maintain efficiency.
- Mix 2 oz (60ml) of white vinegar with 4 oz (120ml) of cold water.
- Pour the solution into the warming chamber.
- Turn on the warmer and select a warming cycle (e.g., 'Room' mode for 10-15 minutes) without a bottle inside.
- After the cycle, unplug the unit and let it cool.
- Empty the solution and rinse the chamber thoroughly with clean water several times.
7. Troubleshooting
| Problem | Possible Cause | Solution |
|---|---|---|
| Warmer not turning on. | No power, loose plug. | Check power connection, try a different outlet. |
| Milk not warming. | Insufficient water, incorrect settings. | Ensure water level is correct. Verify mode, material, and volume settings. |
| Milk too hot/cold. | Incorrect time/temperature setting. | Adjust time/temperature using +/- buttons. Always test milk temperature before feeding. |
| Unit displays an error code. | Internal malfunction. | Unplug the unit, wait 5 minutes, then plug back in. If error persists, contact customer support. |
If you encounter issues not listed here, please contact customer support for assistance.
8. Specifications
- Model: Y-H12-H5M7
- Product Dimensions: 4.53 x 4.53 x 6.5 inches
- Material Composition: Plastic
- Item Weight: 1.43 pounds
- Care Instructions: Hand wash
- Additional Features: 24H Keep Warm, 8-in-1 Fast Bottle Warming, Adjustable Temperature Control and Timer, Automatic Shut Off, Universal Fit for All Bottles.
9. Warranty and Support
For warranty information or technical support, please refer to the product packaging or contact Bear customer service. Keep your purchase receipt as proof of purchase.
Note: No official product videos were available in the provided data for embedding in this manual.


