1. Introduction
This manual provides detailed instructions for the setup, operation, and maintenance of your PULWTOP BD240A Mac mini M4 Dock. This accessory is designed to seamlessly integrate with your Mac mini M4/M4 Pro, expanding its connectivity and storage capabilities.

Image: The PULWTOP BD240A Mac mini M4 Dock with a Mac mini unit placed on top, showcasing its integrated design and accessible front ports.
2. Package Contents
Please verify that all items are present in the package:
- PULWTOP Mac mini M4 Dock (Model: BD240A)
- USB-C to USB-C Cable (for host connection)
- Fixed Screws for SSD installation
- Screwdriver
- Heat Dissipation Silicone Pad
- User Manual (this document)

Image: An illustration showing the contents of the product package, including the dock, USB-C cable, screws, screwdriver, heat dissipation silicone, and user manual.
3. Product Features
The PULWTOP BD240A Mac mini M4 Dock offers a range of features to enhance your Mac mini experience:
- Custom-Designed for Mac mini M4/M4 Pro: Acts as both a stand and a USB-C dock, perfectly matching the aesthetic and dimensions of your Mac mini.
- M.2 SSD Enclosure: Supports up to 4TB/10Gbps M.2 PCIe NVMe SSDs (sizes 2242/2260/2280) for expanded storage. (SSD not included)
- 4K@60Hz HDMI Output: Connect to an external display for vivid video synchronization, supporting mirror or extend modes.
- Multiple USB-A 2.0 Ports: Three USB-A 2.0 data ports (Max 480Mbps) for connecting mouse, keyboard, and other USB-A peripherals without Wi-Fi/Bluetooth interference. (Data transfer only, no charging)
- SD/Micro SD Card Slots: Convenient access to SD and Micro SD cards (104 Mbps).
- 3.5mm Audio/Mic Jack: For connecting headphones or microphones.
- Ergonomic Design: Features a rounded edge and corner notch for easy access to the Mac mini's power button. Anti-slip ring and silicone pads ensure stability.

Image: A detailed diagram highlighting the various ports (USB-A, HDMI, Audio/Mic, USB-C to Host, SD/TF) and the M.2 NVMe SSD enclosure within the dock.
4. Setup Guide
4.1. SSD Installation (M.2 NVMe SSD)
Follow these steps to install an M.2 NVMe SSD into your dock. Note: SSD is NOT included. SATA SSDs are NOT supported.
- Use the included screwdriver to remove the screw and take off the SSD slot's cover on the bottom of the dock.
- Use the included screwdriver to separate the fixed screw that is used to secure the SSD.
- Place the longer part of the fixed screw into the hole that matches the size of your SSD (2230/2242/2260/2280).
- Completely insert the SSD into the slot at a 45-degree angle, then push it down and use the shorter part of the fixed screw to secure the SSD.
- Tear off the protective film of the heat dissipation silicone pad and stick it onto the SSD card.
- Cover the SSD slot's cover and tighten the screw to finish the installation.
Video: Step-by-step guide on how to install an M.2 NVMe SSD into the PULWTOP BD240A dock.
Video: A more detailed visual demonstration of the SSD installation process for the BD240A dock.
4.2. Connecting to Mac mini
- Place your Mac mini M4/M4 Pro directly on top of the PULWTOP BD240A dock. Ensure the corner notch on the dock aligns with the Mac mini's power button for easy access.
- Connect the included USB-C to USB-C cable from the "USB-C to Host" port on the dock to one of the Thunderbolt/USB-C ports on your Mac mini. This single connection enables all dock functionalities.
- Connect your external display(s) to the HDMI port on the dock and/or directly to your Mac mini.
- Connect any desired USB-A peripherals (mouse, keyboard, etc.) to the USB-A 2.0 ports on the dock.
- Insert SD or Micro SD cards into their respective slots as needed.
- Connect headphones or a microphone to the 3.5mm audio/mic jack.
Video: An overview of the USB-C Hub with HDMI for Mac Mini 2024 M4/M4 Pro, demonstrating its features and connectivity.
5. Operating Instructions
5.1. 4K HDMI HD Output
The HDMI port on the dock supports up to 4K resolution at 60Hz. You can easily mirror or extend your Mac mini's display to an HDTV, monitor, or projector. For dual monitor setups, you can use both the HDMI port on the dock and an additional HDMI port directly on your Mac mini, supporting SST or MST mode.

Image: A visual representation of connecting two monitors to a Mac mini, one via the dock's HDMI and another directly to the Mac mini, enabling an extended display setup.
5.2. USB-A Ports
The three USB-A 2.0 ports are designed for connecting low-bandwidth peripherals such as a mouse, keyboard, or USB flash drives. These ports are specifically chosen as USB 2.0 to prevent interference with the Mac mini's 2.4GHz Wi-Fi and Bluetooth signals. They support data transfer only and do not provide charging capabilities.

Image: A comparison demonstrating that the PULWTOP dock's USB 2.0 ports do not cause Wi-Fi interference, unlike some other products.
5.3. SD/Micro SD Card Slots
Insert your SD or Micro SD cards into the designated slots on the front of the dock. Ensure the card is inserted correctly (label side up for SD, label side down for Micro SD) until it clicks into place. These slots support data transfer speeds of up to 104 Mbps.
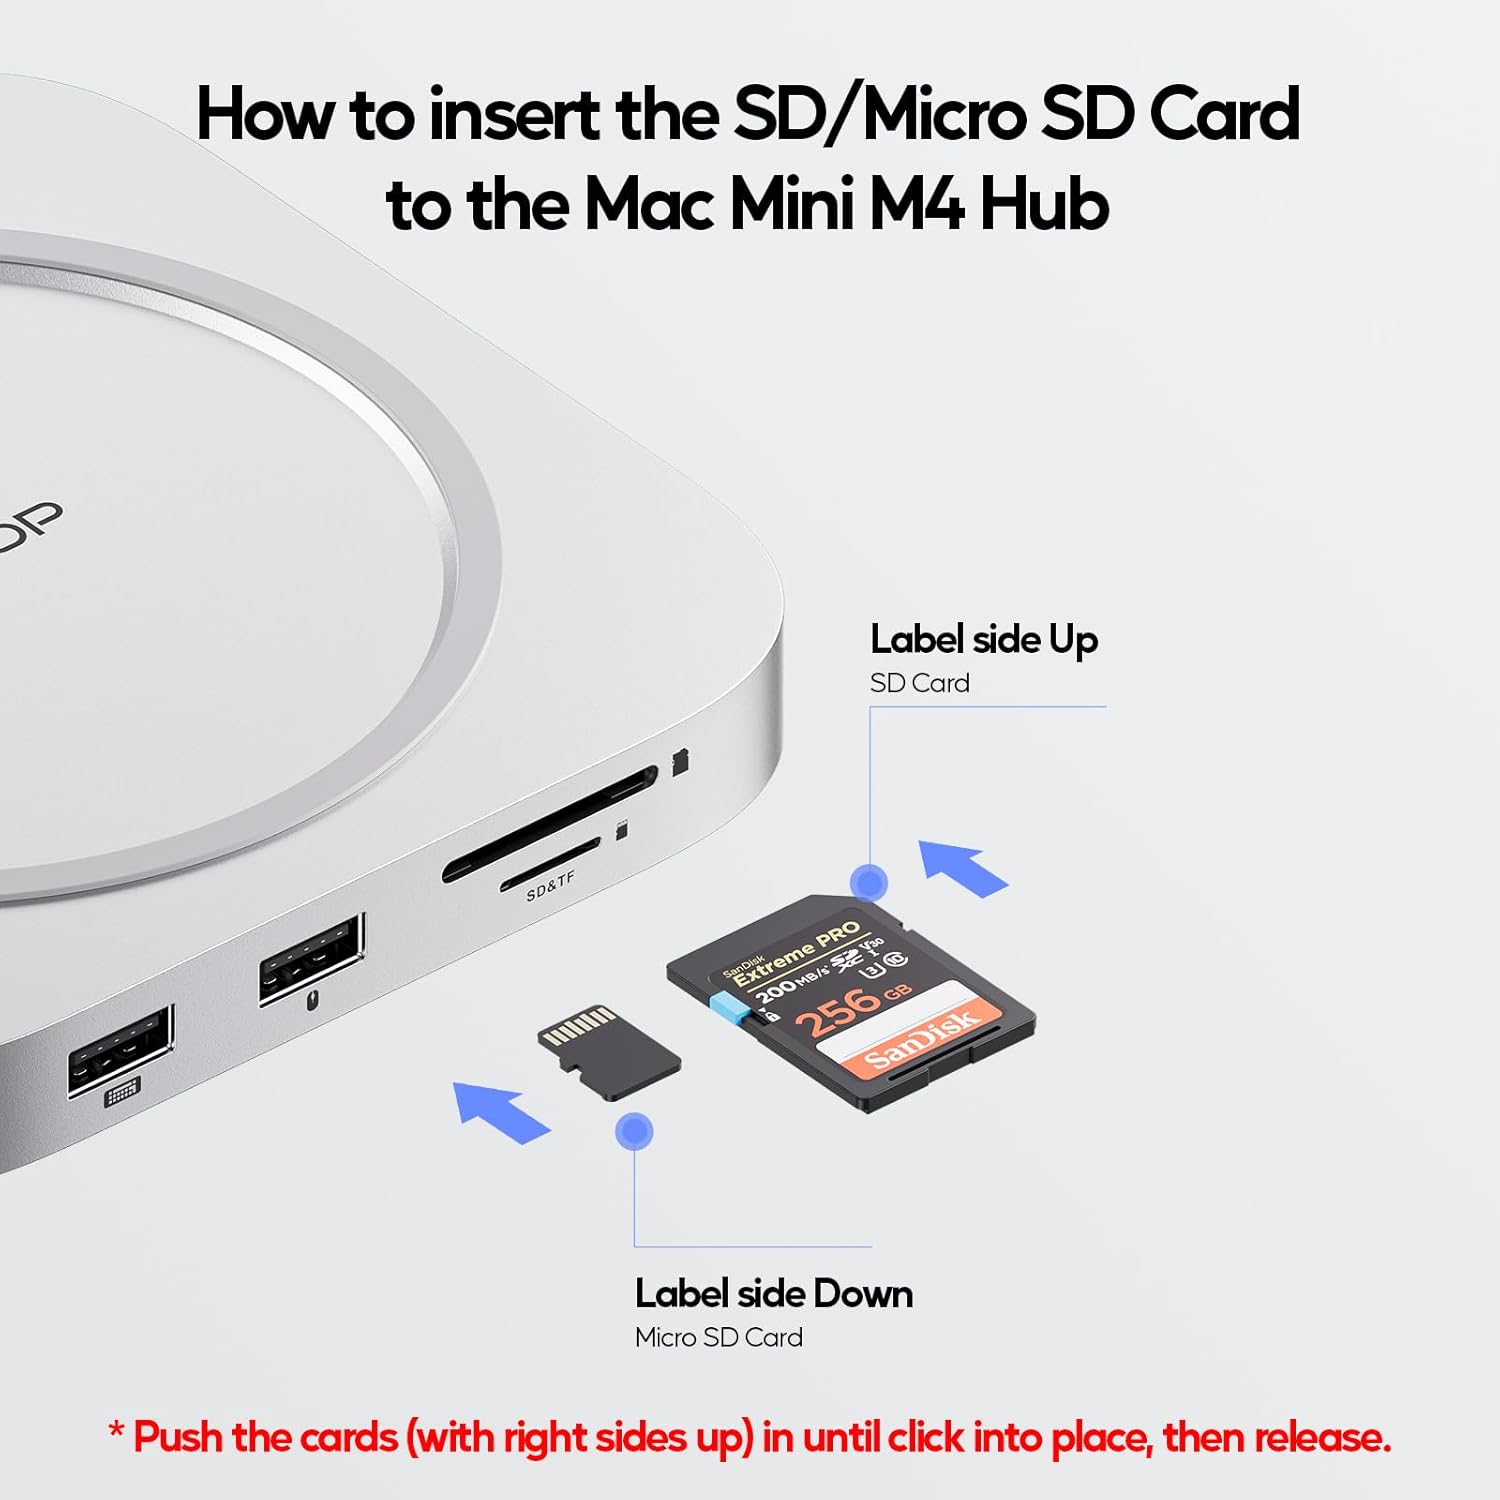
Image: A visual guide showing the correct orientation for inserting SD and Micro SD cards into the dock's card reader slots.
5.4. 3.5mm Audio/Mic Jack
Connect your headphones or external microphone to the 3.5mm audio/mic jack for audio input/output. If the audio jack does not work, please check your PC Sound settings and select "USB Audio System" as the output device.
6. Specifications
| Feature | Detail |
|---|---|
| Product Dimensions | 5.12 x 5.12 x 0.59 inches |
| Item Weight | 7.4 ounces |
| Model Number | BD240A |
| Brand | PULWTOP |
| Color | Silver |
| Hardware Interface | HDMI, MicroSD, USB 2.0 |
| Special Feature | Lightweight, Plug and Play |
| Compatible Devices | Mac Mini M4, Mac Mini M4 Pro, 2024 Mac Mini |
| SSD Expansion | Up to 4TB/10Gbps M.2 PCIe NVMe (2242/2260/2280) |
| HDMI Output | 4K@60Hz |
| USB-A Ports | 3 x USB-A 2.0 (Max 480Mbps, data only) |
| Card Reader | SD/Micro SD (104 Mbps) |
| Audio Jack | 3.5mm Audio/Mic |
7. Troubleshooting
- SSD Not Working:
- Ensure you are using an M.2 PCIe NVMe SSD. The hub does NOT support SATA SSDs or SSDs with heat sinks.
- Initialize and format your new SSD to "exFat" or "apfs" format for compatibility with your Mac.
- If issues persist, please contact PULWTOP after-sales service.
- SD/Micro SD Card Reader Not Working:
- Check if the card is inserted correctly (label side up for SD, label side down for Micro SD).
- Ensure your SD/Micro SD card functions correctly on other devices.
- If issues persist, please contact PULWTOP after-sales service.
- Audio Jack Not Working:
- If using both the Mac mini's audio jack and the hub's audio jack, only the first connected device will be active.
- Go to your Mac's System Settings > Sound and select "USB Audio System" in the Output column to ensure the hub's audio is selected.
- If issues persist, please contact PULWTOP after-sales service.
- Why USB-A 2.0 Ports?
- The USB 2.0 ports are intentionally designed to avoid interference with the Mac mini's 2.4GHz Wi-Fi and Bluetooth signals, ensuring stable wireless connectivity.
8. Maintenance
- Keep the dock clean by wiping it with a soft, dry cloth.
- Avoid exposing the device to extreme temperatures, humidity, or direct sunlight.
- Do not attempt to disassemble or repair the device yourself. Contact professional support if needed.
9. Warranty and Support
PULWTOP products come with a standard manufacturer's warranty. For detailed warranty information, technical support, or after-sales service, please refer to the contact information provided with your purchase or visit the official PULWTOP website.
Email: support@pulwtop.com
Website: www.pulwtop.com
Service Time: Mon - Fri, 9AM - 5PM (EST)