
1. Introduction
The HITBOX MIG200III is a versatile multi-process welding machine designed for both beginners and professionals. It supports Gas MIG, Flux MIG, Stick (MMA), Lift TIG, and Spot Welding. This welder is suitable for various materials including carbon steel, iron, galvanized steel, stainless steel, and aluminum, providing precision and efficiency for DIY projects, agricultural repairs, and professional tasks.
Key features include an easy-to-read LED display for essential welding data, compatibility with a spool gun for aluminum welding, and 2T/4T/Spot Welding modes for precise control.
2. Safety Information
WARNING: Welding can be dangerous. Always follow safety precautions to prevent injury or damage.
- Wear appropriate personal protective equipment (PPE), including welding helmet, gloves, and protective clothing.
- Ensure adequate ventilation in the work area to avoid inhaling fumes.
- Keep flammable materials away from the welding area.
- Do not touch live electrical parts.
- Always disconnect power before performing maintenance or changing accessories.
- The HITBOX MIG200III is equipped with safety protections such as VRD (Voltage Reduction Device), overcurrent, overvoltage, overload, and overheating protection.

Figure 1: Internal components and safety features of the HITBOX MIG200III welder. This image illustrates the machine's robust design, incorporating protections against overcurrent, overvoltage, overheating, overload, and a Voltage Reduction Device (VRD) for enhanced user safety.
3. Package Contents
Verify that all items listed below are included in your package:
- Ground Clamp 1.5 m
- Electrode Holder 1.5 m
- MIG 15AK Torch 3.0 m
- Graphene Tube 3.5 m
- Gas Hose 2.0 m
- Flux Wire 0.8 mm 1 kg
- Contact Tips (0.8 mm * 2; 1.0 mm * 2)
- Rollers * 3 (V: 0.6 mm / 0.8 mm & 0.9 mm / 1.0 mm; U: 1.0 mm / 1.2 mm, Note: Max. 1.0 mm supported)
- Wrench
- Hammer
- Hose Clamps * 2
- User Manual
4. Specifications
| Feature | Detail |
|---|---|
| Manufacturer | HITBOX |
| Model Number | MIG200III (H1032035) |
| Product Dimensions (L x W x H) | 40 x 20 x 35 cm |
| Machine Weight | 8.52 kg |
| Power Type | AC |
| Welding Processes | Flux MIG, Gas MIG, MMA (Stick), Lift TIG, Spot Welding |
| Gasless Welding Wire Sizes | 0.8 mm / 0.9 mm / 1.0 mm |
| Gas Welding Wire Sizes (Carbon Steel with CO2) | 0.6 mm / 0.8 mm / 0.9 mm / 1.0 mm |
| Gas Welding Wire Sizes (Aluminum with Argon) | 1.0 mm |
| TIG Electrode Sizes | 1.6 mm to 3.2 mm |
| Welding Thickness (TIG) | 1 mm to 4 mm |
| Welding Thickness (MIG) | 1 mm to 4 mm |
| Welding Thickness (MMA) | 2 mm to 10 mm |
| Wire Feed Speed Adjustment | 0 to 10 |
| Inductance Adjustment | -10 to +10 |
| Pre/Post Gas Flow Adjustment | 0 to 2 seconds |
5. Setup
5.1 Power Connection
Connect the welder to a suitable 230V AC power supply. Ensure the power source meets the machine's requirements.
5.2 Wire Spool Installation and Feeding
Open the wire spool compartment. Place the welding wire spool onto the spindle, ensuring it rotates freely. Thread the wire through the guide tube and into the drive rollers. Adjust the tension of the drive rollers to prevent slipping or crushing the wire.
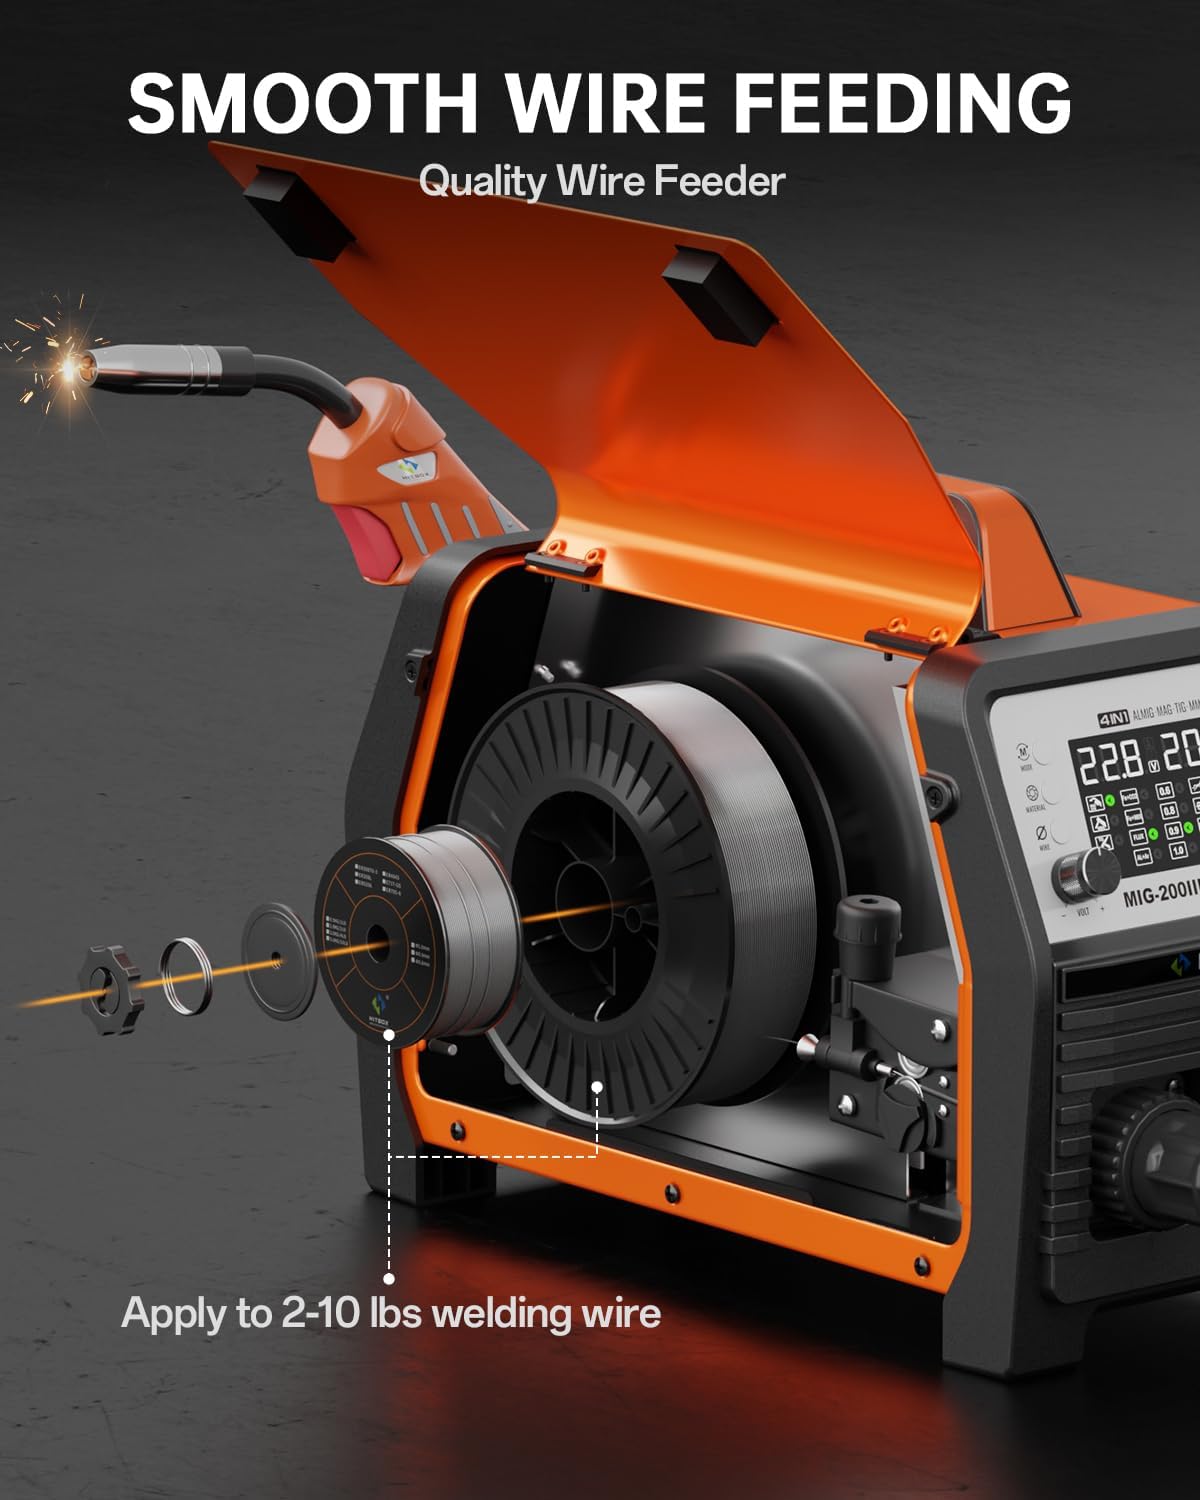
Figure 2: Wire spool installation and feeding mechanism. This illustration shows how to correctly install the welding wire spool and thread it through the machine's smooth wire feeding system, compatible with 2-10 lbs spools.
5.3 Gas Connection (for Gas MIG/TIG)
For Gas MIG or TIG welding, connect the gas hose (included) from your gas cylinder regulator to the gas inlet on the back of the welder. Ensure all connections are secure and leak-free.
5.4 Torch and Ground Clamp Connection
- MIG/TIG without Gas (Flux Core MIG): Connect the ground clamp to the positive (+) terminal.
- MIG/MMA with Gas: Connect the ground clamp to the negative (-) terminal.
- Connect the MIG torch or TIG torch (sold separately for TIG) to the appropriate connectors on the front panel.
6. Operating Instructions
The HITBOX MIG200III offers multiple welding modes and synergic control for ease of use.

Figure 3: Overview of welding processes. This image highlights the 7-in-1 multi-process capabilities of the welder, including Gas MIG, Flux MIG, Spool Gun compatibility, Lift TIG, Spot Welding, Single Pulse MIG, and MMA.
6.1 Synergic Control and Mode Selection
The synergic control feature simplifies parameter setting.
- Select SYN mode: Activate synergic mode on the control panel.
- Select Material: Choose the material type (e.g., Fe+CO2 for carbon steel with CO2 gas, AL+Ar for aluminum with Argon gas).
- Select Wire Size: Specify the diameter of your welding wire.
The machine will automatically suggest recommended current and wire feed speed settings. You can fine-tune these settings as needed.

Figure 4: Synergic control panel. The LED display provides clear visual feedback for selecting welding modes, materials, and wire sizes, making setup straightforward for all skill levels.
6.2 Welding Modes and Adjustments
- 2T/4T/Spot Welding: Select between 2T (trigger held for weld), 4T (trigger press to start, press again to stop), or Spot Welding mode for precise control. Spot welding time is adjustable.
- Wire Feed Speed: Adjust the wire feed speed from 0 to 10 for optimal welding control.
- Inductance: Adjust inductance from -10 to +10 to control arc stability.
- Pre/Post Gas Flow: Customize pre-flow and post-flow gas times from 0 to 2 seconds for optimal weld protection.
6.3 Aluminum Welding
The MIG200III supports aluminum welding with argon gas using a 1.0 mm wire. For enhanced performance, a spool gun (sold separately) is recommended.

Figure 5: Aluminum welding methods. This image demonstrates the use of both the standard MIG gun and an optional spool gun for effective aluminum welding.
7. Maintenance
Regular maintenance ensures the longevity and optimal performance of your welding machine.
- Cleaning: Periodically clean the machine's exterior and ventilation openings to prevent dust and debris buildup. Use compressed air to clear internal components if necessary, ensuring the machine is unplugged.
- Torch and Consumables: Inspect the MIG torch, contact tips, nozzles, and electrode holder regularly. Replace worn or damaged consumables to maintain weld quality.
- Wire Feeder: Keep the wire feeder rollers clean and free of debris. Check for proper wire tension.
- Cables and Connections: Inspect all cables for damage and ensure connections are tight and secure.
- Storage: Store the welder in a dry, clean environment when not in use.
8. Troubleshooting
This section provides solutions to common issues you might encounter.
| Problem | Possible Cause | Solution |
|---|---|---|
| No power | Power cable disconnected, circuit breaker tripped, machine switch off | Check power connections, reset breaker, turn on machine switch |
| Poor arc start/unstable arc | Improper ground connection, incorrect settings, dirty workpiece, worn contact tip | Ensure good ground, adjust voltage/wire speed, clean workpiece, replace contact tip |
| Wire feeding issues | Incorrect roller tension, clogged liner, wrong wire size, tangled wire spool | Adjust roller tension, clean/replace liner, verify wire size, untangle spool |
| Overheat protection activated | Exceeded duty cycle, blocked ventilation | Allow machine to cool down, ensure clear ventilation paths |
If you encounter issues not covered here, please contact customer support.
9. Warranty and Support
Each HITBOX MIG welding machine undergoes rigorous testing before leaving the factory to ensure it meets high industrial standards.
For specific warranty details and terms, please refer to the warranty card included with your product or contact HITBOX customer support directly.
Customer Support: For technical assistance, troubleshooting, or parts inquiries, please visit the official HITBOX website or contact their customer service department.


