1. Introduction
This manual provides detailed instructions for the safe and effective operation, maintenance, and troubleshooting of your VTSYIQI Ultrasonic Hardness Tester Meter. This instrument is designed for direct measurement of Vickers hardness values, eliminating the need for conversion from other hardness scales and thereby reducing potential conversion errors. It offers high test speed, producing results within seconds, and creates a standard Vickers indentation with minimal damage to the workpiece. Please read this manual thoroughly before using the device.
2. Product Overview
2.1 Components
The VTSYIQI Ultrasonic Hardness Tester Meter consists of the main host unit, a probe, and connecting cables. Key interfaces include a USB port for charging and data transfer, and an eight-core socket for probe connection.

Figure 2.1: VTSYIQI Ultrasonic Hardness Tester Meter with labeled components. This image displays the main host, probe, probe connection cable, charge lamp, USB interface, and eight-core socket, indicating their positions on the device.
2.2 Key Features
- Direct Vickers Hardness Measurement: Eliminates conversion errors from other scales.
- High Test Speed: Provides results within seconds.
- Minimal Workpiece Damage: Standard Vickers indentation is tiny.
- Multi-point Calibration Mode: Essential for new or composite materials.
- Color Display: For clear readability of measurements and settings.
- Long-lasting Battery: Equipped with a 3000mA lithium battery.
- Data Storage: Stores up to 50 groups of measurement data.
- Bluetooth Connectivity: For external data printing and export.
- Portable Design: Small volume, light weight, and easy to carry for on-site testing.
- Versatile Application: Suitable for small forgings, foundry materials, weld inspection, and difficult-to-access areas like gear teeth.

Figure 2.2: Multiple functions of the VTSYIQI Ultrasonic Hardness Tester. This image highlights features such as one-point and multi-point calibration, various hardness scales (HRC, HRB, HRA, HB, HV), color LCD screen, 3000mA lithium battery, 360° test support, 50 sets of data storage, Bluetooth connection, small test indentation, and fast measurement speed. It also lists compliance with several industry standards.
3. Setup
3.1 Unpacking and Inspection
- Carefully unpack all components from the carrying case.
- Verify that all items listed in the packing list are present and undamaged. The typical package includes the main host, probe, connection cables, charger, and a calibration block.
- Report any missing or damaged items to your supplier immediately.
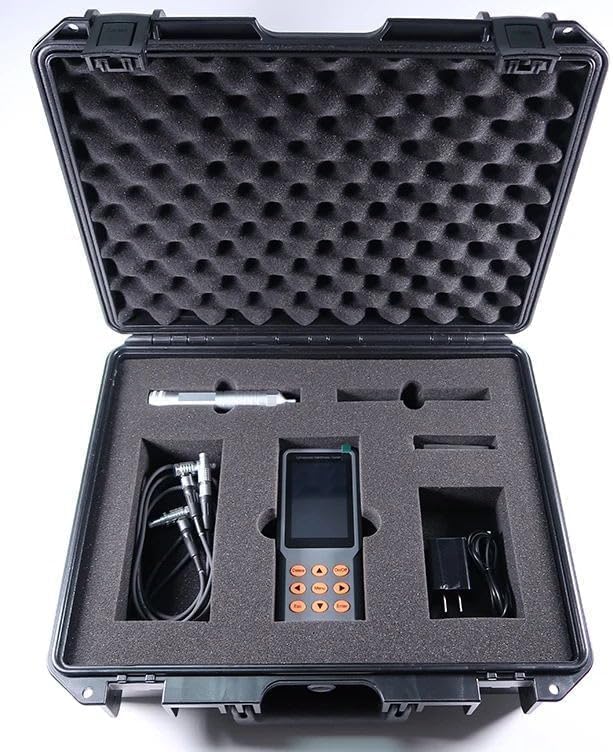
Figure 3.1: Contents of the VTSYIQI Ultrasonic Hardness Tester Meter package. This image shows the main host unit, probe, connecting cables, charger, and a small calibration block neatly arranged within a protective carrying case.
3.2 Connecting the Probe
Connect the probe cable to the eight-core socket on the main host unit. Ensure the connection is secure to prevent measurement inaccuracies.
3.3 Powering On and Charging
- Press and hold the On/Off button to power on the device.
- If the battery is low, connect the charger to the USB interface. The charge lamp will indicate charging status.
- Allow the device to fully charge before initial use for optimal battery life.

Figure 3.2: VTSYIQI Ultrasonic Hardness Tester Meter ready for operation. This image shows the main unit and its connected probe, illustrating the device in a ready-to-use configuration.
4. Operation
4.1 Basic Measurement
- From the main menu, navigate to Meas Setup.
- Select the appropriate material type for your workpiece. The test results are related to the elastic constants of the workpiece.
- Ensure the workpiece surface has a maximum roughness of Ra<15μm and a minimum thickness of 2mm. The minimum workpiece weight should be 0.3kg.
- Place the probe firmly and perpendicularly onto the test surface.
- Initiate the measurement as per the on-screen instructions. The device will output the Vickers hardness value within seconds.
- Read the displayed hardness value.

Figure 4.1: Ultrasonic Hardness Tester in use. This image shows the device with its probe applied to a material, demonstrating the process of taking a hardness measurement. The main menu is visible on the screen.
4.2 Calibration
For new materials or composites, calibration is crucial to ensure accurate readings. The device supports multi-point calibration.
- Access the Material or System menu to find calibration options.
- Follow the on-screen prompts to perform a multi-point calibration using a known reference block for the specific material.
- The device allows direct testing with multi-point calibration, eliminating the need for a hardness conversion table for new materials.

Figure 4.2: Multi-point calibration mode. This image shows the device display with options for various hardness scales (HL, HB, HV, HS, HRA, HRB, HRC), indicating the device's capability for multi-point calibration across different material types.
4.3 Data Management
The device can store up to 50 groups of measurement data. You can access stored data via the Storage menu.
- Data Export: Measurement data can be exported to an external Bluetooth printer for immediate hard copies or connected to a computer via USB for detailed analysis and record-keeping.
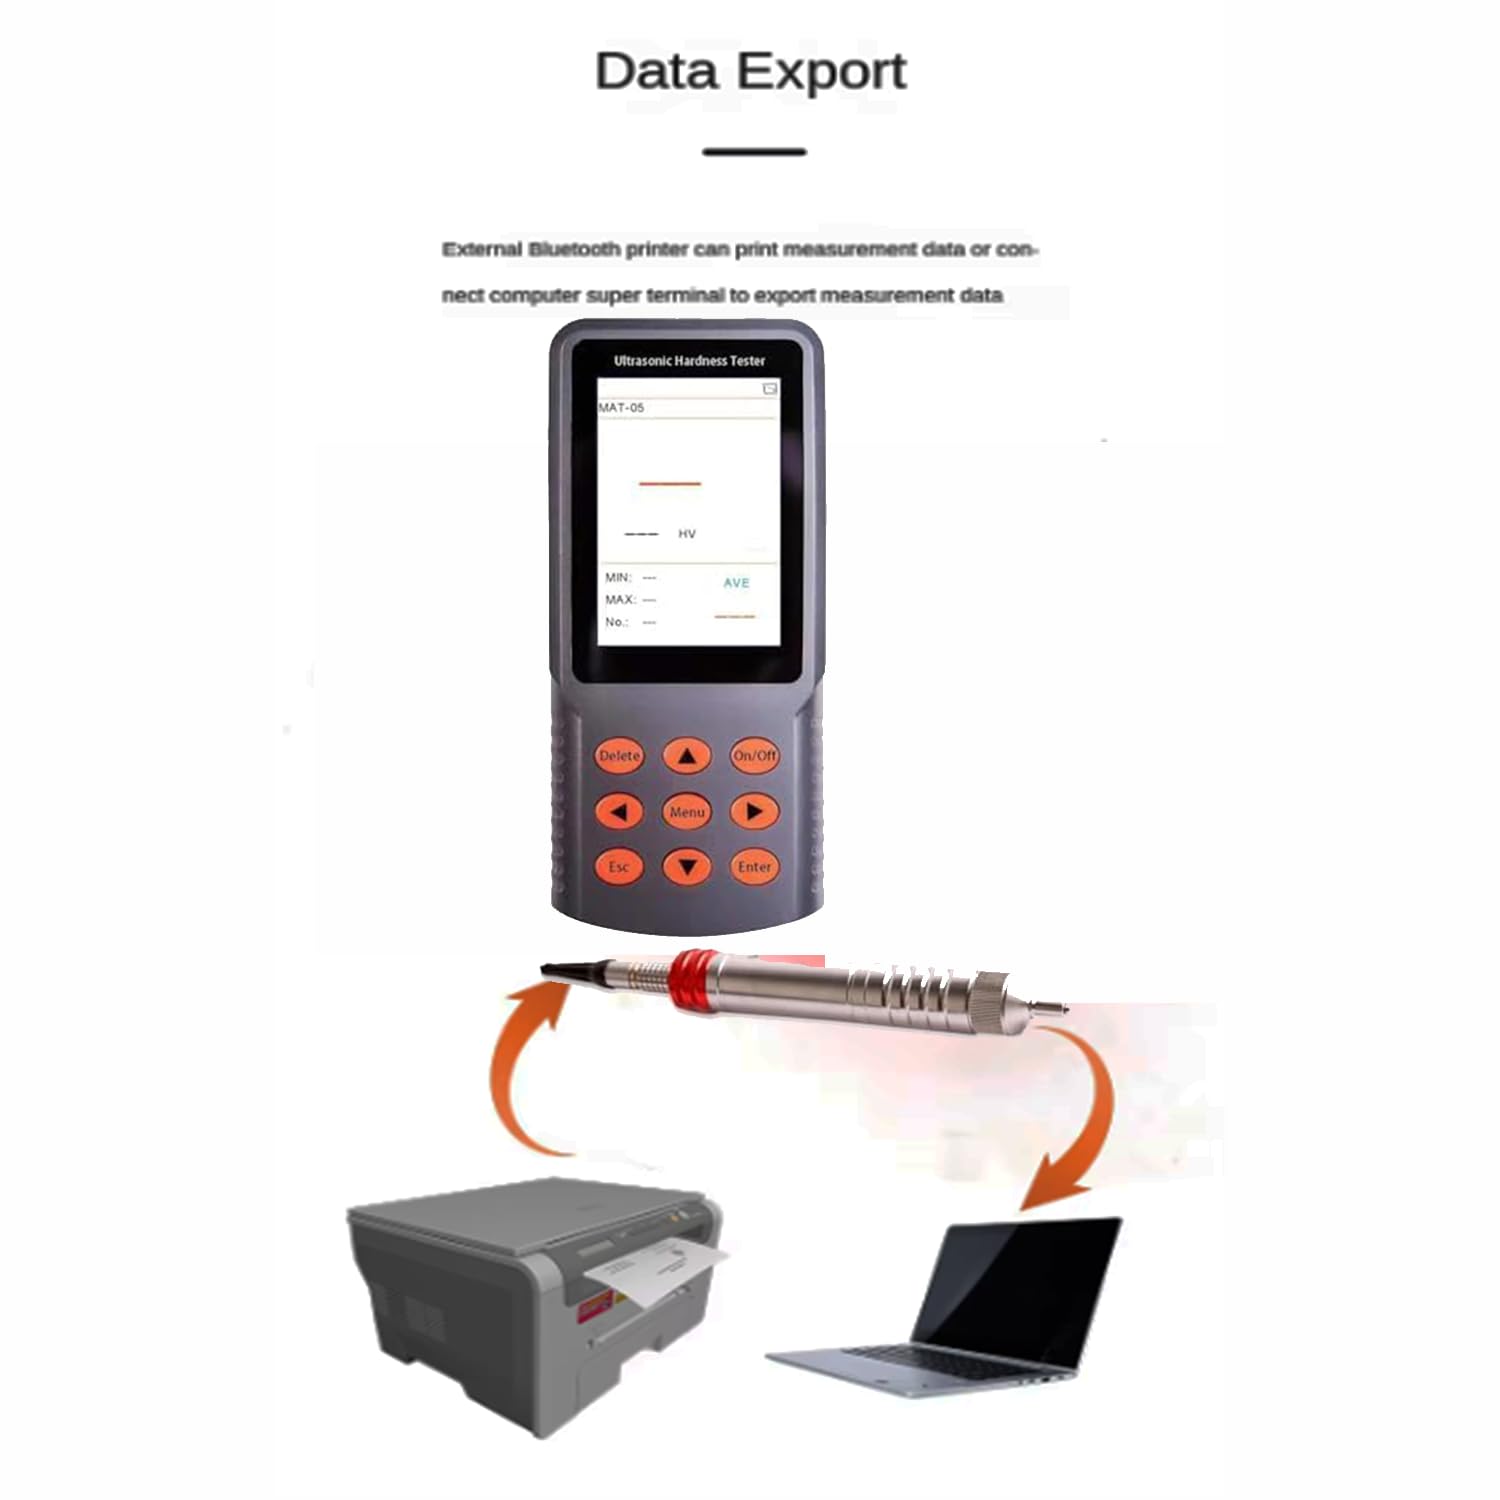
Figure 4.3: Data export functionality. This image illustrates the device's ability to export data, showing it connected to both a printer and a laptop, signifying options for printing or digital transfer of measurement results.
4.4 Operation Video
Video 4.1: Ultrasonic Hardness Meter Operation. This video provides a brief demonstration of the VTSYIQI Ultrasonic Hardness Tester Meter in operation, showcasing how to use the device for hardness measurements.
5. Maintenance
5.1 Cleaning
- Regularly clean the main unit and probe with a soft, dry cloth.
- Do not use abrasive cleaners or solvents, as these can damage the device's surface or internal components.
- Ensure the probe tip is free from debris before each measurement to maintain accuracy.
5.2 Battery Care
- Charge the device regularly, even if not in frequent use, to maintain battery health.
- Avoid fully discharging the battery frequently.
- Store the device in a cool, dry place when not in use.
5.3 Storage
When not in use, store the hardness tester and its accessories in the provided protective carrying case to prevent damage from dust, moisture, and impact.
6. Troubleshooting
This section addresses common issues you might encounter with your device.
6.1 Device Not Powering On
- Check Battery: Ensure the battery is sufficiently charged. Connect the charger and allow it to charge for at least 30 minutes before attempting to power on again.
- Power Button: Confirm the On/Off button is pressed and held correctly.
6.2 Inaccurate or Inconsistent Readings
- Probe Connection: Verify the probe is securely connected to the main unit.
- Probe Tip: Inspect the probe tip for wear or damage. A worn tip can affect accuracy.
- Workpiece Surface: Ensure the test surface is clean, smooth (Ra<15μm), and flat.
- Material Selection: Confirm the correct material type is selected in the device settings.
- Calibration: Perform a multi-point calibration, especially if testing a new material or if results are consistently off.
- Workpiece Size: Ensure the workpiece meets the minimum requirements (thickness > 2mm, weight > 0.3kg).
6.3 Data Export Issues
- Bluetooth Connection: Ensure Bluetooth is enabled on both the tester and the external device (printer/computer) and that they are properly paired.
- USB Connection: Verify the USB cable is correctly connected and that the computer recognizes the device.
7. Specifications
| Feature | Specification |
|---|---|
| Model Number | VTSYIQI20241203140278954VTSYIQI |
| Probe Type | 10kgf Manual Probe |
| Test Force | 98N |
| Probe Diameter | 22mm |
| Probe Length | 150mm |
| Resonating Rod Diameter | 2.4mm |
| Max. Surface Roughness | Ra < 15μm |
| Min. Workpiece Weight | 0.3kg |
| Min. Workpiece Thickness | 2mm |
| Battery | 3000mA Lithium Battery |
| Product Dimensions | 5.91 x 1.97 x 9.84 inches |
| Product Weight | 8.82 Pounds |
8. Warranty and Support
For warranty information, please refer to the documentation provided at the time of purchase. If you require technical assistance, troubleshooting beyond this manual, or have questions regarding your VTSYIQI Ultrasonic Hardness Tester Meter, please contact the manufacturer or your authorized dealer for support.


