
E88 Pro
Drone E88 Pro User Manual
Model: E88 Pro | Brand: Generic
1. Introduction
Thank you for choosing the Drone E88 Pro. This foldable quadcopter with camera and remote control is designed for aerial photography and videography enthusiasts. Its compact design, advanced features, and user-friendly controls make it an excellent choice for exploring the world from a new perspective. Please read this manual thoroughly before operating the drone to ensure safe and optimal performance.
2. Safety Guidelines
Operating a drone requires responsibility. Adhere to the following safety guidelines to prevent injury or damage.
- Pre-Flight Check: Always inspect the drone, remote control, and batteries for any damage before each flight.
- Environmental Conditions: Do not fly in strong winds, rain, snow, or fog. Avoid flying near power lines, buildings, or crowded areas.
- Line of Sight: Always maintain visual line of sight with the drone during flight.
- Battery Safety: Use only the provided charger and batteries. Do not overcharge or puncture batteries. Store batteries in a cool, dry place.
- Propeller Safety: Keep hands, face, and loose clothing away from rotating propellers. Ensure propellers are securely attached before flight.
- Age Restriction: This product is recommended for adults.
- Respect Privacy: Be mindful of privacy laws when capturing aerial footage.
- Emergency Landing: In case of emergency, land the drone immediately in a safe, open area.
3. Package Contents
Verify that all items listed below are included in your package:
- 1 x Drone E88 Pro
- 1 x Remote Controller
- 1 x USB Charging Cable
- 1 x User Manual
- Spare Propellers (quantity may vary)
- Drone Battery (pre-installed or separate)
- AAA Batteries for Remote Controller (2 included)
4. Component Identification
4.1 Drone E88 Pro
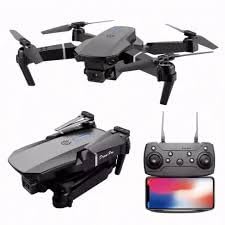
Image Description: This image displays the Drone E88 Pro in both its unfolded flight configuration and its compact, folded state. Alongside the drone, the remote control is shown with a smartphone mounted in its holder, illustrating the complete operational setup.
- Foldable Arms: Allow for compact storage and portability.
- Propellers: Four main propellers for lift and thrust.
- Motors: Power the propellers.
- HD Camera: Located at the front, capable of capturing photos and videos.
- Battery Compartment: Located on the underside or rear of the drone.
- LED Indicator Lights: Provide status information (e.g., power, pairing, low battery).
4.2 Remote Controller
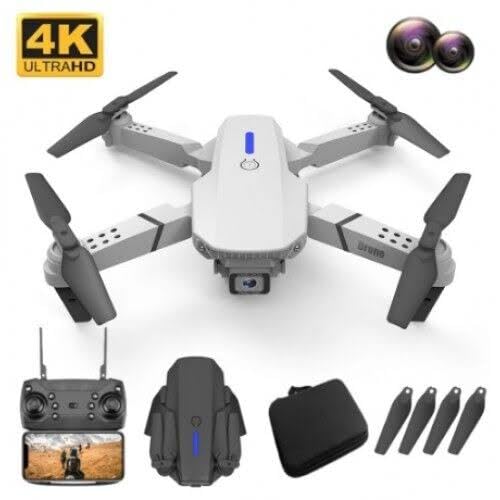
Image Description: This image features a white version of the Drone E88 Pro, accompanied by its remote control, a carrying case, and a set of spare propellers. This illustrates the typical contents of the product package.
- Left Joystick: Controls altitude (up/down) and rotation (left/right).
- Right Joystick: Controls forward/backward and left/right movement.
- One-Key Take-off/Landing Button: Initiates automatic take-off or landing.
- Headless Mode Button: Activates headless flight mode.
- One-Key Return Button: Commands the drone to return to its take-off point.
- Speed Switch Button: Toggles between different flight speeds (e.g., low, medium, high).
- Photo/Video Button: Captures photos or starts/stops video recording.
- Power Button: Turns the remote controller on/off.
- Smartphone Holder: For mounting your smartphone to view FPV (First Person View) footage.
5. Setup
5.1 Charging the Drone Battery
- Remove the drone battery from the drone.
- Connect the USB charging cable to the battery.
- Plug the other end of the USB cable into a 5V/1A USB power adapter (not included) or a computer USB port.
- The indicator light on the USB cable will show charging status (e.g., red for charging, off when fully charged).
- Charging typically takes 60-90 minutes. Do not leave unattended while charging.
5.2 Installing Propellers
The drone comes with pre-installed propellers. If replacement is needed, ensure correct orientation. Propellers are marked 'A' and 'B'. Match them to the corresponding motor arms.
5.3 Installing Drone Battery
- Ensure the drone is powered off.
- Insert the fully charged battery into the battery compartment on the drone until it clicks into place.
5.4 Installing Remote Controller Batteries
- Open the battery cover on the back of the remote controller.
- Insert 2 x AAA batteries (included) according to the polarity markings (+/-).
- Close the battery cover securely.
5.5 Pairing the Drone and Remote Control
- Place the drone on a flat, level surface.
- Power on the drone by pressing and holding the power button. The drone's LED lights will flash.
- Power on the remote controller. The remote's indicator light will flash.
- Push the left joystick (throttle) all the way up, then pull it all the way down.
- The drone's and remote's indicator lights will stop flashing and become solid, indicating successful pairing.
5.6 App Installation (Optional for FPV)
For FPV (First Person View) and advanced features, download the dedicated app (e.g., "WiFi_CAM" or similar, refer to packaging for exact app name) from your smartphone's app store (iOS/Android).
- Scan the QR code on the packaging or search for the app name in your app store.
- Install the app.
- Connect your smartphone to the drone's Wi-Fi network (usually named "WiFi_UFO" or similar) in your phone's Wi-Fi settings.
- Open the app to view the live camera feed and access additional controls.
6. Operating Instructions
6.1 Pre-Flight Checks
- Ensure drone and remote batteries are fully charged.
- Check that propellers are securely attached and undamaged.
- Confirm drone and remote are successfully paired.
- Choose an open, clear area free from obstacles, people, and animals.
6.2 Take-off and Landing
- Manual Take-off: After pairing, push both joysticks simultaneously outwards and downwards to unlock the motors. Then, slowly push the left joystick (throttle) up to ascend.
- One-Key Take-off: Press the One-Key Take-off/Landing button. The drone will automatically ascend to a certain height and hover.
- Manual Landing: Slowly pull the left joystick (throttle) down until the drone lands. Once landed, hold the joystick down for a few seconds until the motors stop.
- One-Key Landing: Press the One-Key Take-off/Landing button again. The drone will automatically descend and land.
6.3 Basic Flight Controls
| Control | Action | Description |
|---|---|---|
| Left Joystick Up/Down | Ascend/Descend | Controls the drone's altitude. |
| Left Joystick Left/Right | Rotate Left/Right | Controls the drone's yaw (rotation around its vertical axis). |
| Right Joystick Up/Down | Forward/Backward | Controls the drone's pitch (movement along its longitudinal axis). |
| Right Joystick Left/Right | Fly Left/Right (Sideways) | Controls the drone's roll (movement along its lateral axis). |
6.4 Advanced Features
- Altitude Hold: The drone will automatically maintain its current altitude when the left joystick is released, providing stable hovering.
- Headless Mode: Press the Headless Mode button. In this mode, the drone's orientation is relative to the pilot, regardless of the drone's actual front. This simplifies control for beginners. Press again to exit.
- One-Key Return: Press the One-Key Return button. The drone will attempt to fly back towards its take-off point. This feature is basic and relies on the drone's internal compass; it is not GPS-accurate. Press any joystick to cancel.
- Speed Switch: Press the Speed Switch button to cycle through different flight speeds (e.g., low, medium, high). Low speed is recommended for beginners.
6.5 Camera Operation
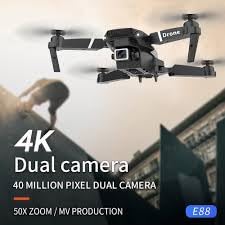
Image Description: This image shows the Drone E88 Pro in flight, with text overlays highlighting its "4K Dual camera" capability and "40 MILLION PIXEL DUAL CAMERA" feature, emphasizing its high-resolution imaging.
- Taking Photos: While flying, press the Photo/Video button once on the remote control to take a photo. The drone's lights may flash to indicate a photo has been taken.
- Recording Video: Press and hold the Photo/Video button for 2-3 seconds to start video recording. Press and hold again to stop recording. The drone's lights may flash differently or continuously during recording.
- Viewing Footage: If using the app, photos and videos will be saved directly to your smartphone's gallery. If using an SD card (not included, if applicable), remove the card from the drone and insert it into a card reader to view files on a computer.
7. Maintenance
- Cleaning: Use a soft, dry cloth to clean the drone and remote control. Do not use water or chemical cleaners.
- Propeller Replacement: If propellers are damaged or bent, replace them immediately with spare parts. Ensure correct 'A' and 'B' propeller types are installed on the correct motor arms.
- Battery Care:
- Do not overcharge or over-discharge batteries.
- Store batteries in a cool, dry place away from direct sunlight and heat.
- If storing for extended periods, charge batteries to about 50% capacity.
- Storage: Store the drone and its accessories in a cool, dry environment, preferably in its original packaging or a protective case, away from direct sunlight and extreme temperatures.
8. Troubleshooting
| Problem | Possible Cause | Solution |
|---|---|---|
| Drone does not respond to remote. | Not paired; low battery; interference. | Re-pair drone and remote; charge batteries; move to an area with less interference. |
| Drone drifts during flight. | Not calibrated; uneven surface at take-off; wind. | Calibrate the drone (refer to app or specific remote sequence); take off from a flat surface; avoid flying in windy conditions. |
| Propellers not spinning. | Motors locked; damaged propellers; motor issue. | Unlock motors (joysticks outwards/downwards); replace damaged propellers; contact support if motors are faulty. |
| Camera feed is choppy or disconnected. | Weak Wi-Fi signal; too far from drone; app issue. | Ensure strong Wi-Fi connection; fly closer to the drone; restart app and drone. |
| Short flight time. | Battery not fully charged; old battery; aggressive flying. | Ensure battery is fully charged; consider replacing old batteries; fly more conservatively. |
9. Specifications
| Feature | Detail |
|---|---|
| Brand | Generic |
| Model Name | E88 Pro |
| Special Features | Headless Mode, Foldable, Wifi Fpv, Altitude Hold |
| Age Range (Description) | Adult |
| Colour | Gray |
| Video Capture Resolution | 1080p |
| Effective Still Resolution | 32 MP |
| Connectivity Technology | Bluetooth, Wi-Fi |
| Included Components | User Manual, USB Cable, Drone, Remote Controller |
| Skill Level | Beginner |
| Item Weight | 220 Grams |
| Battery Capacity | 2 Amp Hours |
| Remote Control Technology | 2.4ghz |
| Control Type | Remote Control |
| Media Type | Micro SDXC (if applicable, not included) |
| Material | Plastic, Metal |
| Wireless Communication Technology | Wi-Fi |
| Battery Cell Composition | Lithium Ion |
| Batteries Included | Yes (2 AAA for remote) |
| Supported Image Format | JPEG, MP4 |
| Video Output Resolution | 1080p |
| Product Dimensions | 25L x 15W x 5H Centimeters |
| Manufacturer | Riya global |
| Date First Available | 2 December 2024 |
10. Warranty and Support
This product is manufactured by Riya global. For any manufacturing defects or issues not covered by troubleshooting, please contact the seller or manufacturer directly.
Please retain your proof of purchase for any warranty claims. Specific warranty terms and conditions may vary by region and retailer.
For further assistance, refer to the contact information provided with your purchase or visit the manufacturer's official website.
Related documentsE88 Pro


Ask a question about this manual
Ask about setup, troubleshooting, compatibility, parts, safety, or missing instructions. Manuals+ will review the question and use this page’s manual context to help answer it.