1. Introduction
Thank you for choosing the FreshDcart Electric Cleaning Brush. This cordless spin power scrubber is designed to simplify your cleaning tasks across various surfaces, from bathrooms and kitchens to glass and tiles. This manual provides essential information for the safe and effective use, maintenance, and troubleshooting of your device. Please read it thoroughly before first use and retain it for future reference.

Image 1.1: The FreshDcart Electric Cleaning Brush with its full set of accessories, including the main unit, extendable handle, and multiple brush heads.
2. Product Components
Familiarize yourself with the main parts of your FreshDcart Electric Cleaning Brush:
- Main Unit: Contains the motor, battery, display, power switch, and angle adjustment switch.
- Extendable Handle: Allows for reaching high or low areas without bending or stretching.
- Brush Heads: A variety of interchangeable heads for different cleaning tasks.
- USB Type-C Charging Cable: For recharging the device.

Image 2.1: Detailed view of the product components, including the length adjustment buckle, charging port, display, power switch, angle adjustment switch, and brush head attachment point.
3. Setup
3.1. Initial Charging
Before first use, fully charge the device. The unit features a 2500mAh battery that requires approximately 3 hours for a full charge, providing up to 90 minutes of working time.
- Locate the USB Type-C charging port on the main unit.
- Connect the provided USB Type-C cable to the charging port and the other end to a suitable USB power adapter (not included).
- The LED display will indicate charging status. Disconnect once fully charged.

Image 3.1: The electric cleaning brush connected for USB Type-C fast charging, showing the digital display.
3.2. Assembling the Handle
The handle is extendable and detachable for versatile cleaning.
- To extend the handle, twist the length adjustment buckle counter-clockwise to unlock, pull to desired length, then twist clockwise to lock.
- To attach the main unit to the handle, align the connection points and twist until securely fastened.

Image 3.2: Steps for adjusting the handle length and attaching the main unit.
3.3. Attaching Brush Heads
Select the appropriate brush head for your cleaning task. The device comes with 9 replaceable heads, including:
- Large Brush
- Small Brush
- Round Brush
- Corner Brush
- Coral Fleece Mop
- Detergent Cloth
- Short Pile Brush
- Absorbent Cloth
- Sponge Brush
To attach a brush head, align it with the rotating base of the main unit and press firmly until it clicks into place. To remove, pull it off.

Image 3.3: Overview of the 9 replaceable brush heads and their names.
4. Operating Instructions
4.1. Power On/Off and Speed Adjustment
The device features an LED digital display and three adjustable speed levels.
- Press the Power Switch to turn the device on. The display will show the current speed level.
- Press the Power Switch again to cycle through the speed levels: Level 1 (300 RPM - Slow and Soft), Level 2 (400 RPM - Power Saving), Level 3 (500 RPM - Fast & Strong).
- Press and hold the Power Switch to turn the device off.
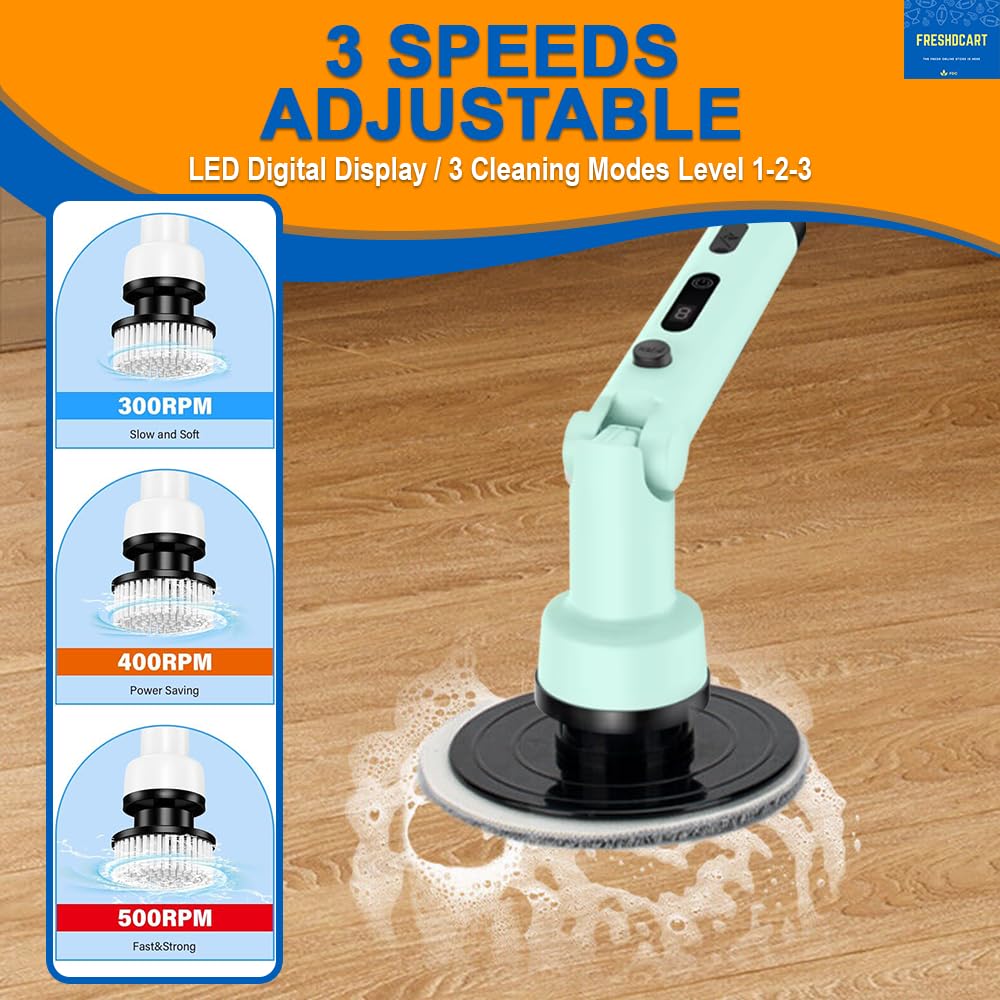
Image 4.1: The three adjustable speed settings and their recommended uses.
4.2. Adjusting Brush Head Angle
The brush head can be adjusted to multiple angles for flexible cleaning.
- Locate the Angle Adjustment Switch on the main unit.
- Press the switch and adjust the brush head to the desired angle (90°, 135°, or 180°). Release the switch to lock the angle.

Image 4.2: The multi-angle adjustable feature of the brush head for flexible cleaning.
4.3. General Usage Tips
- Always select the appropriate brush head for the surface and type of dirt.
- For stubborn stains, apply a suitable cleaning solution to the surface before scrubbing.
- Start with a lower speed setting and increase if necessary.
- Avoid excessive pressure; let the brush's rotation do the work.
- The device is splashproof, but avoid submerging the main unit in water.
5. Maintenance
5.1. Cleaning Brush Heads
After each use, remove the brush head and rinse it thoroughly under running water. For heavily soiled heads, use a mild detergent and allow them to air dry completely before storing.
5.2. Cleaning the Main Unit and Handle
Wipe the main unit and handle with a damp cloth. Do not use abrasive cleaners or immerse the main unit in water. Ensure the charging port is dry before recharging.
5.3. Storage
Store the FreshDcart Electric Cleaning Brush and its accessories in a cool, dry place, away from direct sunlight and out of reach of children.
6. Troubleshooting
If you encounter issues with your FreshDcart Electric Cleaning Brush, please refer to the following common solutions:
- Device not turning on: Ensure the battery is fully charged. Connect the charger and check the display.
- Brush not spinning or spinning slowly: Check the battery level. If low, recharge the device. Ensure the brush head is securely attached. Reduce pressure if applying too much force.
- Short operating time: The battery may not be fully charged, or it may be nearing the end of its lifespan. Ensure a full 3-hour charge.
- Unusual noise or vibration: Discontinue use immediately. Check for any foreign objects caught in the brush head or rotating mechanism. If the issue persists, contact customer support.
7. Specifications
| Feature | Detail |
|---|---|
| Brand | FreshDcart |
| Model Number | JY-7011 |
| Color | White |
| Material | Plastic |
| Battery Capacity | 2500 mAh |
| Charging Time | Approximately 3 hours |
| Working Time | Up to 90 minutes |
| Speed Levels | 3 (300 RPM, 400 RPM, 500 RPM) |
| Handle Features | Extendable, Grip Handle |
| Brush Heads | 9 replaceable heads |
| Product Dimensions | 10.8L x 2W x 33.5H Centimeters (main unit) |
| Item Weight | 1075 Grams (1 kg 80 g) |
| Special Features | Cordless, Rechargeable, Multi-angle adjustable head, LED display, Splashproof |

Image 7.1: Key specifications and performance metrics of the electric cleaning brush.
8. Warranty and Support
For warranty information, product registration, or technical support, please refer to the documentation included with your purchase or visit the official FreshDcart website. You may also contact FreshDcart customer service directly for assistance.
FreshDcart Customer Service: Please refer to your purchase receipt or the product packaging for contact details.