1. Introduction
Thank you for choosing the HMFOR Entryway Shoe Storage Cabinet. This manual provides detailed instructions for the assembly, operation, maintenance, and troubleshooting of your new shoe cabinet. Please read this manual thoroughly before assembly and use to ensure proper installation and safe operation.
1.1 Safety Information
General Safety Precautions:
- Ensure the cabinet is stable and not overloaded.
- Keep all small parts and packaging materials away from children during assembly.
- Always use the anti-tipping device provided to secure the cabinet to a wall, especially in homes with children or pets.
- Do not stand or climb on the cabinet.
- Place the cabinet on a flat, stable surface.

Image 1.1: Illustration of the anti-tipping device installation. This device is crucial for preventing the cabinet from tipping over, ensuring safety, especially around children.
2. Parts List
Before beginning assembly, please verify that all parts listed below are present and undamaged. If any parts are missing or damaged, please contact customer support.
| Part | Description | Quantity |
|---|---|---|
| A | Top Panel | 1 |
| B | Side Panels | 2 |
| C | Bottom Panel | 1 |
| D | Back Panel | 1 |
| E | Flip-Down Door (Upper) | 1 |
| F | Flip-Down Door (Lower) | 1 |
| G | Internal Shoe Racks | 4 |
| H | Adjustable Partitions | 2 |
| I | Legs | 4 |
| J | Hardware Pack (Screws, Dowels, Hinges, Anti-Tipping Kit) | 1 |
Note: The exact appearance of parts may vary slightly from illustrations. Refer to the included assembly diagram for precise identification.
3. Assembly Instructions
Assembly typically requires two adults and a Phillips head screwdriver. Follow the steps carefully.
- Step 1: Attach Legs to Bottom Panel.
Secure the four legs (Part I) to the bottom panel (Part C) using the screws from the hardware pack (Part J). Ensure they are tightly fastened.
- Step 2: Assemble the Main Frame.
Connect the side panels (Part B) to the bottom panel (Part C) and the top panel (Part A) using dowels and screws. Ensure all connections are secure and the frame is square.
- Step 3: Install Back Panel.
Slide or nail the back panel (Part D) into the grooves on the main frame. This adds stability to the cabinet.
- Step 4: Attach Flip-Down Doors and Internal Racks.
Attach the hinges to the flip-down doors (Parts E and F) and then secure them to the main cabinet frame. Install the internal shoe racks (Part G) within each compartment. The adjustable partitions (Part H) can be inserted into the racks as needed.

Image 3.1: Fully assembled shoe cabinet with shoes stored in the flip-down compartments.
- Step 5: Install Anti-Tipping Device.
Position the cabinet in its desired location. Using the anti-tipping kit from the hardware pack (Part J), secure the cabinet to the wall according to the instructions provided with the kit. This step is critical for safety.
Image 3.2: Detailed view of the anti-tipping device installation process.
4. Operating Instructions
4.1 Storing Shoes
The cabinet features two flip-down compartments designed for shoe storage. Gently pull the handle on each door to open the compartment. Place shoes with the toe facing inwards for optimal space utilization.

Image 4.1: The shoe cabinet shown in both its closed and open states, demonstrating the flip-down mechanism.
4.2 Adjustable Partitions
Each flip-down compartment includes an adjustable partition. This partition can be removed to accommodate larger shoes or boots, providing flexible storage options.

Image 4.2: Illustrates the flexibility of the adjustable partition. The top section shows shoes stored with the partition, while the bottom section shows boots stored after removing the partition.
4.3 Top Storage Shelf
The top surface of the cabinet serves as an additional storage shelf, ideal for placing small items such as keys, wallets, or decorative objects.

Image 4.3: Detail of the top storage shelf, highlighting its utility for everyday items.
4.4 Capacity
The cabinet is designed to accommodate various shoe sizes. With the partition, it can hold smaller shoes efficiently. Without the partition, it can store larger shoes or boots up to US size 13.5.

Image 4.4: Visual comparison demonstrating the HMFOR cabinet's superior capacity for larger shoe sizes (up to US size 13.5) compared to typical designs.
5. Maintenance
Regular maintenance will help prolong the life and appearance of your shoe cabinet.
- Cleaning: Wipe the cabinet surfaces with a soft, damp cloth. Avoid using harsh chemicals or abrasive cleaners, which can damage the finish.
- Dusting: Dust regularly with a dry, soft cloth.
- Spills: Immediately wipe up any spills to prevent water damage or staining.
- Hardware Check: Periodically check all screws and fasteners to ensure they remain tight. Retighten if necessary.
- Sunlight Exposure: Avoid prolonged exposure to direct sunlight, which can cause fading or warping of the wood finish.
6. Troubleshooting
If you encounter any issues with your shoe cabinet, refer to the following common problems and solutions.
| Problem | Possible Cause | Solution |
|---|---|---|
| Cabinet is wobbly or unstable. | Loose fasteners; uneven floor; anti-tipping device not installed. | Ensure all screws are tightened. Move to a level surface or use shims under legs. Install the anti-tipping device securely to the wall. |
| Flip-down doors do not close properly. | Hinges misaligned; obstruction inside compartment; overloaded. | Check hinge alignment and adjust if necessary. Remove any items obstructing the door. Reduce the number of shoes if overloaded. |
| Shoes do not fit in compartments. | Partition installed for large shoes; shoes are too large for the cabinet. | Remove the adjustable partition for larger shoes/boots. Note that very tall boots may not fit. Refer to capacity guidelines in Section 4.4. |
7. Specifications
Detailed specifications for the HMFOR Entryway Shoe Storage Cabinet.
| Feature | Detail |
|---|---|
| Brand | HMFOR |
| Model Number | 240913-XG-V1 |
| Color | Rustic Brown |
| Material | Wood (Top Material Type: Wood, Frame Material: Wood) |
| Finish Type | Rustic |
| Product Dimensions (D x W x H) | 9.65 x 31.5 x 34.65 inches |
| Item Weight | 48.8 pounds |
| Mounting Type | Wall Mount (with Anti-Tipping Device) |
| Installation Type | Freestanding |
| Number of Levels | 2 (Flip-down compartments) |
| Assembly Required | Yes |
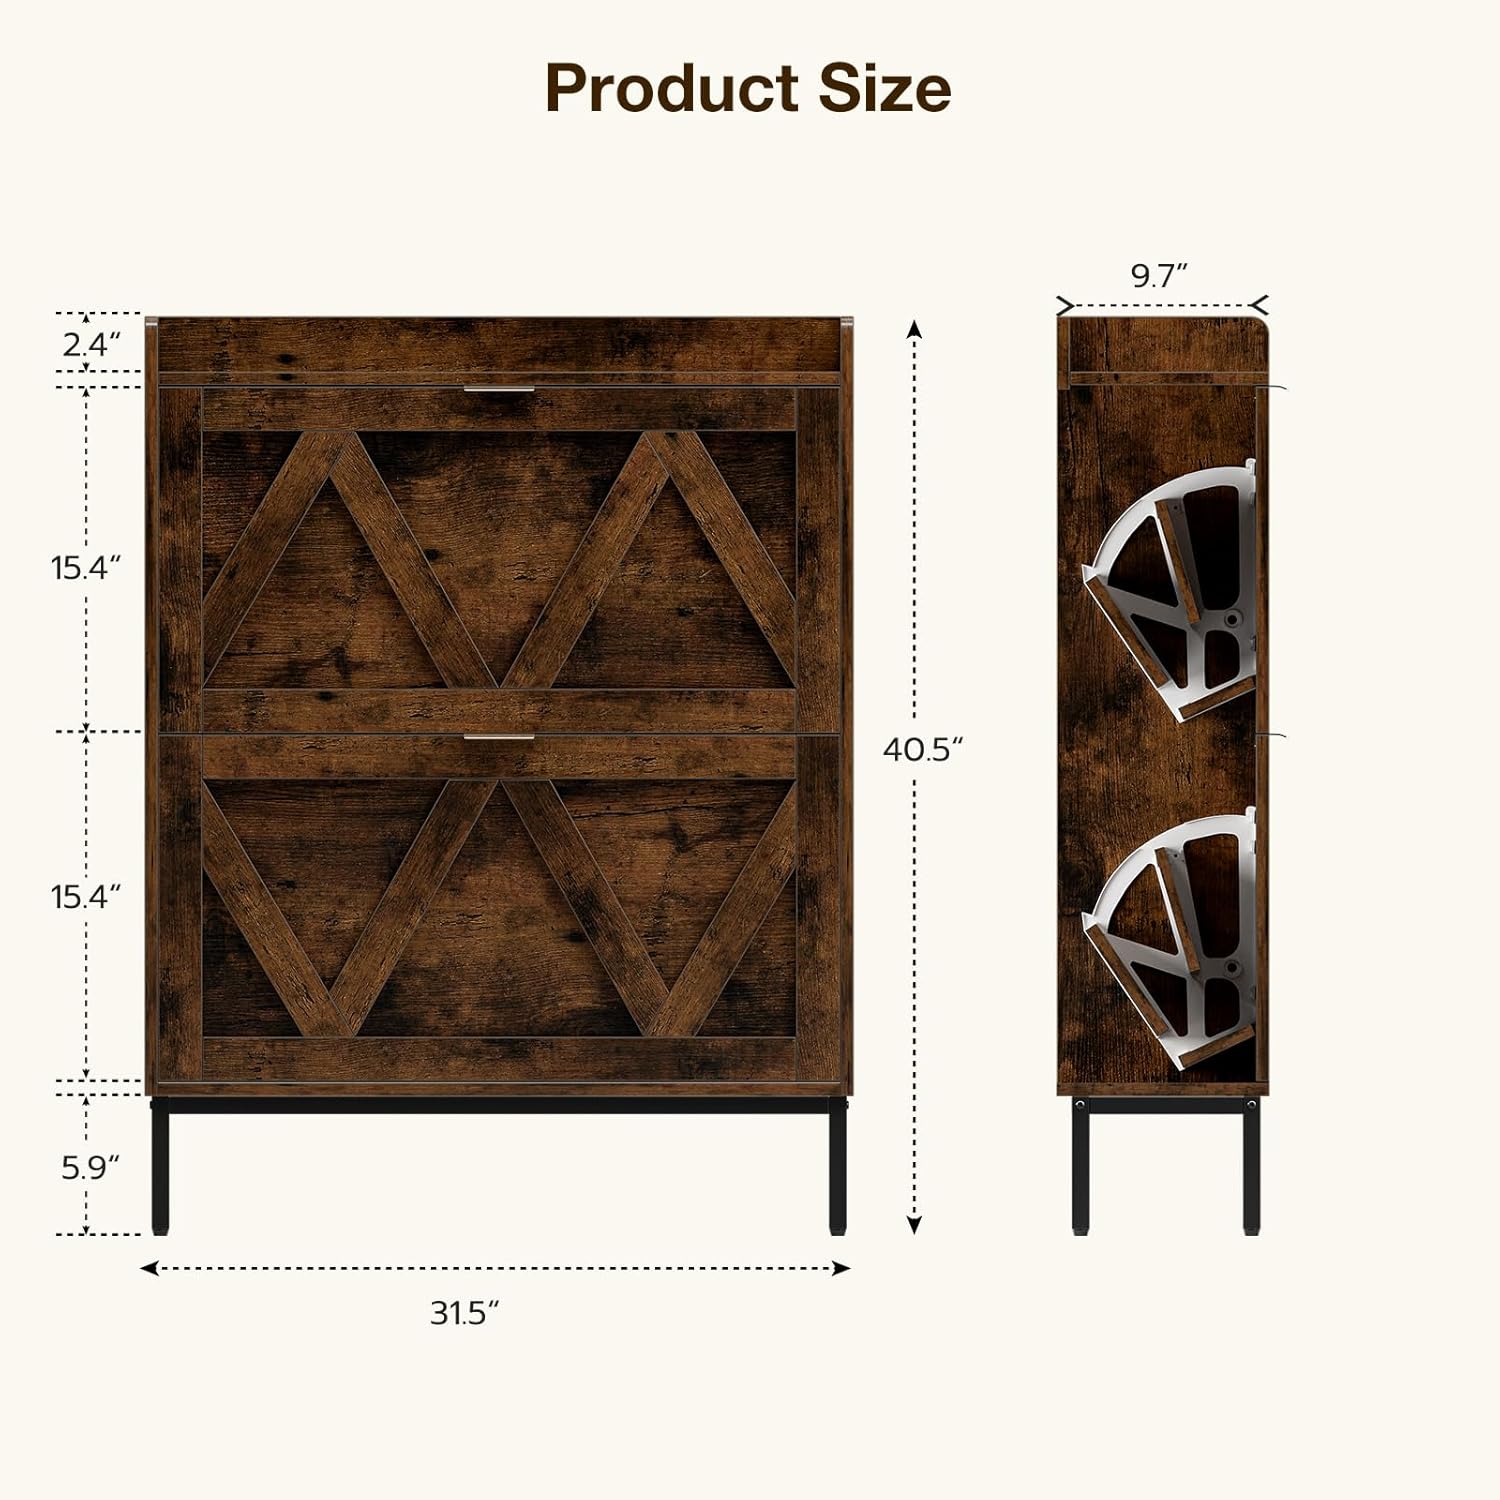
Image 7.1: Detailed product dimensions. Note that the image shows a height of 40.5 inches, while the text specifications state 34.65 inches. The depth is approximately 9.7 inches.
8. Warranty and Support
8.1 Warranty Information
This product comes with a standard manufacturer's warranty against defects in materials and workmanship. Please retain your proof of purchase for warranty claims. For specific warranty terms and conditions, refer to the documentation included with your purchase or contact HMFOR customer service.
8.2 Customer Support
If you have any questions, require assistance with assembly, or need to report missing/damaged parts, please contact HMFOR customer support. For further assistance, please visit the official HMFOR website or refer to the contact information provided with your product packaging.
Please have your model number (240913-XG-V1) and purchase date ready when contacting support.