1. Introduction
The Alxum HDMI DisplayPort USB 3.0 KVM Switch allows you to control two computers using a single set of peripherals (keyboard, mouse, monitors). This device supports dual monitor output for each computer, enabling seamless switching between systems for enhanced productivity in various environments.
2. Package Contents
- 1 x USB HDMI DP KVM Switch
- 2 x USB A to B cables
- 1 x Desktop Controller
- 1 x DC 5V Power Adapter
- 1 x User Manual
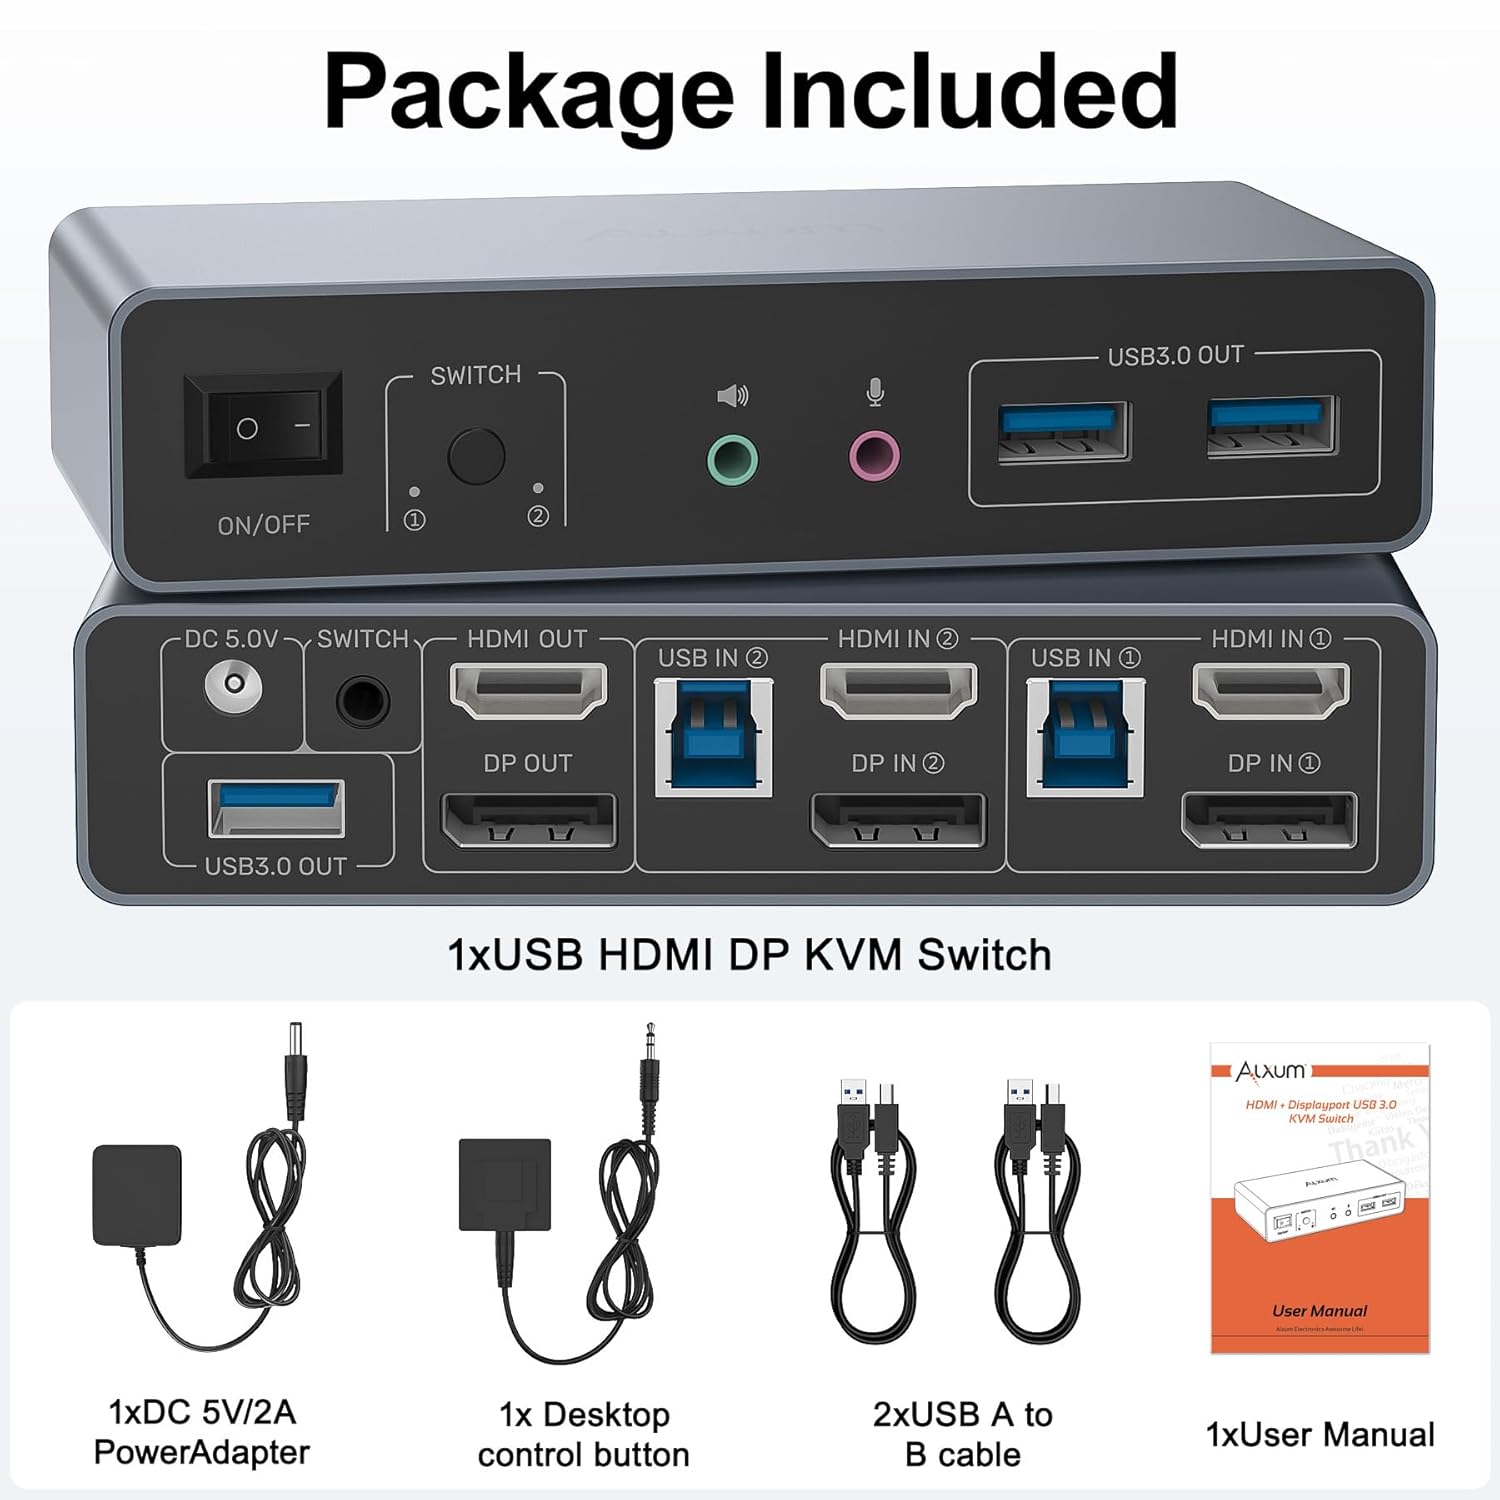
Figure 1: Package Contents
3. Product Overview
3.1 Front Panel
- ON/OFF Switch: Power control for the KVM switch.
- Switch Button: Manually switch between PC1 and PC2.
- Audio Output (Line Out): Connect headphones or speakers.
- Microphone Input (Mic In): Connect a microphone.
- USB 3.0 OUT Ports (x3): Connect USB peripherals like keyboard, mouse, USB drives, or printers.
3.2 Rear Panel
- DC 5V: Power input port.
- HDMI OUT: Connect to Monitor 1.
- DP OUT: Connect to Monitor 2.
- USB IN (PC1/PC2): Connect to the USB 3.0 port on your computer.
- HDMI IN (PC1/PC2): Connect to the HDMI output of your computer.
- DP IN (PC1/PC2): Connect to the DisplayPort output of your computer.
- Desktop Controller Port: Connect the included desktop controller for remote switching.

Figure 2: Connection Diagram
4. Setup Instructions
- Connect Computers:
For each computer (PC1 and PC2), connect one HDMI cable from the computer's HDMI output to the KVM switch's HDMI IN port, and one DisplayPort cable from the computer's DisplayPort output to the KVM switch's DP IN port. Additionally, connect a USB A to B cable from each computer's USB 3.0 port to the KVM switch's USB IN port. - Connect Monitors:
Connect your primary monitor to the KVM switch's HDMI OUT port. Connect your secondary monitor to the KVM switch's DP OUT port. Ensure you use 4K-compatible HDMI and DisplayPort cables for optimal results. - Connect Peripherals:
Connect your keyboard, mouse, USB drives, printer, or other USB 3.0 devices to the USB 3.0 OUT ports on the front panel of the KVM switch. - Connect Audio Devices:
If desired, connect your headphones/speakers to the Audio Output (Line Out) and your microphone to the Microphone Input (Mic In) on the front panel. - Connect Desktop Controller:
Plug the desktop controller into the dedicated port on the rear panel for convenient remote switching. - Power On:
Connect the DC 5V Power Adapter to the KVM switch's DC 5V port and plug it into a power outlet. Turn on the KVM switch using the ON/OFF switch.
Important Notes:
- To use dual-screen mode, both of your computers must be desktop PCs. This USB 3.0 KVM Switch is NOT recommended for use with laptops in dual-screen mode.
- All interfaces must be properly connected for the KVM switch to control two monitors with two computers.
- Always ensure the included DC 5V power adapter is connected when using the KVM switch, especially when connecting high-power equipment.
- For protection during transportation, the product is covered with a clear protective film. You can remove the clear protective film before use.
Video 1: Alxum USB 3.0 HDMI KVM Switch 2 Monitors to 2 Computers - This video demonstrates the connection process and functionality of the KVM switch, showing how to connect two computers to two monitors and share USB peripherals.
5. Operating Instructions
5.1 Switching Between Computers
You can instantly switch between the two connected computers using one of the following methods:
- Device Buttons: Press the 'Switch' button on the front panel of the KVM switch.
- Desktop Controller: Press the button on the included wired desktop controller.

Figure 3: Multiple Switching Methods
5.2 Display Modes
The KVM switch supports both Extend Mode and Mirror Mode for your dual monitor setup. To switch between these modes, you must set both computers to the desired mode simultaneously by operating on the monitor settings of each computer.
- Extend Mode: Each monitor displays different content, extending your desktop across two screens.
- Mirror Mode: Both monitors display the same content, duplicating your desktop.

Figure 4: Extend Mode and Mirror Mode
6. Troubleshooting
- No Display/Inconsistent Signal: Ensure all HDMI and DisplayPort cables are securely connected and are 4K-compatible. Verify that the DC 5V power adapter is connected and providing power. Check your computer's display settings to ensure the correct output mode (Extend/Mirror) is selected for both monitors.
- USB Peripherals Not Responding: Confirm that the USB A to B cables are correctly connected from both computers to the KVM switch. Try connecting the USB device to a different USB 3.0 OUT port on the KVM switch. Ensure the KVM switch is powered.
- Switching Issues: If the device button or desktop controller is not switching, ensure the desktop controller is properly plugged in. Try restarting the KVM switch by cycling its power.
- Laptop Compatibility: This KVM switch is primarily designed for desktop PCs for dual-screen output. Connecting a laptop for dual monitor output is not recommended and may result in unstable performance.
- Optimal 4K Resolution: For 4K@60Hz resolution, use high-quality, 4K-compatible HDMI and DisplayPort cables.
7. Specifications
| Feature | Specification |
|---|---|
| Model Number | SJW-DKM202B |
| Video Inputs | 2x HDMI, 2x DisplayPort |
| Video Outputs | 1x HDMI, 1x DisplayPort |
| USB Inputs | 2x USB 3.0 (Type-B) |
| USB Outputs | 3x USB 3.0 (Type-A) |
| Max Resolution | 4K@60Hz (backward compatible with 4K@30Hz, 1080p) |
| USB Data Transfer Speed | Up to 5Gbps |
| Audio Ports | 1x Line Out, 1x Mic In |
| Switching Methods | Device Button, Desktop Controller |
| Power Supply | DC 5V Power Adapter (Included) |
| Material | Aluminum |
| Product Dimensions | 13 x 6.25 x 2.96 cm |
| Item Weight | 490 g |
8. Warranty and Support
Alxum is committed to providing high-quality products and excellent customer service. If you have any questions before purchase or during use, please contact us. We offer 24-hour customer-friendly support service to assist you with any inquiries or issues.
Please refer to the product packaging or the official Alxum website for specific warranty details and terms.


