1. Introduction
This manual provides essential information for the safe and effective installation, operation, and maintenance of your Sekelo SK018 63A 110V Automatic/Manual Transfer Switch. This device is designed to manage power supply by automatically or manually switching between two independent 110V power sources, such as public utility power (L1) and a backup generator or inverter (L2). It ensures continuous power for critical applications by prioritizing the L1 source and switching to L2 upon L1 failure, then returning to L1 when restored.

The SK018 is equipped with an LED display for real-time monitoring of voltage and operating status, along with comprehensive protection features against overvoltage, undervoltage, and overcurrent. Its compact design allows for standard DIN rail mounting, making it suitable for various industrial, commercial, and residential applications requiring a stable and reliable power supply.
2. Safety Information
WARNING: Electrical shock hazard. Installation and servicing must be performed by qualified personnel only. Failure to follow these instructions may result in serious injury or death.
- Always disconnect all power sources before installing or servicing the transfer switch.
- Ensure proper grounding of the device.
- Verify that the voltage and current ratings of the transfer switch match your application requirements.
- Do not operate the device if it appears damaged.
- Keep children away from electrical equipment.
- Adhere to all local and national electrical codes.
3. Package Contents
Upon opening the package, verify that all items are present and undamaged:
- 1 x Sekelo SK018 Automatic/Manual Transfer Switch
- 1 x DIN Rail (for mounting)
- 1 x User Manual (this document)
4. Specifications
| Parameter | Value |
|---|---|
| Model Number | SK018 |
| Current Rating | 63 Amps |
| Operating Voltage | 110 Volts |
| Operation Mode | Automatic / Manual (ON-OFF-ON) |
| Frequency | 50/60 Hz |
| Contact Type | Normally Closed |
| Connector Type | Plug In (Screw Terminals) |
| Actuator Type | Push Button |
| Circuit Type | 2-way |
| Product Dimensions (L x W x H) | 4.3 x 3.5 x 3.3 inches (109 x 89 x 84 mm) |
| Weight | 13.12 ounces (372 grams) |
| Operating Temperature | -25°C to +50°C |
| Storage Temperature | -25°C to +55°C |
| Permissible Relative Humidity | ≤ 50% at 40°C (Without Condensation) |
| Certifications | CE Certified |
5. Installation
The Sekelo SK018 is designed for standard DIN rail mounting, offering a compact and efficient installation process. Ensure all power is disconnected before proceeding.
5.1 Mounting
- Select a suitable location within an electrical panel or enclosure that provides adequate ventilation and protection from environmental factors.
- Secure the provided DIN rail to the chosen surface using appropriate fasteners.
- Align the transfer switch with the DIN rail and press firmly until it clicks into place. Ensure it is securely fastened.

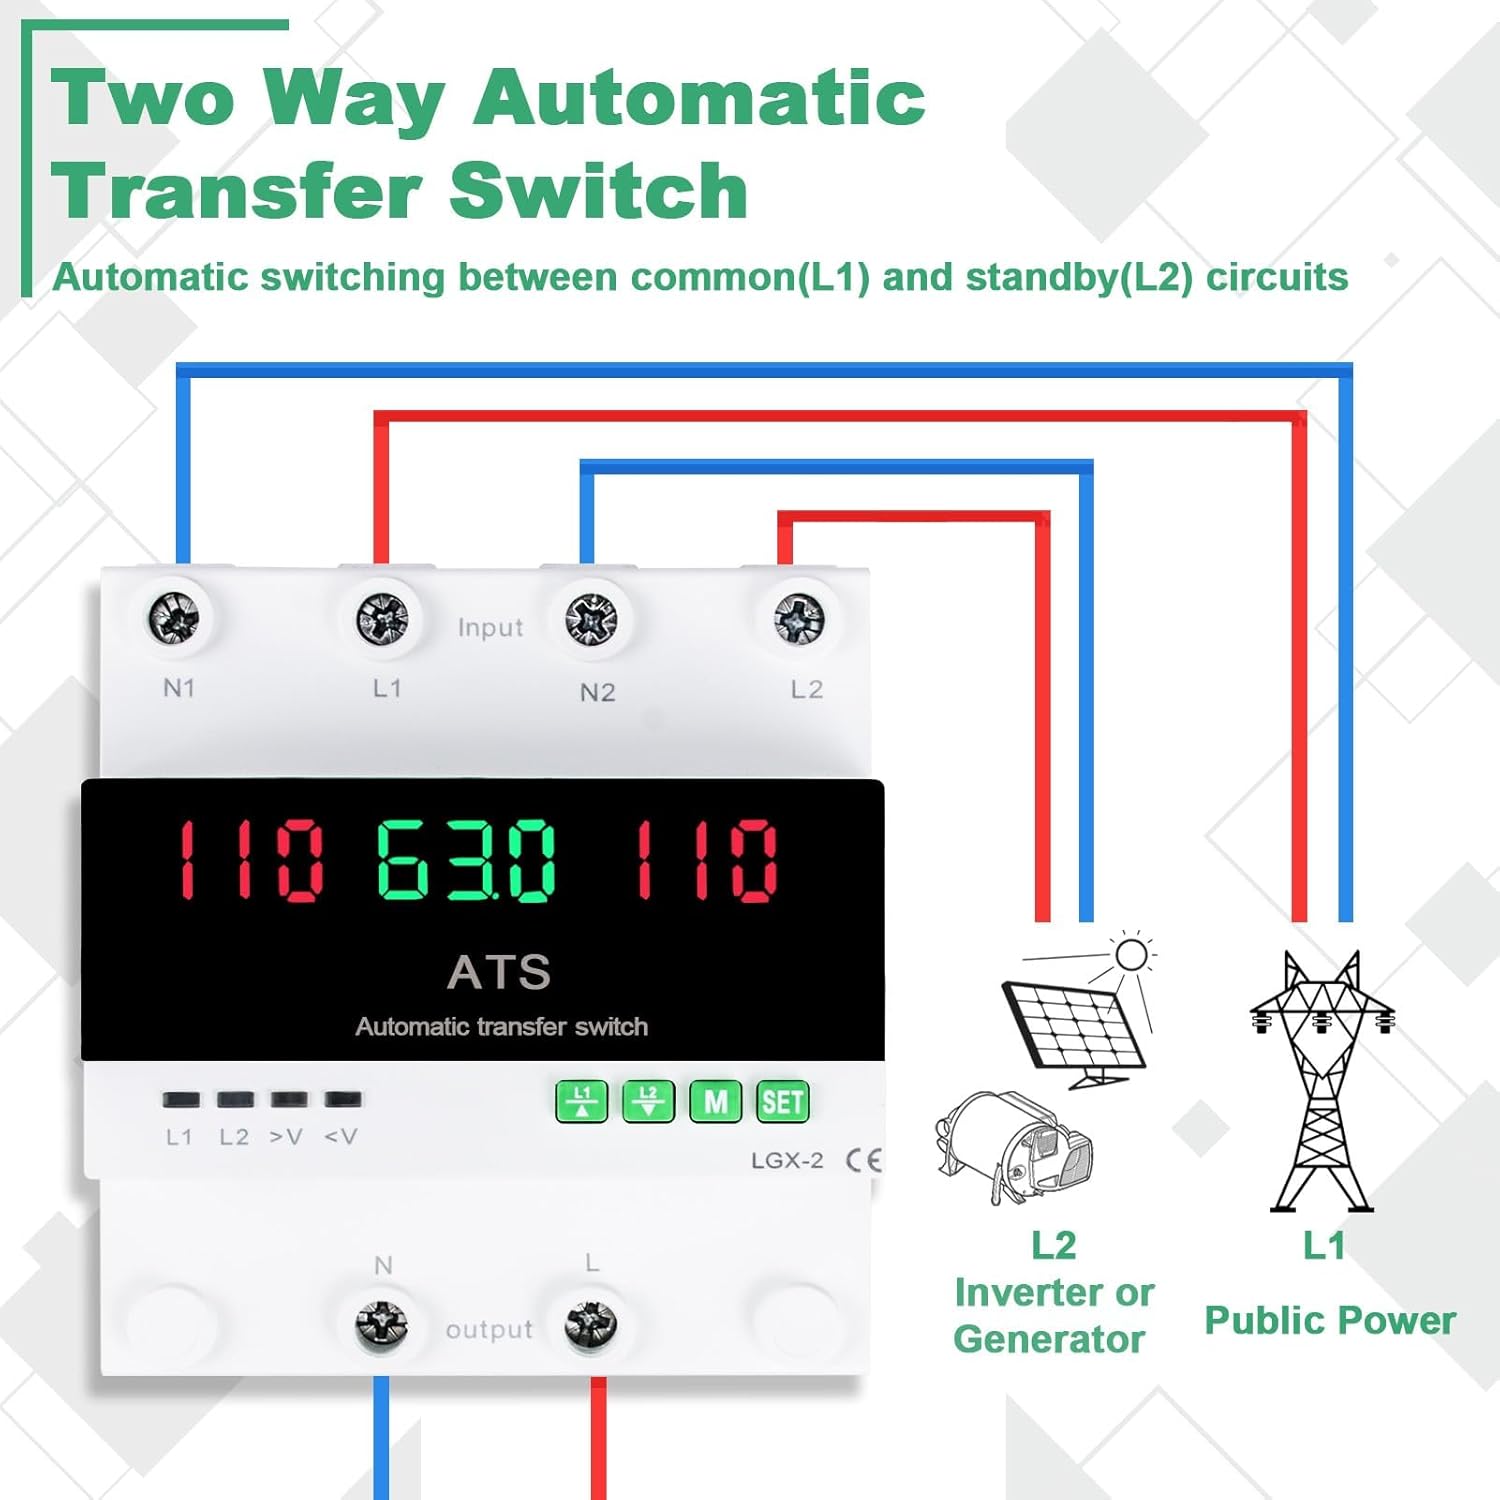
5.2 Wiring Diagram
Follow the wiring diagram carefully. Incorrect wiring can lead to device malfunction or electrical hazards. The device supports two input power sources (L1 and L2) and one output.
- L1 Input: Connect your primary power source (e.g., public utility power) to the L1 and N1 terminals.
- L2 Input: Connect your secondary power source (e.g., generator, inverter) to the L2 and N2 terminals.
- Output: Connect your load to the 'output' L and N terminals.
- Ensure all connections are tight and secure.

6. Operation
The Sekelo SK018 transfer switch offers both automatic and manual switching capabilities, along with an informative LED display.
6.1 LED Display and Indicators
The high-definition LED display and status indicators provide real-time information about the system's status.

- L1/L2 Voltage Display: Shows the current voltage of the respective power source.
- Current Display: Shows the current flowing through the switch.
- L1/L2 Output Indication: Lights indicate which source is currently supplying power to the output.
- >V (Overvoltage Indicator): Illuminates when an overvoltage condition is detected.
- <V (Undervoltage Indicator): Illuminates when an undervoltage condition is detected.
6.2 Automatic Switching
The device is configured to prioritize the L1 power source. In automatic mode:
- When L1 is stable and within acceptable parameters, the switch will connect the load to L1.
- If L1 experiences voltage irregularities or failure, the switch will automatically transfer the load to L2 (if L2 is stable).
- Once L1 is restored and stable, the switch will automatically transfer the load back to L1, ensuring uninterrupted power stability.
6.3 Manual Switching
You can manually switch between L1 and L2 as needed. The manual switching buttons are labeled L1 and L2 on the front panel.

- To connect the load to L1, press the L1 button. Press again to open (disconnect) L1.
- To connect the load to L2, press the L2 button. Press again to open (disconnect) L2.
- The M SET button is used for menu selection and resetting parameters. Refer to the detailed parameter settings in the full product documentation for advanced configuration.
7. Features
The Sekelo SK018 incorporates advanced features to ensure reliable and safe power transfer:
7.1 Comprehensive Protection
The device is equipped with multiple protection mechanisms to safeguard connected equipment and ensure system stability.

- Overvoltage Protection: Automatically disconnects the load if the input voltage exceeds a safe threshold (e.g., AC140V).
- Undervoltage Protection: Automatically disconnects the load if the input voltage drops below a safe threshold (e.g., AC90V).
- Overcurrent Protection: Monitors the current draw and disconnects the load if it exceeds the rated capacity (63A) to prevent damage.
These protection parameters are pre-set for common applications but can be adjusted via the menu settings to meet specific requirements. Refer to the detailed parameter adjustment guide in the full product documentation.
7.2 Microcontroller Technology
The internal microcontroller ensures precise and rapid detection of power fluctuations, enabling quick and reliable switching between power sources. This technology contributes to the device's stability and accuracy in monitoring circuit performance.
8. Troubleshooting
If you encounter issues with your Sekelo SK018 transfer switch, refer to the following common problems and solutions:
- No Power to Load:
- Check if both L1 and L2 power sources are active and stable.
- Verify all wiring connections are secure and correct according to the wiring diagram.
- Check the LED display for overvoltage (>V) or undervoltage (<V) indicators, which may indicate a protection trip.
- Ensure the manual switch is not in an 'open' position for both L1 and L2.
- Switch Not Transferring Automatically:
- Confirm that the L1 source is indeed unstable or failed for automatic transfer to L2 to occur.
- Ensure L2 is stable and within operational voltage limits.
- Check for any error codes or indicators on the LED display.
- Inaccurate Voltage Readings:
- Verify the input voltage with a multimeter to compare against the display.
- Ensure connections are clean and free from corrosion.
For persistent issues or complex problems, contact Sekelo customer support.
9. Maintenance
The Sekelo SK018 transfer switch requires minimal maintenance to ensure optimal performance and longevity.
- Regular Inspection: Periodically inspect the device for any signs of physical damage, loose connections, or discoloration.
- Cleaning: Keep the device clean and free from dust and debris. Use a dry, soft cloth for cleaning. Do not use liquid cleaners or solvents.
- Connection Checks: Annually, or as needed, verify that all terminal connections are tight and secure.
- Environmental Conditions: Ensure the operating environment remains within the specified temperature and humidity ranges.
WARNING: Always disconnect power before performing any maintenance or inspection.
10. Warranty and Support
For warranty information, technical support, or service inquiries, please contact Sekelo customer service through the retailer where the product was purchased or refer to the official Sekelo website for contact details. Please have your model number (SK018) and purchase date available when contacting support.

