1. Important Safety Information
Read all instructions thoroughly before installation and operation. Failure to follow these instructions could result in property damage, personal injury, or death. Keep this manual for future reference.
- This appliance must be installed by a qualified professional in accordance with all local codes and regulations.
- Ensure proper ventilation. A smoke exhaust pipe is required for safe operation.
- This unit is designed exclusively for use with Natural Gas (LNG). Do not attempt to use with Propane (LPG).
- Do not store or use gasoline or other flammable vapors and liquids in the vicinity of this or any other appliance.
- Regularly inspect the unit for any signs of damage or leaks.
- In cold weather, drain residual water from the unit if it will not be used for an extended period to prevent freezing damage.
- The unit features multiple safety protections including flame failure device, anti-freeze protection, and overheating protection. However, proper installation and maintenance are crucial.
2. Product Overview
The VELPAX Natural Gas Tankless Water Heater provides on-demand hot water with high efficiency. It features a compact design, digital temperature display, and multiple safety features.
2.1. Key Features
- Capacity: 4.74 GPM (18L) hot water delivery.
- Fuel Type: Natural Gas (LNG) only.
- Temperature Range: Adjustable between 95°F (35°C) and 149°F (65°C).
- Safety: Flame failure device, anti-freeze protection, overheating protection, dry burning protection, corrosion protection, overpressure protection, short circuit protection.
- Efficiency: High-performance output of 68,000 BTU per hour.
- Display: LED smart digital display for temperature control.
2.2. Package Contents
Verify that all components are present before beginning installation.
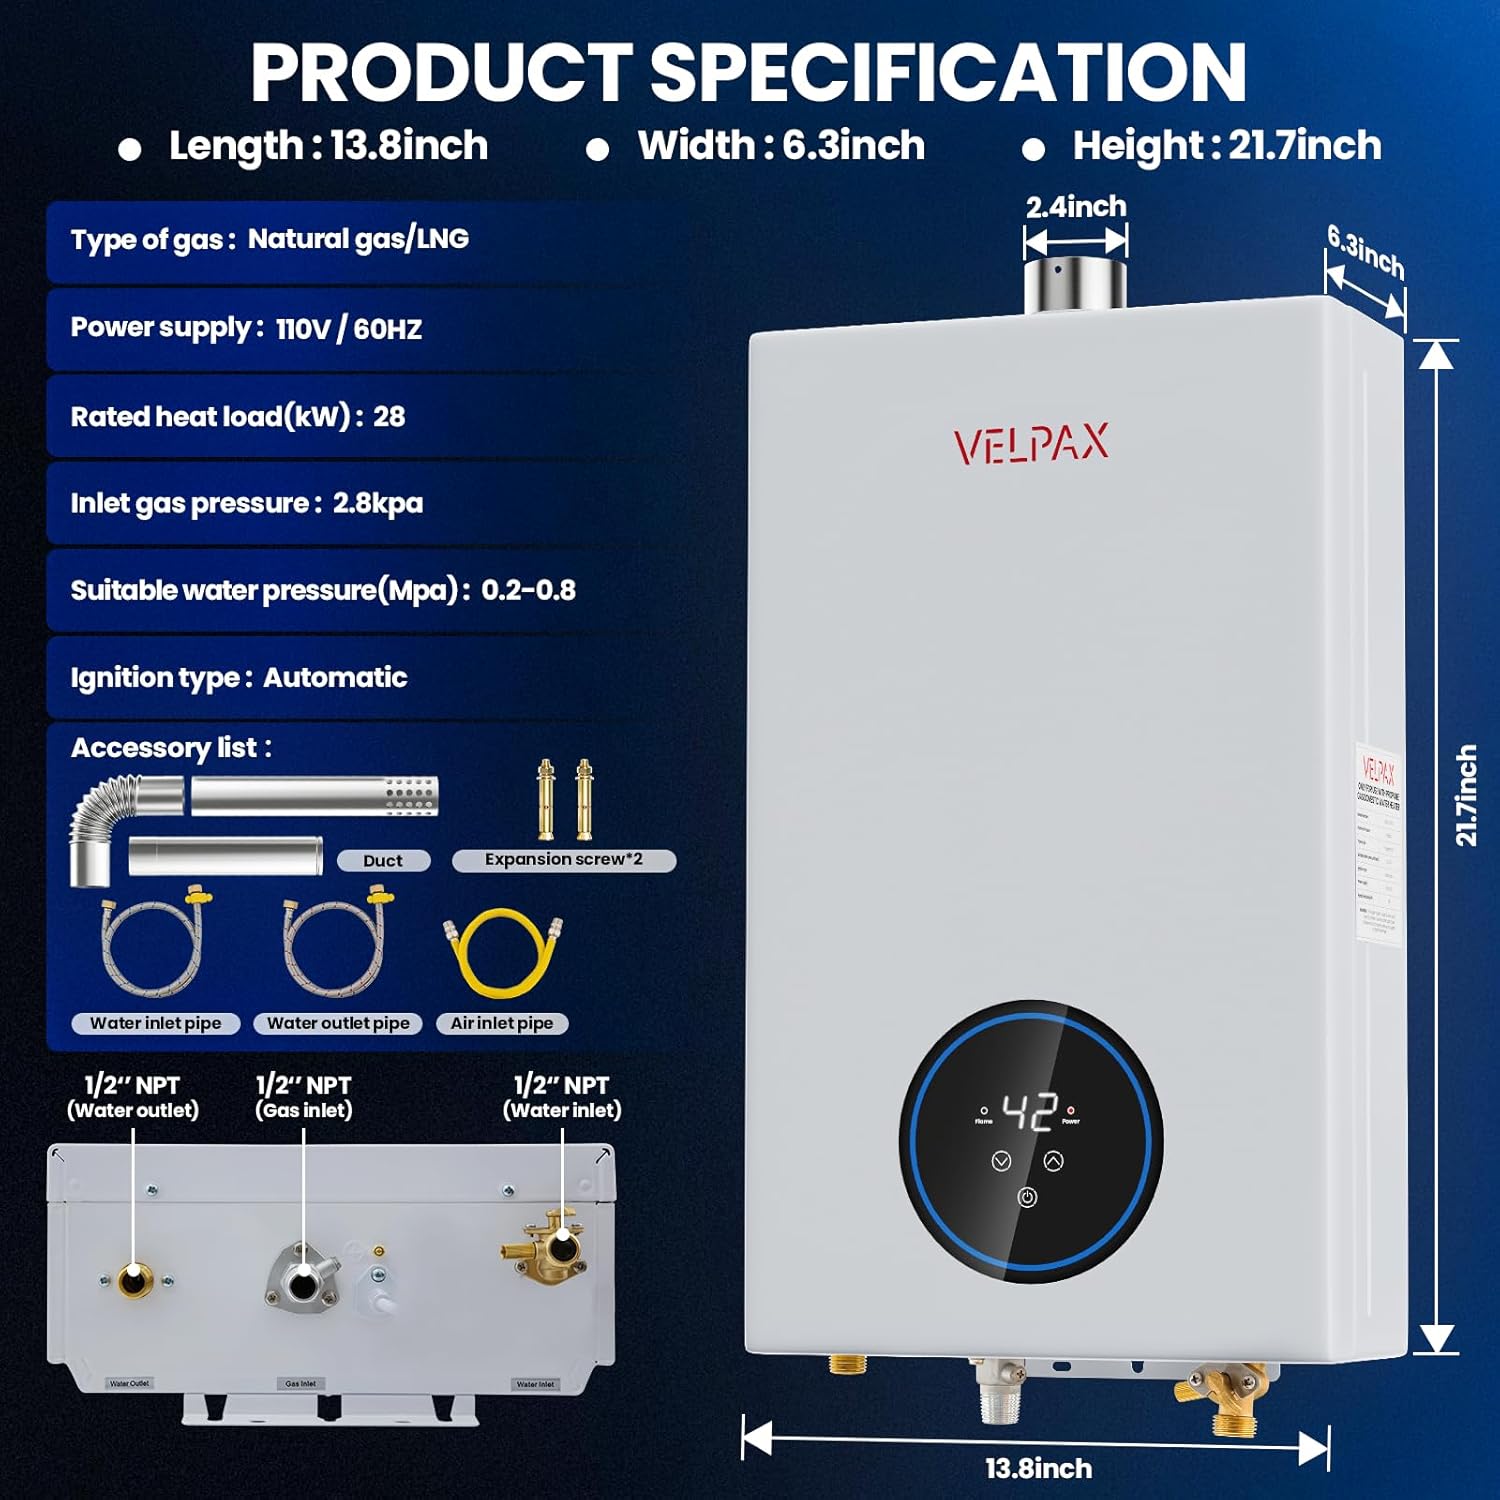
Figure 1: VELPAX Natural Gas Tankless Water Heater with included accessories. This image shows the main unit, two sections of vent pipe, a flexible gas hose, two flexible water hoses, and two expansion screws for mounting.
- VELPAX Natural Gas Tankless Water Heater Unit
- Horizontal Vent Pipe (2.5" diameter, two sections)
- Gas Pipe (flexible hose)
- Inlet Water Pipe (flexible hose, 1/2" NPT)
- Outlet Water Pipe (flexible hose, 1/2" NPT)
- Expansion Screws (x2)
- User Manual (this document)
3. Installation and Setup
This section provides general guidelines for installation. Professional installation is strongly recommended.
3.1. Site Requirements
- Install indoors only.
- Ensure adequate ventilation and a clear path for the exhaust pipe.
- The mounting surface must be capable of supporting the unit's weight (approximately 24.7 lbs).
- Access to a standard 110V/60Hz power supply is required for ignition and fan operation.
- Minimum water pressure of 3.6 PSI is required for operation.
3.2. Mounting the Unit
- Select a suitable indoor location, away from flammable materials and with proper ventilation.
- Mark the drilling points for the expansion screws on the wall, referring to the unit's dimensions (13.8"W x 21.7"H).
- Drill holes and insert the expansion screws.
- Mount the water heater securely to the wall.
3.3. Connecting Water and Gas Lines

Figure 2: Connection points for water inlet, water outlet, and gas inlet. The water inlet is on the right, gas inlet in the center, and water outlet on the left.
- Connect the cold water supply line to the Water Inlet (1/2" NPT) on the right side of the unit.
- Connect the hot water output line to the Water Outlet (1/2" NPT) on the left side of the unit.
- Connect the Natural Gas supply line to the Gas Inlet in the center. Ensure all gas connections are tight and leak-free. A gas regulator may be required (not included).
- Use a small portable spanner to ensure secure connections for water and air hoses.
- After connecting water lines, slowly open the main water supply valve and check for leaks.

Figure 3: Step-by-step visual guide for connecting water hoses and adjusting the water volume knob. The left image shows connecting a hose with a spanner, and the right image shows rotating the knob to adjust water flow.
3.4. Exhaust Venting
- Install the provided 2.5" horizontal vent pipe to safely exhaust combustion gases to the outside.
- Ensure the vent pipe is properly sealed and angled to prevent back-drafting and water ingress.
- Consult local building codes for specific venting requirements.
3.5. Electrical Connection
- Plug the power cable into a grounded 110V/60Hz electrical outlet.
4. Operating Instructions
The VELPAX tankless water heater features an intuitive LED digital display for easy operation.
4.1. Digital Display and Controls

Figure 4: The LED digital display showing temperature, flame indicator, power indicator, and touch buttons for temperature adjustment and power.
- Temperature Display: Shows the current hot water output temperature in Fahrenheit.
- Temperature Up Button (▲): Press to increase the desired water temperature.
- Temperature Down Button (▼): Press to decrease the desired water temperature.
- Switch Button (ⓘ): Press to turn the unit ON or OFF.
- Flame Indicator: Illuminates when the burner is active.
- Power Indicator: Illuminates when the unit is powered on.
4.2. Initial Startup
- Ensure all water and gas connections are secure and leak-free.
- Open the main gas supply valve.
- Open a hot water faucet in your home to allow water to flow through the unit.
- Press the Switch Button (ⓘ) on the unit's display to turn it on.
- The unit will automatically ignite and begin heating water. Adjust the temperature using the Up (▲) and Down (▼) buttons to your desired setting (95°F - 149°F).
- Close the hot water faucet once the desired temperature is reached and stable. The unit will enter standby mode.
4.3. Normal Operation
- To obtain hot water, simply open any hot water faucet in your home. The unit will detect water flow and automatically activate to heat the water to the set temperature.
- The unit requires a minimum water flow rate to activate. If the water flow is too low, the unit may not ignite or may cycle on and off.
- The advanced combustion technology ensures a constant temperature output.
5. Maintenance
Regular maintenance ensures optimal performance and extends the lifespan of your water heater.
- Annual Inspection: It is recommended to have a qualified technician inspect the unit annually, including gas connections, water connections, and the exhaust system.
- Draining for Cold Weather: If the unit will not be used for an extended period in cold weather, it is crucial to drain all residual water to prevent freezing. To do this, turn off the gas and water supply, then open the pressure relief valve and any hot water faucets to allow water to drain completely.
- Cleaning: Keep the exterior of the unit clean with a soft, damp cloth. Do not use abrasive cleaners or solvents.
- Vent Pipe: Periodically check the exhaust vent pipe for any obstructions or damage.
6. Troubleshooting
This section addresses common issues you might encounter. For problems not listed here or if issues persist, contact a qualified technician.
| Problem | Possible Cause | Solution |
|---|---|---|
| No hot water / Unit does not ignite |
|
|
| Inconsistent hot water temperature |
|
|
| Unit leaks water |
|
|
| Error code on display | Internal fault or sensor issue | Note the error code and consult a professional technician. |
7. Specifications
Technical specifications for the VELPAX Natural Gas Tankless Water Heater.
| Feature | Specification |
|---|---|
| Brand | VELPAX |
| Model Number | HWRSQ-18L-001 |
| Product Dimensions (W x H) | 13.8" x 21.7" |
| Item Weight | 24.7 pounds |
| Fuel Type | Natural Gas (LNG) |
| Water Flow Rate | 4.74 GPM (18L) |
| Rated Heat Load | 68,000 BTU/hour (28 kW) |
| Maximum Temperature | 149°F (65°C) |
| Minimum Temperature | 95°F (35°C) |
| Minimum Water Pressure | 3.6 PSI (0.025 MPa) |
| Power Supply | 110V/60Hz |
| Mounting Type | Wall-mounted |
| Special Features | Multiple Safety Protections, Advanced Combustion Technology, LED Smart Digital Display, Easy Installation |
| UPC | 717504332390 |
8. Warranty and Support
Specific warranty details are not provided in the product information. Please refer to the product packaging or contact the manufacturer directly for warranty information and customer support.
For technical assistance or inquiries, please visit the VELPAX official website or contact their customer service department.
Manufacturer: VELPAX


