1. Introduction
Thank you for choosing the WANLIPO A13 Dual Channel Dash Cam. This device is designed to record your driving journey in high definition, providing crucial evidence in case of incidents. It features 4K front recording, 2.5K rear recording, 5GHz WiFi connectivity, built-in GPS, G-sensor, loop recording, and parking monitoring. Please read this manual thoroughly before use to ensure proper installation and operation.
2. Safety Information
- Do not operate the dash cam or access its settings while driving.
- Ensure the dash cam is securely mounted and does not obstruct your view of the road.
- Use only the provided power cable and accessories to prevent damage or fire.
- Avoid exposing the device to extreme temperatures, direct sunlight for prolonged periods, or moisture.
- Keep the lens clean for optimal recording quality.
- Do not attempt to disassemble or repair the device yourself. Contact customer support for assistance.
3. Package Contents
Verify that all items are present in the box:
- 1 x WANLIPO A13 Front Dash Camera
- 1 x Rear Camera
- 1 x Suction Cup Mount
- 1 x Cigarette Lighter with Type C Car Charger (11.5ft/3.5m)
- 1 x 64GB Memory Card (pre-installed in the dashcam)
- 1 x User Manual
- 1 x Crowbar
- 4 x Cable Clamps
- 1 x Reset Pin

Image: All components included in the WANLIPO A13 Dash Cam package, laid out for clear identification.
4. Product Overview
The WANLIPO A13 Dash Cam is a compact and feature-rich device designed for comprehensive vehicle surveillance. It includes a front camera with a 2.0" IPS screen and a separate rear camera.

Image: The WANLIPO A13 front dash camera, rear camera, 64GB SD card, and a smartphone displaying the dash cam's app interface with GPS tracking and 5GHz WiFi indicator.

Image: The WANLIPO A13 Mini Dual Dash Cam mounted on a windshield, with icons highlighting its key features: 4K Ultra HD Video, 5G WiFi & App Control, GPS, WDR, Seamless Loop Recording, Front 170° Rear 120° wide angle, G-sensor, Super Night Vision, and Parking Monitor.
5. Setup
5.1. SD Card Insertion
- Ensure the dash cam is powered off.
- Locate the SD card slot on the side of the dash cam.
- Insert the provided 64GB SD card (or another compatible card, up to 256GB) into the slot until it clicks into place.
- To remove, gently push the card in until it springs out.
5.2. Front Camera Installation
- Clean the windshield area where you intend to mount the dash cam.
- Attach the suction cup mount to the front dash cam.
- Press the suction cup firmly against the windshield, ideally behind the rearview mirror, and secure the lever.
- Adjust the camera angle to ensure a clear view of the road ahead.
5.3. Rear Camera Installation
- Connect the rear camera cable to the AV-IN port on the front dash cam.
- Route the rear camera cable neatly along the vehicle's headliner and pillars to the rear of the vehicle. Use the provided cable clamps and crowbar to tuck the cable.
- Mount the rear camera on the rear windshield using its adhesive, ensuring it has a clear view.
5.4. Power Connection
- Connect the Type-C end of the car charger to the dash cam's power input.
- Plug the cigarette lighter adapter into your vehicle's 12V power outlet.
- Route the power cable neatly to avoid obstructing driving.

Image: A diagram illustrating the easy installation of the WANLIPO A13 Dash Cam, showing the front camera with suction cup mount, the rear camera, and the power connection via a Type-C car charger. It also shows the suction cup mount and the rear camera mounted on a rear windshield.

Image: A detailed wiring diagram for the WANLIPO A13 Dash Cam, showing how the front camera connects to the car charger and the rear camera, with suggested cable routing paths within a car.
6. Operating Instructions
6.1. Power On/Off & Basic Recording
- The dash cam will automatically power on and begin recording when your vehicle's ignition is turned on.
- It will automatically power off when the ignition is turned off.
- To manually power on/off, press and hold the power button.
6.2. Menu Navigation
- Use the navigation buttons (Up, Down, Menu, OK) on the side of the dash cam to access and adjust settings on the 2.0" IPS screen.
- Press the 'Menu' button to enter the settings menu.
- Use 'Up'/'Down' to scroll through options and 'OK' to select.
6.3. Video Resolution
The dash cam records in 4K (3840*2160P) for the front camera and 2.5K for the rear camera. These settings are typically default and provide high clarity for identifying details like license plates.

Image: Comparison of video clarity from the WANLIPO A13 Dash Cam, showing a clear 4K front view capturing a license plate and a clear 2.5K rear view capturing another license plate.
6.4. Loop Recording
The dash cam features intelligent loop recording. When the memory card is full, the oldest files are automatically overwritten by new recordings, ensuring continuous operation without manual intervention. You can set the duration of each video segment in the settings.

Image: An illustration demonstrating the seamless loop recording feature of the WANLIPO A13 Dash Cam, showing continuous video segments being recorded and older files being overwritten when the storage is full. It also indicates recording times for different SD card capacities.
6.5. G-Sensor (Automatic Incident Detection)
The built-in G-sensor detects sudden impacts or collisions. When an event is detected, the dash cam automatically locks the current video footage, preventing it from being overwritten by loop recording. This ensures critical evidence is preserved.

Image: A visual representation of the WANLIPO A13 Dash Cam's built-in G-Sensor, showing a car collision and a lock icon, indicating that footage is automatically secured during an impact.
6.6. Parking Monitoring Mode
When enabled, the parking monitoring function activates the dash cam to record a 15-second emergency video if it detects a strong vibration or impact while the vehicle is parked and turned off. This video is locked to prevent overwriting. Note: This function requires a hardwire kit (sold separately, ASIN: B0F1JZR1M5) for continuous power.
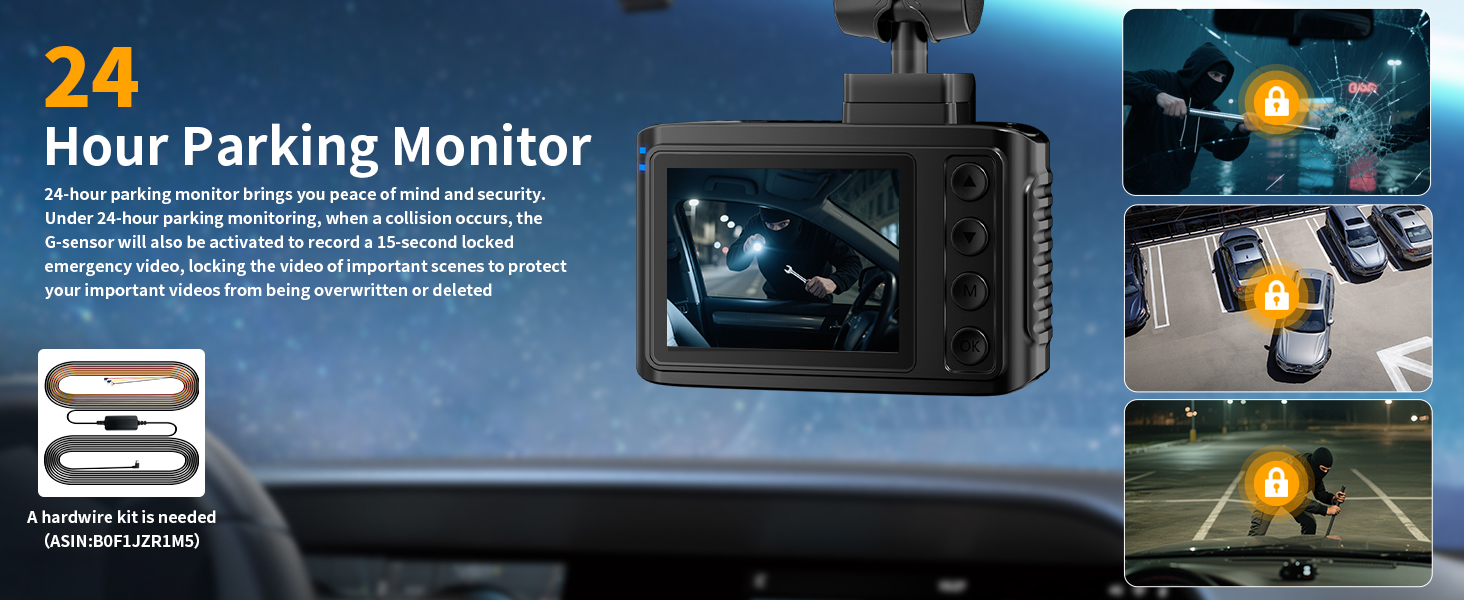
Image: The WANLIPO A13 Dash Cam screen displaying a parking monitor scenario, with additional images showing various parking incidents like theft, collision, and vandalism, highlighting the 24-hour parking monitor feature. A hardwire kit is shown as a requirement.
6.7. Night Vision (WDR, F1.8 Aperture, 6-Layer Lens)
The dash cam is equipped with a premium F1.8 aperture and a 6-layer optical lens, combined with WDR (Wide Dynamic Range) technology, to enhance clarity and capture details in low-light conditions, ensuring clear footage even at night.

Image: A night scene captured by the WANLIPO A13 Dash Cam, demonstrating its Super Night Vision capabilities with F1.8 aperture, WDR, and a 6-layer lens for clear footage in dark environments.
6.8. 5GHz WiFi Connection & App Control
The dash cam features 5GHz WiFi for faster video downloads and seamless app control. The 'Viidure' app allows you to view live footage, playback recordings, download videos, and adjust settings directly from your smartphone.
- Press the power button to turn on the dash cam. Long press the UP button to turn on WiFi.
- Download the 'Viidure' app from the App Store (iOS) or Google Play (Android).
- Open the 'Viidure' app and grant necessary permissions.
- In the app, click 'Connect device', find the dash cam's WiFi network (e.g., DC-XXXX), and enter the default password (12345678).
- Once connected, you can use the app to control the dash cam and manage recordings.
Note: The 'Viidure' app does not require VIP for basic functions like online video viewing, front/rear view switching, playback, video downloading, and camera setup. Some advanced features like video speed adjustment, timeline viewing, and cloud disk uploads may require membership.

Image: A smartphone displaying the WANLIPO A13 Dash Cam's app interface, showing video playback and social media sharing options, emphasizing the built-in 5GHz WiFi for faster downloads and sharing.
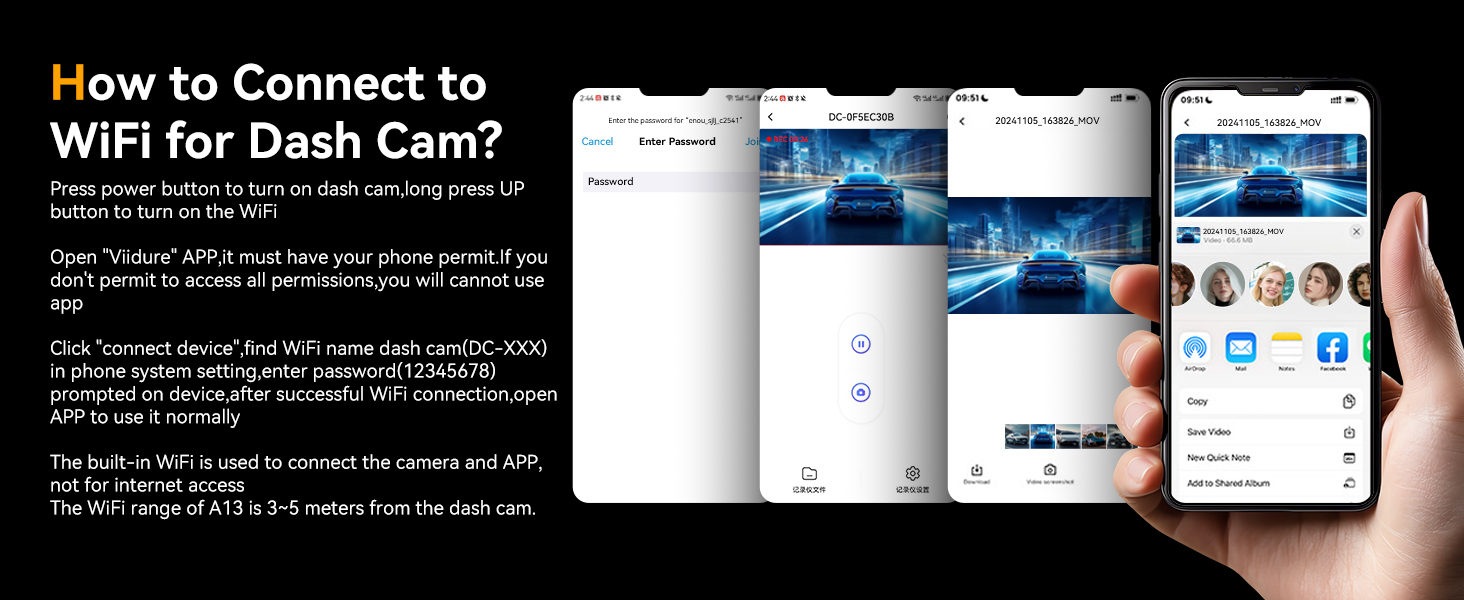
Image: A step-by-step guide on how to connect the WANLIPO A13 Dash Cam to WiFi using the Viidure app, showing screenshots of the app interface for password entry, device connection, and video management.
6.9. GPS Functionality
The integrated GPS module logs your driving speed, route, and real-time latitude and longitude. This information can be viewed on maps via the 'Viidure' app or a dedicated GPS Player on your PC, providing additional evidence if needed.
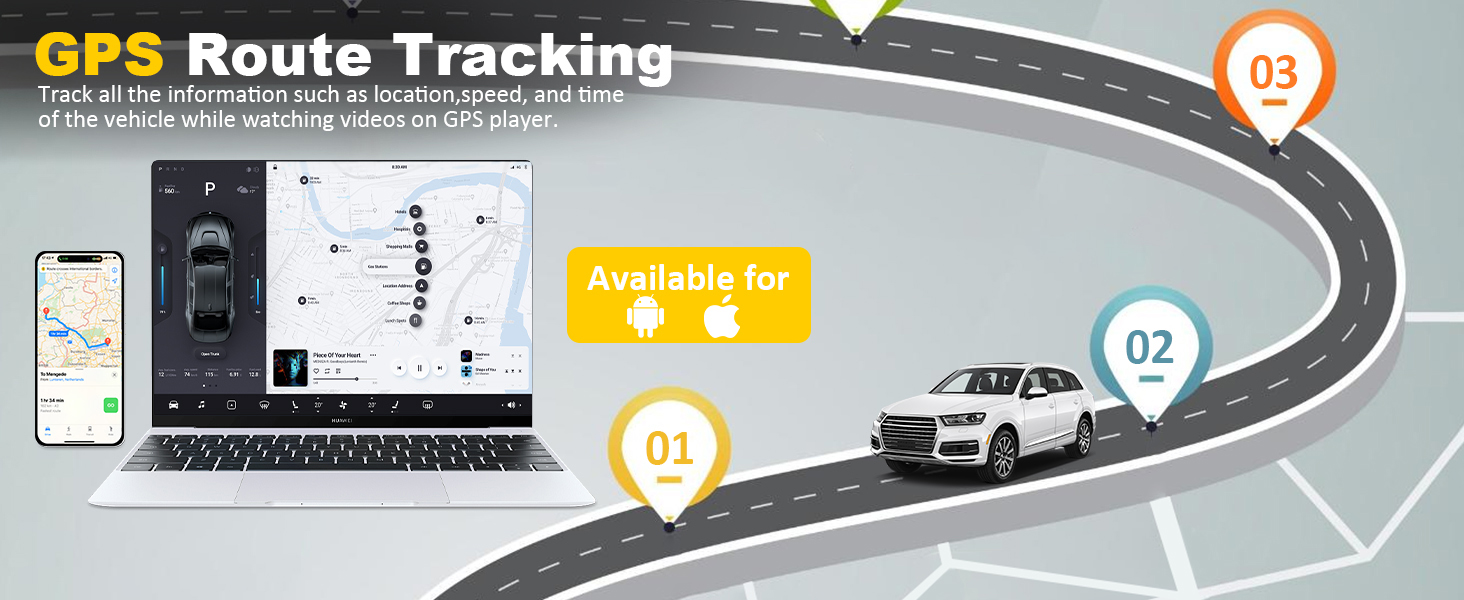
Image: A graphic illustrating the GPS Route Tracking feature of the WANLIPO A13 Dash Cam, showing a map interface on a smartphone and laptop, indicating how location, speed, and time information can be tracked.
7. Maintenance
7.1. Cleaning
- Gently wipe the camera lenses with a soft, lint-free cloth to remove dust or smudges.
- Do not use chemical cleaners or abrasive materials.
7.2. SD Card Management
- Regularly format the SD card (at least once a month) through the dash cam's settings to ensure optimal performance and prevent data corruption.
- Replace the SD card if you notice any recording errors or performance degradation.
8. Troubleshooting
| Problem | Possible Solution |
|---|---|
| Dash cam does not power on. | Check the power connection to the car charger and the vehicle's 12V outlet. Ensure the vehicle's ignition is on. |
| Dash cam stops recording. | Ensure the SD card is inserted correctly and has sufficient space. Format the SD card. Check if loop recording is enabled. |
| Video footage is blurry. | Clean the camera lens. Ensure the protective film has been removed from the lens. |
| WiFi connection issues. | Ensure WiFi is enabled on the dash cam. Re-enter the WiFi password in the app. Ensure your phone is within 3-5 meters of the dash cam. |
| GPS not tracking. | Ensure the dash cam has a clear view of the sky. GPS signal acquisition may take a few minutes. |
| Parking monitor not working. | Verify that parking monitoring is enabled in the settings. A hardwire kit (sold separately) is required for this feature to function when the vehicle is off. |
9. Specifications
- Model Name: A13
- Front Camera Resolution: 4K (3840*2160P)
- Rear Camera Resolution: 2.5K
- Display: 2.0" IPS Screen
- Connectivity: 5GHz Wi-Fi, GPS
- Lens Aperture: F1.8
- Lens Layers: 6-layer optical lens
- Front Field of View: 170° Wide Angle
- Rear Field of View: 120° Wide Angle
- Special Features: G-Sensor, Loop Recording, Parking Monitor (requires hardwire kit), WDR, Night Vision, App Control
- Storage: Supports up to 256GB Micro SD card (64GB included)
- Power Input: Type-C Car Charger (12V)
- Product Dimensions: 19.5 x 6.5 x 10.5 inches
- Item Weight: 1.01 pounds
10. Warranty & Support
The WANLIPO A13 Dash Cam comes with a 1-Year Warranty. For any product inquiries, technical support, or warranty claims, please contact our dedicated customer support team.
Email: Wanlipo@hotmail.com
Please provide your product model (A13) and purchase details when contacting support for faster assistance.


