1. Introduction
Thank you for purchasing the Morpilot Glass Milk Frother HS001. This manual provides essential information for the safe and efficient operation, maintenance, and troubleshooting of your new appliance. Please read these instructions thoroughly before first use and retain them for future reference.
2. Important Safety Instructions
- Read all instructions before using the appliance.
- Do not immerse the electrical base unit in water or any other liquid.
- Ensure the power supply voltage matches the rating label on the appliance.
- Keep the appliance out of reach of children.
- Do not operate the appliance with a damaged cord or plug.
- Always place the frother on a stable, flat, heat-resistant surface.
- Do not touch hot surfaces. Use handles or knobs.
- Unplug from outlet when not in use and before cleaning. Allow to cool before putting on or taking off parts, and before cleaning the appliance.
- Do not use attachments not recommended by the appliance manufacturer.
- This appliance is for household use only.
3. Product Overview and Components
The Morpilot Glass Milk Frother HS001 is designed to create various milk textures for your beverages. It features a detachable glass jug for easy cleaning and a simple one-button operation.

Image 1: The Morpilot Glass Milk Frother HS001, showcasing the main unit, detachable glass jug, lid, whisk attachments (frothing and heating), and a cleaning brush. A cup of frothed milk is also visible, illustrating the product's output.
Components:
- Main Base Unit: Contains the heating element and control panel.
- Glass Jug: Detachable, with MIN/MAX fill lines for milk.
- Lid: Transparent lid for the glass jug.
- Frothing Whisk: For creating dense or airy milk foam.
- Heating Whisk: For heating milk without frothing.
- Cleaning Brush: For easy cleaning of the jug and whisks.
4. Setup and First Use
4.1 Unpacking
- Carefully remove all components from the packaging.
- Remove any stickers or promotional materials.
4.2 Initial Cleaning
- Wash the glass jug, lid, and whisk attachments with warm soapy water.
- Rinse thoroughly and dry completely.
- Wipe the exterior of the main base unit with a damp cloth. Do not immerse the base unit in water.
4.3 Assembly
- Place the desired whisk attachment (frothing or heating) onto the spindle at the bottom of the glass jug. Ensure it is securely seated.
- Place the glass jug onto the main base unit. Ensure it is properly aligned and stable.
- Connect the power cord to a suitable electrical outlet.
5. Operating Instructions
The Morpilot Glass Milk Frother HS001 offers four distinct functions, easily selected with a single button.

Image 2: This diagram illustrates the four functions of the Morpilot Milk Frother: Cold Milk Foam, Warm Airy Milk Foam, Warm Dense Milk Foam, and Hot Milk. Each function is depicted with an icon and a corresponding beverage example.
5.1 Adding Milk
- Ensure the correct whisk is installed in the jug.
- Pour cold milk into the glass jug. Observe the MIN and MAX fill lines.
- For frothing, do not exceed the lower MAX line (typically 150ml) to prevent overflow.
- For heating milk without frothing, you can fill up to the upper MAX line (typically 250ml).
- Place the lid securely on the glass jug.
5.2 Selecting a Function
The frother operates with a single power button. Pressing the button cycles through the functions, indicated by the LED light color.

Image 3: This image displays four Morpilot Milk Frothers, each illuminated with a different LED color (Red, Blue, Purple, Green) corresponding to its active function: Warm Dense Milk Foam, Cold Milk Foam, Hot Milk, and Warm Airy Milk Foam, respectively.
| LED Color | Function | Description |
|---|---|---|
| Red | Warm Dense Milk Foam | Heats and creates thick, creamy foam. |
| Blue | Cold Milk Foam | Creates cold foam without heating. |
| Purple | Hot Milk | Heats milk without frothing (use heating whisk). |
| Green | Warm Airy Milk Foam | Heats and creates light, airy foam. |
- Press the power button once to turn on the frother and select the first function (Red LED).
- Press the button repeatedly to cycle through the desired functions (Blue, Purple, Green).
- The frother will automatically start the selected program after a few seconds of inactivity or immediately after the last press.
- The frother will automatically shut off once the program is complete.
5.3 Pouring
Carefully remove the glass jug from the base unit. The design allows for precise pouring, suitable for latte art.
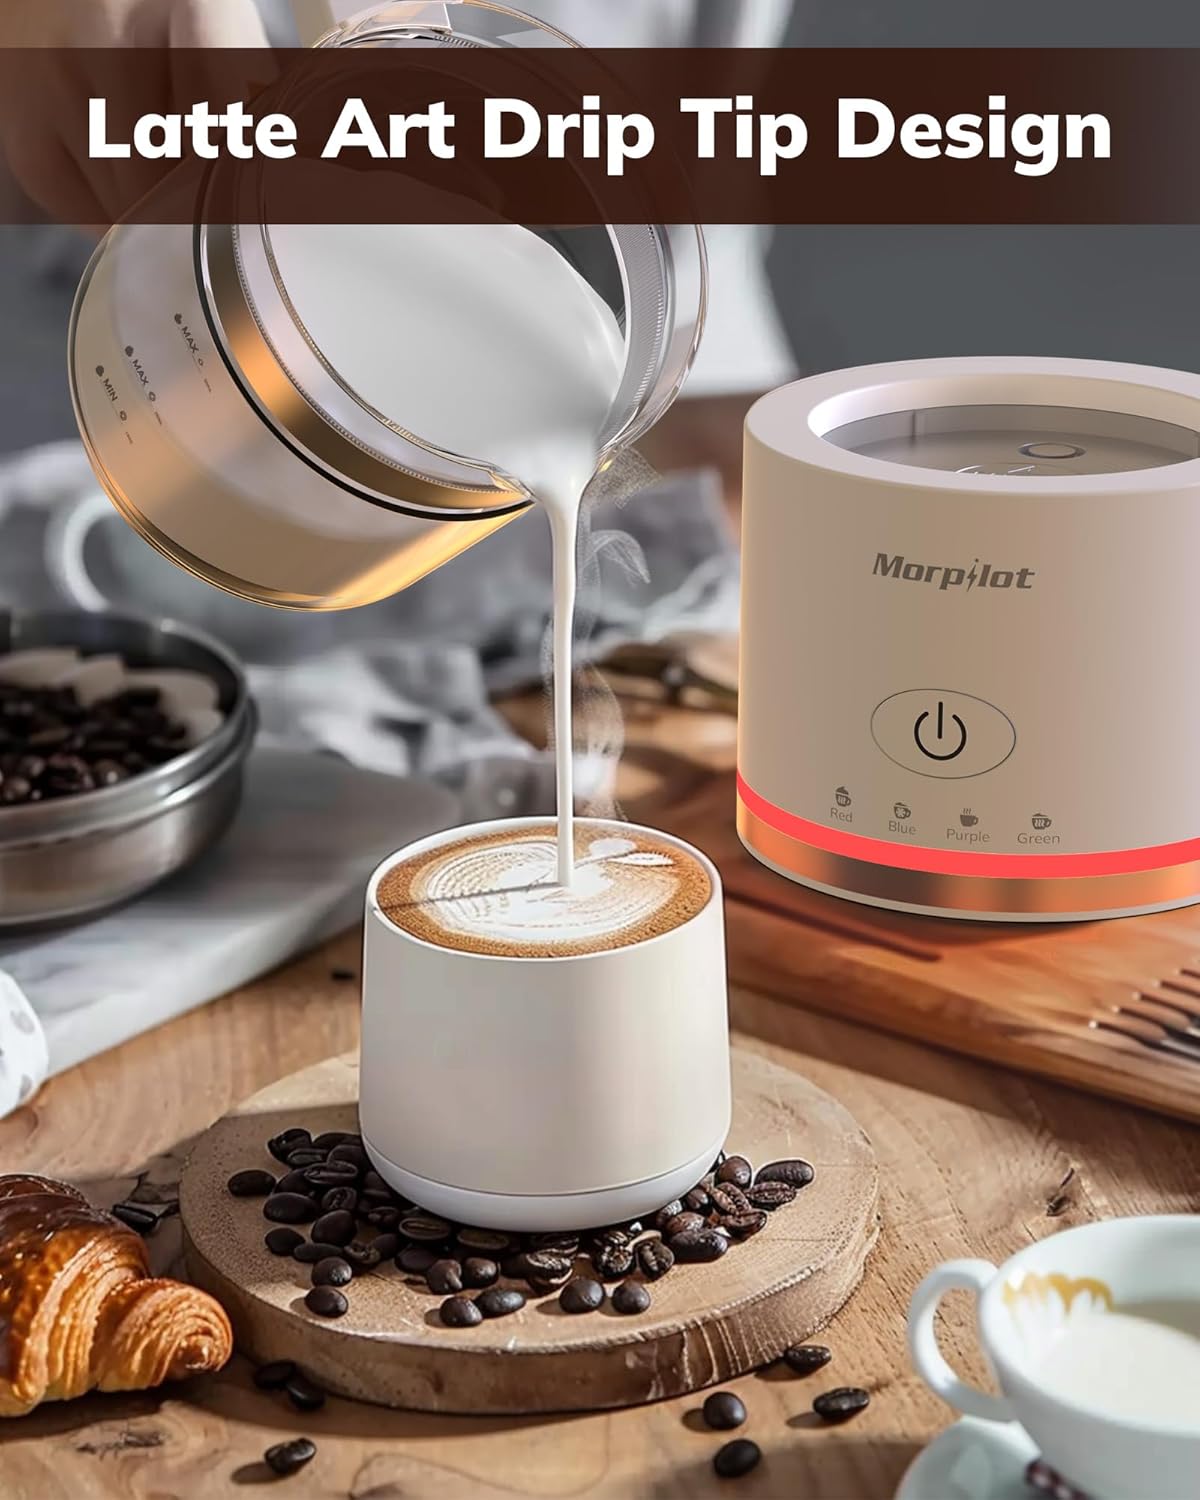
Image 4: A hand is shown carefully pouring frothed milk from the Morpilot Glass Milk Frother into a cup, demonstrating its suitability for creating latte art designs.
6. Maintenance and Cleaning
Regular cleaning ensures optimal performance and longevity of your Morpilot Milk Frother.

Image 5: The detachable glass jug of the Morpilot Milk Frother is shown being rinsed under running water, highlighting its easy-to-clean design.
- Unplug: Always unplug the appliance from the power outlet before cleaning.
- Cool Down: Allow the frother to cool completely before disassembling or cleaning.
- Glass Jug and Lid: The glass jug and lid are detachable and can be washed by hand with warm soapy water. Use the provided cleaning brush to remove any milk residue. Rinse thoroughly and dry completely.
- Whisk Attachments: Remove the whisk from the jug and clean it with warm soapy water and the cleaning brush.
- Base Unit: Wipe the exterior of the main base unit with a soft, damp cloth. Do not immerse the base unit in water or place it under running water. Ensure the electrical contacts are dry before re-use.
- Storage: Store the frother in a clean, dry place when not in use.
7. Troubleshooting
If you encounter any issues with your Morpilot Glass Milk Frother, please refer to the following common problems and solutions:
- Frother does not start:
- Ensure the power cord is securely plugged into a working outlet.
- Check if the glass jug is correctly placed on the base unit.
- Press the power button firmly to select a function.
- Milk is not frothing or foam is insufficient:
- Ensure the frothing whisk is correctly installed.
- Check that the milk level is between the MIN and the lower MAX frothing line. Overfilling or underfilling can affect frothing.
- Use cold, fresh milk. Whole milk generally froths best, but other types of milk (e.g., oat, almond) may require specific frothing techniques or brands.
- Ensure the whisk and jug are clean and free from residue.
- Milk overflows during operation:
- Do not exceed the MAX fill line for frothing (lower MAX line).
- Ensure the lid is securely placed on the jug.
- Milk is not heating:
- Ensure the heating whisk (if applicable) is installed, or the frothing whisk is used with a heating function.
- Verify that a heating function (Red, Purple, Green LED) has been selected.
If the problem persists after checking these points, please contact customer support.
8. Specifications
| Feature | Specification |
|---|---|
| Brand | morpilot |
| Model Number | HS001 |
| Color | Transparent/White |
| Dimensions (Package) | 32.4 x 25.3 x 21.8 cm |
| Capacity | 500 Milliliters (Max for heating), 150 Milliliters (Max for frothing) |
| Material | Glass |
| Item Weight | 1.02 Kilograms |
| Power Source | Electric Cord |
| UPC | 810142347457 |
| Country of Origin | China |
9. Warranty and Support
Morpilot products are manufactured to high-quality standards. For warranty information or technical support, please refer to the warranty card included with your product or contact Morpilot customer service through the retailer where the product was purchased. Please have your model number (HS001) and proof of purchase ready when contacting support.


