
Introduction
This manual provides detailed instructions for the assembly, setup, operation, and maintenance of your Dancing Wings Hobby 600mm 3D EPP Sakura Plus Remote Control Airplane, model E4404-L10. Please read this manual thoroughly before assembly and flight to ensure safe and optimal performance.
Important Safety Guidelines
Operating remote control aircraft requires caution and responsibility. Failure to operate this product safely and responsibly could result in injury or damage to the product or other property.
- Always operate in open areas, away from people, buildings, and obstacles.
- Do not fly near airports or restricted airspace.
- Ensure all batteries are fully charged and properly installed before each flight.
- Perform pre-flight checks to ensure all controls are functioning correctly.
- Never fly in adverse weather conditions (high winds, rain, lightning).
- Keep hands and loose clothing away from the propeller when the motor is powered.
- Adult supervision is recommended for younger operators.
- Disconnect the battery after use and during transport.
Package Contents
Your E4404-L10 package includes the following components:
- E44 600mm Sakura Plus EPP KIT (Wingspan: 600mm, Fuselage Length: 650mm)
- MM2208 1700KV Motor
- 7-inch Propeller
- 20A Electronic Speed Controller (ESC)
- 9g Servo with silver gear (4 pieces)
- HOT RC HT-8A Transmitter (Left Throttle)
- HOT RC F08A 8CH Receiver
- Product Manual
Please inspect all components upon receipt. If any parts are missing or damaged, contact your retailer.
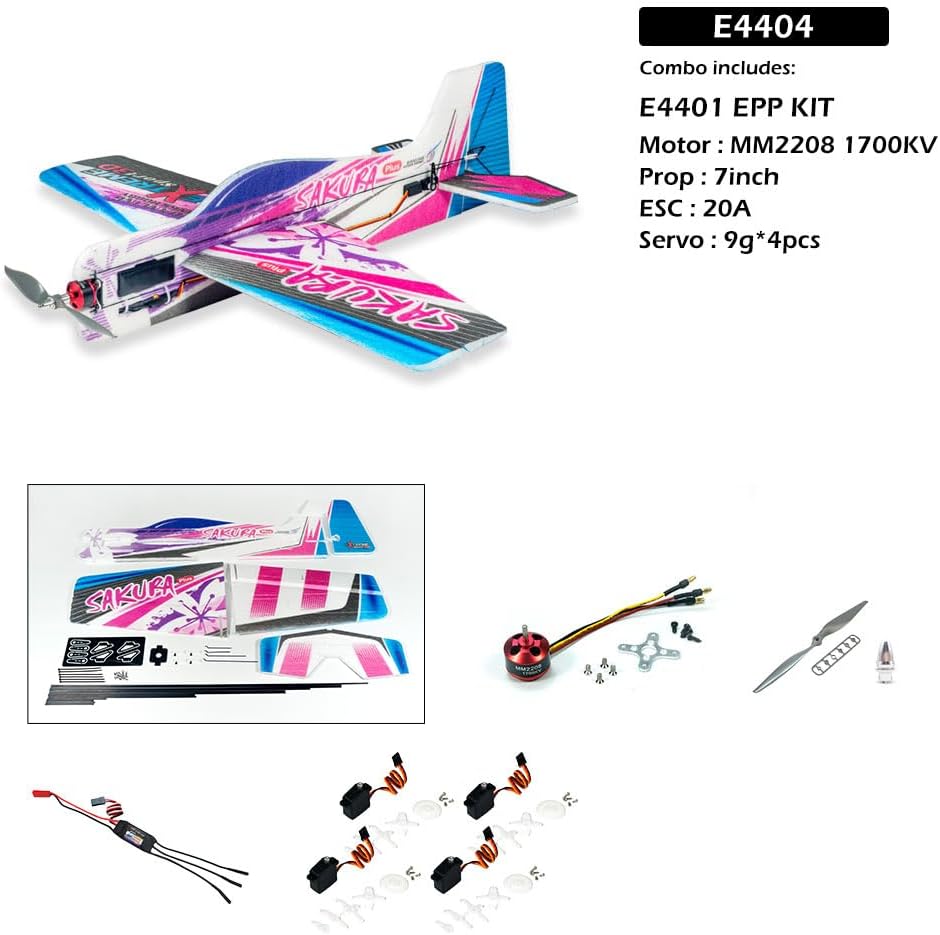
Image description: An overview of the kit components, including the EPP foam airframe parts, motor, propeller, ESC, servos, transmitter, and receiver.
Specifications
| Feature | Specification |
|---|---|
| Model | E4404-L10 |
| Wingspan | 600mm (24 inches) |
| Fuselage Length | 650mm (25 inches) |
| Flying Weight | Approximately 270g |
| Material | High-quality EPP Foam (Wing: 10mm, Fuselage: 20mm) |
| Motor | MM2208 1700KV |
| Propeller | 7-inch |
| ESC | 20A |
| Servos | 9g (4 pieces, silver gear) |
| Transmitter | HOT RC HT-8A (Left Throttle) |
| Receiver | HOT RC F08A 8CH |
| Recommended Battery | 3S LiPo 400-600mAh (Not included) |
| Assembly | Required |
| Features | Easy to hover, roll, loop, and perform basic 3D maneuvers |

Image description: A graphic summarizing the key specifications of the E44 Sakura Plus KIT, including dimensions, weight, motor, ESC, propeller, servos, and recommended battery.
Assembly Instructions
This section guides you through the assembly of your EPP Sakura Plus aircraft. Refer to the images for visual assistance.
1. Fuselage and Wing Assembly
Carefully attach the main wing to the fuselage. Ensure proper alignment for optimal flight performance. The EPP material allows for a snug fit.

Image description: The main EPP foam components of the aircraft, including the fuselage, main wing, and tail sections, laid out before assembly.
2. Tail Section Installation
Install the horizontal and vertical stabilizers onto the rear of the fuselage. Pay attention to the orientation for correct control surface movement.

Image description: A view of the assembled aircraft from the rear, showing the horizontal and vertical stabilizers correctly attached to the fuselage.
3. Motor, ESC, and Servo Installation
Mount the MM2208 1700KV motor to the front of the fuselage. Connect the 20A ESC to the motor and position it within the fuselage for proper cooling. Install the four 9g servos into their designated slots for the ailerons, elevator, and rudder.
4. Propeller Attachment
Secure the 7-inch propeller to the motor shaft. Ensure it is tightened sufficiently but not overtightened, and that it spins freely without obstruction.
5. Receiver and Linkage Setup
Install the HOT RC F08A 8CH receiver inside the fuselage. Connect the servos to the appropriate channels on the receiver. Attach the control linkages from the servos to the control horns on the ailerons, elevator, and rudder. Ensure all control surfaces move freely and in the correct direction.
6. Final Checks
Before proceeding, double-check all connections, ensure all screws are tight, and verify that control surfaces move smoothly and without binding.
Setup
1. Battery Installation
Insert a fully charged 3S LiPo 400-600mAh battery (not included) into the designated battery compartment. Secure it to prevent shifting during flight.
2. Transmitter Binding
Refer to the HOT RC HT-8A transmitter manual for detailed instructions on binding the transmitter to the F08A receiver. Ensure a successful bind before attempting flight.
3. Control Surface Checks
With the transmitter and receiver powered on, verify that all control surfaces (ailerons, elevator, rudder) respond correctly to transmitter inputs.
- Moving the aileron stick left should cause the left aileron to go up and the right aileron to go down.
- Moving the elevator stick back (pulling towards you) should cause the elevator to go up.
- Moving the rudder stick left should cause the rudder to move left.
- Adjust servo directions on your transmitter if necessary.
4. Center of Gravity (CG)
The correct Center of Gravity (CG) is crucial for stable flight. Typically, the CG is located at approximately 1/3 to 1/4 of the wing chord from the leading edge. Adjust battery position to achieve the recommended CG.
Operating Instructions
1. Pre-Flight Inspection
Before each flight, perform a thorough visual inspection:
- Check for any damage to the airframe, propeller, or control surfaces.
- Ensure all connections are secure.
- Verify battery charge levels for both aircraft and transmitter.
- Confirm control surface movement and direction.
2. Takeoff
Hand launch the aircraft into a slight headwind with a gentle, firm toss. Gradually increase throttle as it gains altitude.
3. Basic Flight Controls
Throttle: Controls motor speed and altitude.
Ailerons: Controls roll (banking).
Elevator: Controls pitch (nose up/down).
Rudder: Controls yaw (nose left/right).
4. 3D Maneuvers
The Sakura Plus is designed for 3D aerobatics. With practice, you can perform maneuvers such as hovering, rolling, and looping. Start with basic maneuvers at a safe altitude before attempting advanced 3D flight.

Image description: The Dancing Wings Hobby Sakura Plus RC airplane in flight, demonstrating its agility and suitability for aerobatic maneuvers.
5. Landing
Reduce throttle and approach the landing area into the wind. Maintain a slight nose-up attitude with elevator control to gently settle the aircraft onto the ground.
Maintenance
- After each flight, inspect the aircraft for any damage, loose connections, or worn parts.
- Clean the EPP foam with a soft, damp cloth if necessary. Avoid harsh chemicals.
- Check propeller for cracks or damage; replace if necessary.
- Ensure all control linkages are free from dirt and move smoothly.
- Store the aircraft in a cool, dry place away from direct sunlight.
- Properly charge and store LiPo batteries according to manufacturer guidelines.

Image description: The Sakura Plus RC airplane resting on grass, illustrating its durable EPP foam construction and readiness for outdoor use.
Troubleshooting
| Problem | Possible Cause | Solution |
|---|---|---|
| Aircraft does not respond to controls | Unbound receiver/transmitter, low battery, loose connection | Re-bind transmitter, charge batteries, check all connections |
| Motor not spinning | ESC not armed, motor/ESC connection loose, damaged motor/ESC | Ensure throttle is at lowest position to arm ESC, check connections, replace faulty component |
| Aircraft flies erratically | Incorrect CG, control surfaces reversed, damaged control surface | Adjust CG, check servo directions, inspect and repair/replace damaged parts |
| Short flight time | Battery not fully charged, old/damaged battery, aggressive flying | Fully charge battery, replace old battery, fly more conservatively |
If you encounter issues not listed here, consult online RC forums or contact customer support.
Warranty and Support
For technical assistance, replacement parts, or warranty inquiries, please contact your retailer or visit the official Dancing Wings Hobby website. Keep your purchase receipt as proof of purchase.
This product is designed for hobby use and requires careful handling and assembly.
