1. Introduction
This manual provides essential instructions for the proper setup, operation, and maintenance of your Jumper T12 MAX 2.4G ELRS Hall Gimbals Transmitter. This device is a full-function multi-module radio remote controller designed for RC FPV drones, featuring EDGETX firmware and Hall sensor gimbals. Please read this manual thoroughly before using the product to ensure safe and efficient operation.
2. Safety Information
For your safety and to prevent damage to the product, observe the following precautions:
- This device and its accessories are not toys.
- Do not allow young children to play with the device.
- Keep the device, all its parts, and accessories out of reach of young children.
- Always operate the transmitter responsibly and in accordance with local regulations for radio-controlled models.
- Ensure batteries are installed correctly and charged safely.
3. Package Contents
Verify that all items listed below are included in your package:
- 1x Jumper T12 MAX Transmitter
- 1x Storage Bag
- 1x Data Cable
- 1x Hanging Strap

Image: Jumper T12 MAX Transmitter, data cable, and hanging strap neatly stored within its protective carrying case.
4. Product Overview
The Jumper T12 MAX is a compact yet powerful radio transmitter. Familiarize yourself with its key components:

Image: Front view of the Jumper T12 MAX transmitter, showing the Hall gimbals, switches, power button, and OLED display.
Key Features:
- Hall Sensor Gimbals: Provides precise and durable control.
- Built-in ELRS 2.4G: Integrated ExpressLRS 2.4GHz RF module with up to 500mW transmission power.
- EDGETX Firmware: Advanced open-source firmware for extensive customization.
- 1.7-inch OLED Display: Clear screen for menu navigation and telemetry data.
- External Module Interface: Reserved JR module bay for additional RF modules.
- Bidirectional Foldable Antenna: Enhances portability and signal direction.
- 10W Fast Charging: Efficient battery charging capability.
- Ergonomic Design: Comfortable grip for extended use.

Image: Rear view of the Jumper T12 MAX transmitter, highlighting the large battery compartment and the JR module bay.

Image: Detailed rear view of the Jumper T12 MAX, showing (1) the foldable antenna, (2) the JR module bay, and (3) the battery compartment.

Image: Close-up view illustrating the ergonomic design of the Jumper T12 MAX transmitter's grip for comfortable handling.
5. Setup
5.1 Battery Installation
The Jumper T12 MAX requires two 18650 batteries (not included). To install:
- Locate the battery compartment on the back of the transmitter.
- Open the battery compartment cover.
- Insert two 18650 batteries, ensuring correct polarity (+/-).
- Close the battery compartment cover securely.
5.2 Antenna Setup
The transmitter features a bidirectional foldable antenna. Before operation, unfold the antenna to an upright position for optimal signal transmission.
5.3 TF Card
The Jumper T12 MAX includes a built-in chip for the TF card, specifically recommended for EDGETX firmware. Ensure the TF card is properly inserted for firmware and model memory functions.
6. Operation
6.1 Powering On/Off
Press and hold the power button located on the front of the transmitter to power it on or off. The OLED display will illuminate upon startup.
6.2 Basic Controls
- Gimbals: Control the primary flight surfaces (throttle, aileron, elevator, rudder). The Hall sensor gimbals provide smooth and accurate input.
- Switches: Utilize the various switches for auxiliary functions such as flight modes, arming, or gear control. Refer to your EDGETX model setup for specific assignments.
- OLED Display: Navigate menus and view telemetry data using the scroll wheel and buttons adjacent to the display.
6.3 EDGETX Firmware
The Jumper T12 MAX runs on EDGETX firmware, offering extensive customization options for model setup, mixes, and radio settings. For detailed instructions on EDGETX, please refer to the official EDGETX documentation available online.
External Link: EDGETX Official Website
6.4 Binding with Receiver
The built-in ELRS 2.4G module requires binding with an ELRS-compatible receiver. The binding procedure typically involves putting both the transmitter and receiver into binding mode. Consult your receiver's manual and the EDGETX documentation for specific binding steps.
7. Charging
The Jumper T12 MAX supports 10W fast charging. Connect the provided data cable to the USB-C port on the top of the transmitter and to a suitable USB power source. The OLED display will indicate charging status.

Image: Top view of the Jumper T12 MAX transmitter, highlighting the USB-C charging port and the audio jack.
8. Maintenance
- Cleaning: Use a soft, dry cloth to clean the transmitter. Avoid using harsh chemicals or solvents.
- Storage: Store the transmitter in its protective case in a cool, dry place away from direct sunlight and extreme temperatures.
- Battery Care: If storing for extended periods, remove the 18650 batteries or ensure they are charged to a storage voltage (typically 3.8V per cell) to prolong their lifespan.
- Firmware Updates: Periodically check the official EDGETX website for firmware updates to ensure optimal performance and access to new features.
9. Troubleshooting
- Transmitter not powering on:
- Ensure batteries are correctly installed with proper polarity.
- Check if batteries are sufficiently charged.
- No signal to receiver:
- Verify the transmitter and receiver are properly bound.
- Ensure the antenna is unfolded and positioned correctly.
- Check the RF module settings in EDGETX.
- Display issues:
- Restart the transmitter.
- Ensure firmware is up to date.
10. Specifications
Detailed technical specifications for the Jumper T12 MAX Transmitter:
| Parameter | Value |
|---|---|
| Microcontroller | STM32F407ZET6 |
| Screen Size | 1.7 inches (Resolution 128 * 64) |
| Display Mode | OLED |
| Joystick Type | Standard Hall Sensor Gimbals |
| Built-in RF | ELRS (2.4GHz) |
| Transmission Power | Maximum 500mW |
| External Module Interface | Reserved (JR Module) |
| TF Card | Built-in chip (EDGETX recommended) |
| Working Voltage | 6-8.4V |
| Battery | 18650 * 2 (excluding) |
| Dimensions | 152 * 160 * 63mm (6 x 6.3 x 2.5 inches) |
| Item Weight | 355g (excluding battery) / 2 pounds (approx. with packaging) |
| Manufacturer | JUMPER |
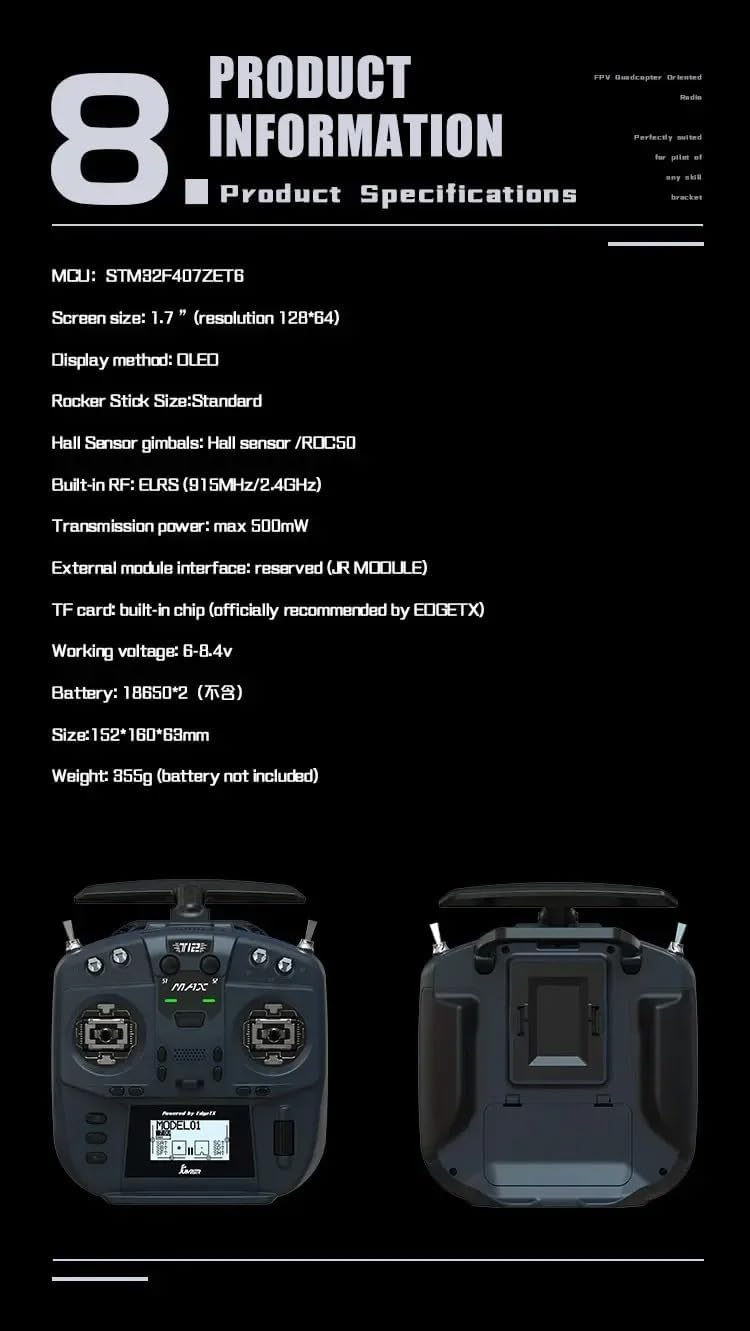
Image: A graphic displaying key product information and specifications for the Jumper T12 MAX transmitter.
11. Warranty and Support
For warranty information or technical support, please contact the retailer or the manufacturer directly. Keep your proof of purchase for any warranty claims.
Manufacturer: JUMPER
For further assistance, you may visit the SPARKHOBBY Store on Amazon.


