1. Important Safety Information
This helmet is designed to provide protection in the event of an impact. For your safety, always wear a properly fitted and secured helmet when riding. Failure to follow these instructions may result in serious injury or death.
- DOT FMVSS 218 Compliance: This HJC C10 snow helmet meets or exceeds U.S. Department of Transportation (DOT) FMVSS No. 218 standards. It has been rigorously tested for energy absorption, penetration resistance, and chin strap retention.
- Proper Fit: Ensure the helmet fits snugly and comfortably. It should not move freely on your head.
- Chin Strap: Always fasten the chin strap securely. The strap should be tight enough so that the helmet cannot be pulled off your head.
- Visibility: Maintain clear visibility. Ensure the shield is clean and free from obstructions.
- Damage Inspection: Inspect your helmet for any signs of damage before each use. If the helmet has sustained an impact, even if no visible damage is present, it should be replaced.
- Chemicals: Avoid contact with petroleum products, cleaning fluids, paints, or adhesives, as these can damage the helmet's materials and compromise its protective capabilities.
2. Product Overview
The HJC C10 Elie Electric Shield Snow Helmet is engineered for snowmobiling, offering advanced protection and comfort features.
2.1 Key Features
- DOT Approved: Meets FMVSS 218 standards for safety.
- Electric Shield: HJ-34P shield with 99% UV protection and anti-scratch coating, designed for electric heating to prevent fogging.
- Advanced Polycarbonate Shell: Lightweight, comfortable, and secure fit with an enlarged 10mm sight of view.
- Moisture-Wicking Interior: Premium, hygienic fabric that is removable and washable.
- Advanced Channeling Ventilation System (ACS): Full front-to-back airflow with 5 intake and 7 exhaust vents.
- Bluetooth Communication Ready: Includes speaker pockets for easy integration of communication systems.
2.2 What's in the Box
- HJC C10 ELIE Full Face Motorcycle Helmet with Electric Lens
- Electric Shield Power Cord (if applicable, typically included with electric shields)
- Helmet Bag
- User Manual (this document)
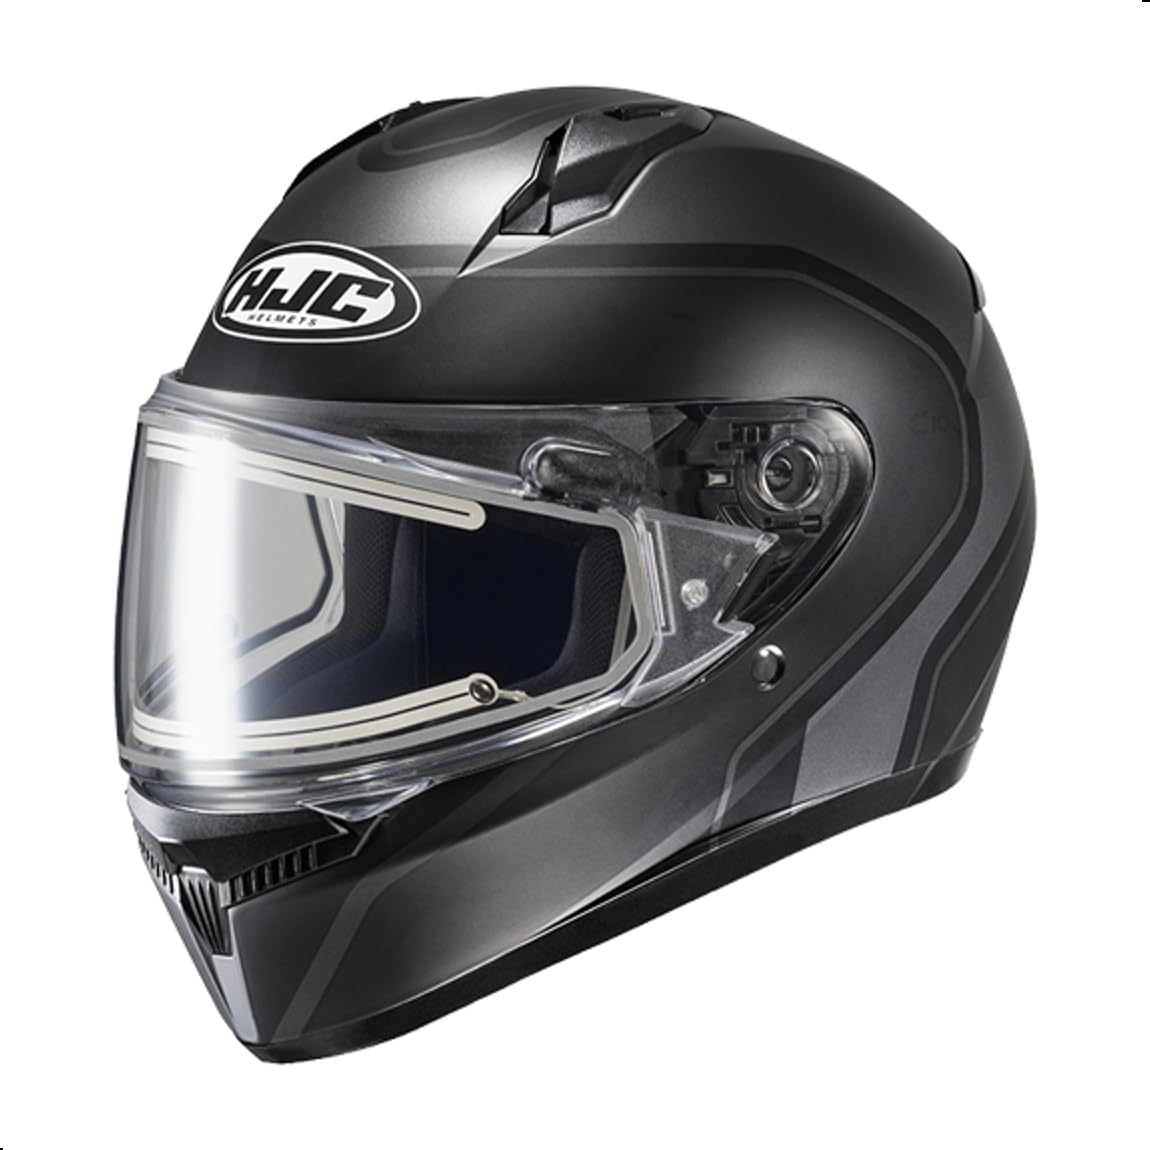
Figure 1: Front view of the HJC C10 Elie Electric Shield Snow Helmet. This image shows the overall design and the electric shield in the closed position.
3. Setup and Installation
3.1 Helmet Fitting
- Measure Head Circumference: Use a soft tape measure to measure the largest part of your head, approximately one inch above your eyebrows.
- Try On Helmet: Place the helmet on your head. It should feel snug around your cheeks and crown without causing pressure points.
- Check Movement: With the chin strap unfastened, try to move the helmet from side to side and up and down. There should be minimal movement.
- Fasten Chin Strap: Secure the chin strap. It should be tight enough that you cannot pull the helmet off your head by rolling it forward or backward.
3.2 Electric Shield Connection
The electric shield prevents fogging by heating the shield surface. Connect it to your snowmobile's power source.
- Locate the electric shield power cord.
- Connect one end of the cord to the designated port on the electric shield.
- Connect the other end of the cord to the 12V power outlet on your snowmobile. Ensure a secure connection.
- Verify the shield is heating by observing any indicator light or feeling a slight warmth on the shield surface after a few minutes of operation.
3.3 Pinlock Ready HJ-34P Shield Installation (Optional)
If you are installing a Pinlock anti-fog insert (sold separately), follow the instructions provided with the Pinlock insert. The HJ-34P shield is designed to accommodate it.
3.4 Bluetooth Communication System Installation (Optional)
The C10 helmet includes speaker pockets for integrating a Bluetooth communication system. Refer to your communication system's manual for specific installation instructions. Typically, speakers fit into the designated pockets, and the microphone can be routed along the helmet's interior lining.
4. Operating Instructions
4.1 Opening and Closing the Shield
- To open the shield, grasp the tab at the bottom center and lift upwards.
- To close the shield, pull it downwards until it securely latches.
- The shield has multiple detent positions for partial opening.
4.2 Activating the Electric Shield
Once connected to a power source (as described in Section 3.2), the electric shield will begin to heat, preventing fogging. Ensure the power source on your snowmobile is active.
4.3 Ventilation System (ACS)
The Advanced Channeling Ventilation System (ACS) provides airflow through the helmet.
- Intake Vents: Located at the front (chin and forehead). Open these vents to allow fresh air into the helmet.
- Exhaust Vents: Located at the rear. These vents allow warm, moist air to exit the helmet. They are typically always open or have minimal adjustment.
- Adjust the intake vents as needed to control airflow and maintain comfort.
5. Maintenance and Care
5.1 Cleaning the Helmet Shell
- Use a soft cloth dampened with mild soap and water.
- Wipe the exterior gently. Avoid abrasive cleaners or solvents.
- Rinse with clean water and dry with a soft, clean cloth.
5.2 Cleaning the Electric Shield
- Disconnect the electric shield power cord before cleaning.
- Use a soft, damp cloth and mild soap. Gently wipe the shield.
- Rinse thoroughly with clean water.
- Dry with a soft, lint-free cloth. Do not use abrasive materials, as this can damage the anti-scratch coating.
- For stubborn dirt, soak a soft cloth in warm water and place it over the affected area for a few minutes to loosen debris before wiping.
5.3 Cleaning the Interior Pads
The crown and cheek pads are removable and washable.
- Carefully remove the crown and cheek pads from the helmet.
- Hand wash in cold water with a mild detergent. Do not use bleach or harsh chemicals.
- Rinse thoroughly and air dry completely before re-installing. Do not machine wash or tumble dry.
- Re-install the pads, ensuring they are correctly seated and secured.
5.4 Storage
Store your helmet in a cool, dry place away from direct sunlight and extreme temperatures. Use the provided helmet bag to protect it from scratches and dust.
6. Troubleshooting
6.1 Electric Shield Not Heating
- Check Connections: Ensure the power cord is securely connected to both the shield and the snowmobile's power outlet.
- Verify Power Source: Confirm that the snowmobile's 12V power outlet is functioning. Test with another device if possible.
- Inspect Cord: Check the power cord for any visible damage or kinks.
6.2 Helmet Fogging (Non-Electric Shield Issues)
- Adjust Vents: Open the intake and exhaust vents to increase airflow.
- Check Breath Deflector: Ensure the breath deflector (if installed) is properly positioned to direct breath away from the shield.
- Pinlock Insert: If fogging persists, consider installing a Pinlock anti-fog insert (sold separately).
6.3 Helmet Feels Too Tight or Loose
- Re-evaluate Fit: Re-check the helmet fitting instructions in Section 3.1.
- Chin Strap: Ensure the chin strap is properly adjusted and secured.
- Pad Wear: Over time, interior pads may compress. If the helmet becomes too loose, consider replacing the pads or the helmet.
7. Specifications
| Model Name | C10 Elie Electric Lens |
| Manufacturer | HJC |
| Safety Standard | DOT FMVSS 218 Certified |
| Shell Material | Polycarbonate (PC) Composite |
| Shield Type | HJ-34P Electric Shield, Pinlock Ready, UV Protection, Anti-scratch |
| Ventilation | Advanced Channeling Ventilation System (ACS) with 5 intakes, 7 exhausts |
| Interior | Moisture-wicking, removable, and washable crown and cheek pads |
| Bluetooth Compatibility | Speaker pockets for communication systems |
| Approximate Item Weight | 3.46 - 3.5 pounds (depending on size) |
| Product Dimensions | 15 x 11 x 11 inches (packaging dimensions) |
8. Warranty and Support
HJC helmets typically come with a manufacturer's warranty covering defects in materials and workmanship. For specific warranty details, including duration and coverage, please refer to the warranty card included with your helmet or visit the official HJC website.
For technical support, parts, or warranty claims, please contact HJC customer service directly. Contact information can usually be found on the HJC website or on the product packaging.
Note: This manual provides general instructions. Always refer to the latest information from the manufacturer for the most accurate and up-to-date details.
9. Official Product Videos
No official product videos from the seller were found in the provided data for this specific model. Please check the manufacturer's official website or authorized retailers for any available video resources.