Package Contents
Verify that all items listed below are included in your package:
- Furrion RV Rooftop Vent Exhaust Fan with Lid
- Installation Hardware (various screws and connectors)
- 1 Tube of Self-Leveling Sealant
- 1 Roll of Butyl Tape
- 1 6" Trim Ring

Model: FVF14D90R6A-PS-AM
Brand: Furrion
This manual provides comprehensive instructions for the installation, operation, and maintenance of your Furrion 10-Blade, 14" RV Rooftop Vent Exhaust Fan. Designed to enhance air circulation within your recreational vehicle, this fan features a robust 10-blade design, four fan speeds, and user-friendly push-button controls. Its flush-mount design ensures a sleek integration with your RV's roof, compatible with roofs ranging from 2 to 7 inches thick.
Please read this manual thoroughly before installation and use to ensure proper function and safety. Retain this manual for future reference.
WARNING: Failure to follow these instructions could result in electric shock, fire, or serious injury.
Verify that all items listed below are included in your package:
| Feature | Detail |
|---|---|
| Model Number | FVF14D90R6A-PS-AM (also FVF14D90R6A-PW-AM) |
| Fan Type | 10-Blade Exhaust Fan |
| Fan Speeds | Four (4) |
| Controls | Push-Button |
| Power Requirement | 12 Volts DC |
| Roof Thickness Compatibility | 2" to 7" |
| Design | Flush-Mount |
| Special Features | Removable Insect Screen |
| Item Weight | 14.37 pounds |
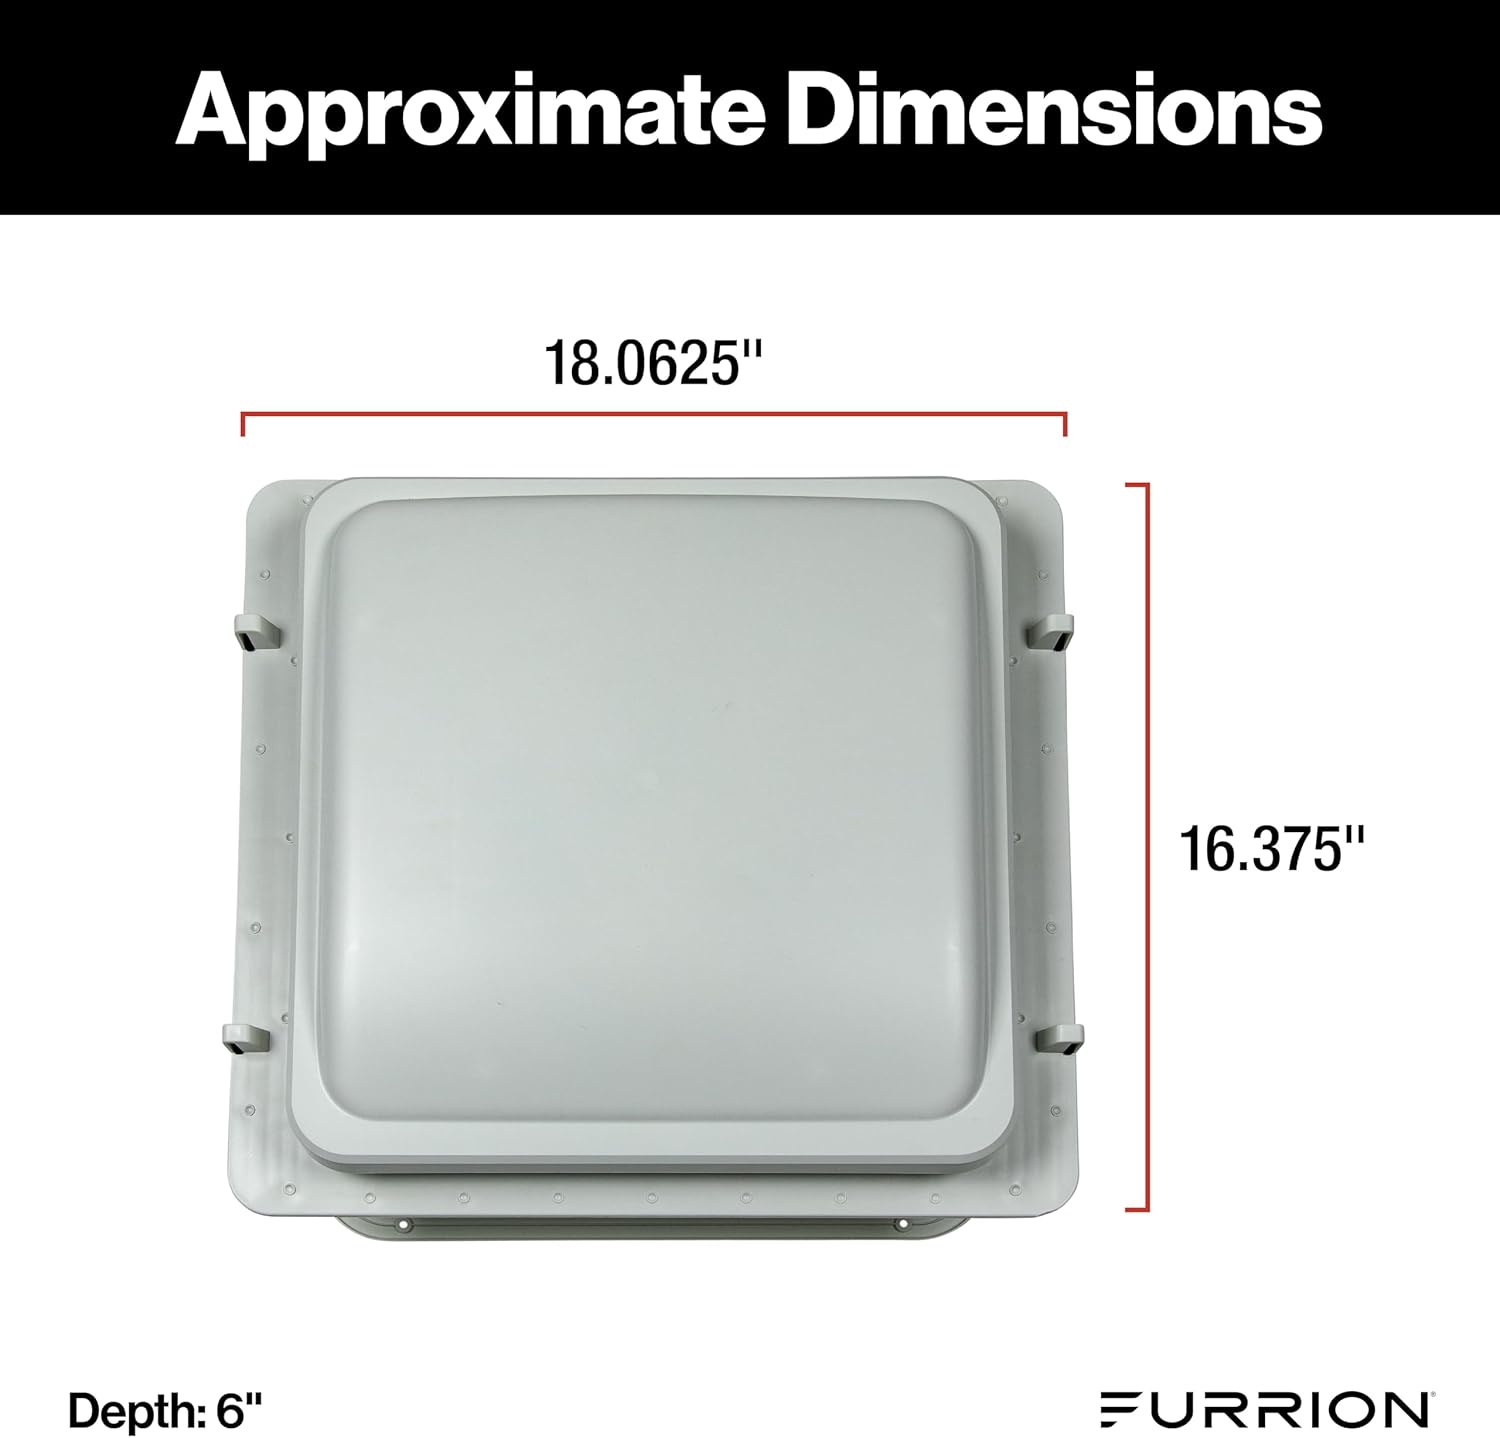
| Product Dimensions | 16 x 16 x 8 inches (Approximate: 18.0625" x 16.375" top flange) |
This section outlines the general steps for installing your Furrion RV Rooftop Vent Exhaust Fan. It is recommended to have basic RV electrical and construction knowledge. If unsure, seek professional assistance.
Ensure the RV is parked on a level surface. Disconnect all power to the RV's 12V DC system at the battery or main power panel. Clean the roof area where the vent will be installed, removing any dirt, debris, or old sealant.
If replacing an existing vent, carefully remove the old unit and clean the opening. If installing in a new location, mark and cut a 14" x 14" opening in the RV roof. Ensure the opening is square and free of obstructions like wiring or structural elements.
Apply the included butyl tape around the perimeter of the fan's mounting flange on the underside. Ensure a continuous, watertight seal.

Carefully lower the fan assembly into the roof opening, ensuring the butyl tape creates a tight seal against the roof surface. Press down firmly. Secure the fan to the roof using the provided screws, driving them through the mounting flange into the roof structure. Do not overtighten.
Locate the 12V DC power wires in your RV's ceiling near the opening. Connect the fan's positive wire (usually red) to the RV's positive 12V wire, and the fan's negative wire (usually black or white with a stripe) to the RV's negative/ground wire. Use appropriate electrical connectors (included) and ensure connections are secure and insulated with electrical tape or heat shrink tubing.
Apply a generous bead of the self-leveling sealant around the entire perimeter of the fan's mounting flange on the roof, covering all screw heads. This creates a secondary waterproof barrier. Allow the sealant to cure according to the manufacturer's instructions.
From inside the RV, slide the 6" trim ring into place, aligning it with the fan assembly. Secure the trim ring with the appropriate screws (if provided, or as per fan instructions) to complete the interior finish.
After installation, reconnect RV power and test the fan's operation.
Your Furrion RV Rooftop Vent Exhaust Fan is designed for simple and efficient operation.

Efficient Operation Tip: The Speed-1 setting is designed to circulate outside air through your RV with minimal power consumption, making it ideal for continuous ventilation without significantly draining your RV batteries.


Regular maintenance ensures optimal performance and longevity of your Furrion RV Rooftop Vent Exhaust Fan.
The fan features a removable insect screen for easy cleaning. Periodically remove the screen to clear any accumulated dust, debris, or insects that may obstruct airflow.

If you encounter issues with your Furrion RV Rooftop Vent Exhaust Fan, refer to the table below for common problems and solutions.
| Problem | Possible Cause | Solution |
|---|---|---|
| Fan does not turn on. | No 12V DC power; Blown fuse; Loose wiring connection; Faulty switch. | Check RV's 12V power supply. Inspect and replace fuse if blown. Verify all wiring connections are secure. If problem persists, contact support. |
| Fan runs slowly or weakly. | Low voltage; Dirty fan blades/screen; Obstruction. | Check RV battery voltage. Clean insect screen and fan blades. Ensure no obstructions are blocking the fan. |
| Excessive noise during operation. | Loose mounting; Debris in fan blades; Worn motor bearings. | Check mounting screws for tightness. Remove any debris from fan blades. If noise persists and is mechanical, contact support. |
| Water leaking around the vent. | Improper sealant application; Damaged lid or seal. | Inspect sealant around the fan on the roof. Reapply sealant as needed. Check lid and gasket for damage and replace if necessary. |
For issues not listed here or if solutions do not resolve the problem, please contact Furrion customer support.
Furrion products are manufactured to the highest standards and are backed by a limited warranty. For specific warranty terms and conditions, please refer to the warranty card included with your product or visit the official Furrion website.
For technical assistance, troubleshooting, or to inquire about replacement parts, please contact Furrion Customer Support:
When contacting support, please have your product model number (FVF14D90R6A-PS-AM) and purchase date available.