Introduction
This manual provides comprehensive instructions for the installation, operation, and maintenance of the LASE NH-12ND replacement diaphragm. This diaphragm is specifically designed as a direct replacement for the NEXO NH 12ND 1.0R/K and is compatible with YAMAHA NEXO Driver Tweeter Speaker Systems. Please read this manual thoroughly before proceeding with any installation or maintenance to ensure proper function and longevity of the component.
Safety Information
Always observe the following safety precautions:
- Power Disconnection: Before attempting any installation or replacement, ensure that the speaker system is completely disconnected from all power sources. Failure to do so may result in electrical shock or damage to the equipment.
- Static Discharge: Handle the diaphragm by its edges to avoid touching the voice coil or dome. Static electricity can damage sensitive electronic components. Consider using an anti-static wrist strap.
- Proper Tools: Use appropriate tools for disassembly and reassembly to prevent damage to the speaker driver or the new diaphragm.
- Professional Installation: If you are unsure about any step, seek assistance from a qualified audio technician.
- Component Compatibility: Ensure the replacement diaphragm matches the specifications of your original driver. This diaphragm is intended for NEXO NH 12ND 1.0R/K and compatible YAMAHA NEXO Driver Tweeter Speaker Systems.
Product Overview
The LASE NH-12ND is a high-quality replacement neodymium diaphragm designed for specific tweeter drivers. It features precise engineering to ensure optimal acoustic performance and durability.
Key Features:
- Overall Diaphragm Diameter: 3 3/8" (85.7mm)
- Voice Coil Diameter: 1 7/16" (36.4mm)
- Nominal Impedance: 16 ohms
- Material: Neodymium
Component Identification:
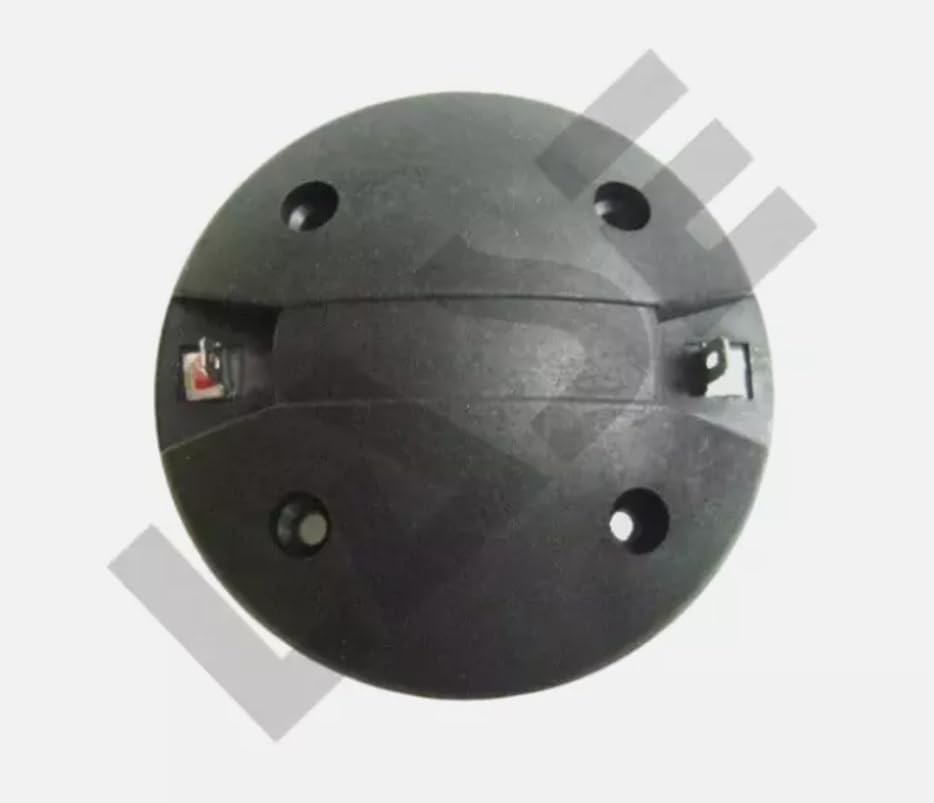
Figure 1: Top view of the LASE NH-12ND diaphragm. This image displays the circular shape of the diaphragm with four screw holes for mounting and two spade terminals for electrical connection.

Figure 2: Angled side view of the LASE NH-12ND diaphragm. This perspective shows the depth and construction of the diaphragm, including the terminal connectors.

Figure 3: Bottom view of the LASE NH-12ND diaphragm. This view provides a clear look at the voice coil assembly, which is the core component responsible for sound production, and its electrical connection points.

Figure 4: Close-up angled view of the voice coil and magnet assembly. This detailed image highlights the intricate winding of the voice coil and its integration within the diaphragm structure.
Installation Guide
This section outlines the steps for replacing a damaged diaphragm in a compatible tweeter driver. Ensure you have the necessary tools (e.g., screwdriver, small pliers) and a clean, static-free workspace.
- Disconnect Power: Absolutely ensure the speaker system is unplugged from any power source and amplifier.
- Access the Driver: Carefully remove the speaker grille and any mounting screws that secure the tweeter driver in its enclosure. Gently pull the driver out.
- Remove Old Diaphragm:
- Locate the screws or clips holding the old diaphragm in place. These are typically on the back or side of the driver assembly.
- Carefully unscrew or unclip them.
- Gently disconnect the two electrical spade terminals from the old diaphragm. Note their polarity if marked (though for a diaphragm, reversing polarity typically only affects phase, not function).
- Remove the old diaphragm, being careful not to damage the magnet assembly or voice coil gap.
- Clean the Gap: Inspect the voice coil gap for any debris, dust, or remnants of the old diaphragm. Use compressed air or a soft, lint-free cloth to meticulously clean the gap. Any foreign material can cause rubbing and damage the new voice coil.
- Install New Diaphragm:
- Carefully align the new LASE NH-12ND diaphragm with the driver's magnet assembly. Ensure the voice coil slides smoothly into the gap without touching the sides.
- Connect the two electrical spade terminals to the corresponding connectors on the new diaphragm. Ensure a secure connection.
- Secure the new diaphragm using the original screws or clips. Do not overtighten, as this can warp the diaphragm or damage the housing.
- Test Functionality: Before reassembling the entire speaker, perform a low-volume test. Connect the driver to an amplifier (at very low volume) and play some audio to ensure sound is produced clearly and without distortion.
- Reassemble Speaker: Once confirmed functional, carefully re-mount the tweeter driver into its enclosure and replace the speaker grille.
Operating Considerations
The LASE NH-12ND diaphragm is a passive component within a larger speaker system. Its operation is directly tied to the performance of the overall tweeter driver and amplifier. Proper operation involves ensuring the speaker system is used within its specified power handling limits.
- Power Handling: Refer to your speaker system's specifications for its maximum power handling. Exceeding these limits can damage the diaphragm and other speaker components.
- Amplifier Matching: Use an amplifier that is appropriately matched in power output to your speaker system's requirements. Underpowering an amplifier can lead to clipping, which generates harmful square waves that can damage tweeters.
- Crossover Settings: Ensure your speaker system's crossover network is functioning correctly. The crossover directs appropriate frequencies to the tweeter, preventing low frequencies that could damage the diaphragm.
- Environmental Factors: Avoid exposing the speaker system to extreme temperatures, high humidity, or direct sunlight, which can degrade diaphragm materials over time.
Maintenance
The LASE NH-12ND diaphragm requires minimal maintenance once installed. However, periodic checks can help ensure its longevity and optimal performance.
- Dust and Debris: Periodically inspect the tweeter for any accumulation of dust or debris, especially if the speaker grille is removable. Use a soft brush or compressed air to gently remove any foreign particles. Avoid touching the diaphragm dome directly.
- Connection Integrity: If the speaker is frequently moved or subjected to vibrations, occasionally check the electrical connections to the diaphragm to ensure they remain secure.
- Sound Quality Monitoring: Listen for any changes in sound quality, such as distortion, buzzing, or reduced high-frequency output, which could indicate an issue with the diaphragm or other speaker components.
Troubleshooting
If you experience issues after installing the LASE NH-12ND diaphragm, refer to the following common problems and solutions:
| Problem | Possible Cause | Solution |
|---|---|---|
| No sound from tweeter |
|
|
| Distorted or buzzing sound |
|
|
| Weak or muffled high frequencies |
|
|
If the problem persists after attempting these solutions, it may indicate an issue with another component of your speaker system or amplifier, or professional assistance may be required.
Specifications
| Feature | Specification |
|---|---|
| Model | NH-12ND |
| Compatibility | NEXO NH 12ND 1.0R/K, YAMAHA NEXO Driver Tweeter Speaker Systems |
| Overall Diaphragm Diameter | 3 3/8" (85.7mm) |
| Voice Coil Diameter | 1 7/16" (36.4mm) |
| Nominal Impedance | 16 ohms |
| Diaphragm Material | Neodymium |
Warranty and Support
For information regarding warranty coverage and technical support for your LASE NH-12ND diaphragm, please refer to the original purchase documentation or contact the seller directly. As a replacement part, warranty terms may vary.
For further assistance, please contact your authorized LASE dealer or the point of purchase.