
1. Introduction
This user manual provides essential information for the safe and efficient operation of your Subtransfer A3 XP600 DTF Printer. Please read this manual thoroughly before operating the printer to ensure proper setup, usage, and maintenance. Retain this manual for future reference.

Image 1.1: The Subtransfer A3 XP600 DTF Printer, showcasing its compact design and external ink system.
2. Product Features
The Subtransfer A3 XP600 DTF Printer is designed with advanced features to enhance your printing experience:
- Automatic White Ink Anti-Precipitation System: Features an adjustable white ink circulation and stirring system to prevent ink clogs and blockages, ensuring smooth ink flow. Includes automatic printhead cleaning.
- Visual External Cartridge: Allows for easy monitoring of ink levels and convenient refilling at any time.
- Efficient Printing Speed: Equipped with an XP600 printhead, capable of printing an A3 (13-inch) full width in approximately 3 minutes. Can produce up to 180 pictures per day.
- Touch Screen Control Panel: Provides a simple and clear interface for controlling cleaning, printing, paper feed, and paper return functions. Supports custom LOGO function.
- Superior Print Quality: Achieves an ultra-high resolution of 720x1440dpi for vibrant colors and precise details.
- Adjustable Press Wheels: Each press wheel can be independently adjusted for balanced and stable paper feeding, preventing wrinkles.
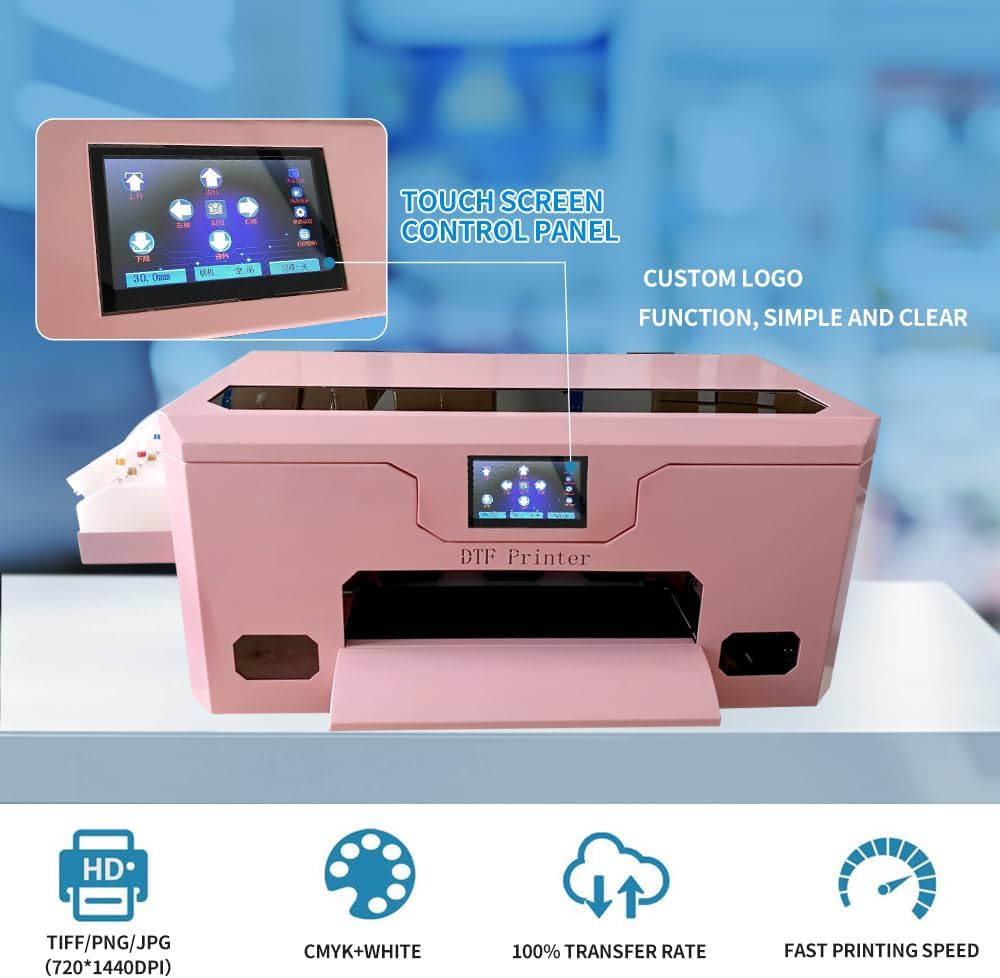
Image 2.1: Close-up of the printer's touch screen control panel, showing its intuitive interface and custom logo function.

Image 2.2: Detailed view of the printer's internal components, including the automatic white ink anti-precipitation system, ink cartridge, running-in wheel, and paper rewinding system.
3. Setup Instructions
3.1 Unpacking and Placement
- Carefully remove the printer from its packaging.
- Place the printer on a stable, level surface with adequate space for operation and maintenance.
- Ensure the operating environment is between 15-35°C as recommended for optimal performance.
3.2 Power Connection
- Connect the power cable to the printer and a suitable power outlet.
- Verify the voltage setting of the machine. Units smaller than 24x32 inches are typically set to 110V, while larger units are 220V. Confirm with the supplier if unsure.
3.3 Ink Installation
- Fill the external ink cartridges with the appropriate DTF inks (CMYK + White).
- Ensure the white ink circulation system is active to prevent pigment settling.
3.4 Software Installation
- Install the RIIN software on your computer (compatible with Windows 10/11).
- Connect the printer to your computer using the provided USB 2.0 cable.
- Follow the software instructions for driver installation and initial setup.
4. Operating Instructions
4.1 Preparing for Print
- Design Preparation: Create or import your design in TIFF, PNG, or JPG format. Ensure the resolution is suitable for 720x1440dpi printing.
- Film Loading: Load the DTF film into the printer. Adjust the press wheels to ensure the film feeds smoothly without wrinkles.
- Ink Check: Verify that all ink cartridges have sufficient ink levels using the visual external cartridges.
4.2 Printing Process
- Send to Printer: From the RIIN software, send your prepared design to the printer.
- Monitor Printing: Observe the printing process. The printer will apply the color inks first, followed by a white ink layer.
- Powder Application: After printing, the film will move to the powder application section (if using an integrated system) where hot-melt adhesive powder is applied.
- Curing: The powdered film then proceeds to the curing unit to melt and set the adhesive.
Video 4.1: Demonstration of the DTF printing process, showing the printer applying white ink to the film and the subsequent powder application and curing stages.
4.3 Transferring the Design
- Once the film is cured, it is ready for transfer.
- Use a heat press to transfer the design from the film onto your desired textile (e.g., clothes, backpacks, shoes, hats).
- Follow the heat press manufacturer's instructions for temperature, pressure, and time settings.

Image 4.1: Examples of items that can be customized using the DTF printer, including t-shirts, hats, and bags.
5. Maintenance
5.1 Automatic Cleaning
- The printer features an automatic printhead cleaning function. Ensure this is enabled and runs regularly to prevent clogs.
- Refer to the touch screen control panel for initiating manual cleaning cycles if needed.
5.2 White Ink Circulation
- The adjustable white ink circulation and stirring system is crucial for preventing white ink precipitation.
- Regularly check that the system is functioning correctly to maintain optimal white ink flow.
5.3 General Cleaning
- Keep the printer's exterior clean and free of dust and ink residue.
- Periodically inspect the paper path and rollers for any debris that could affect feeding.
6. Troubleshooting
| Problem | Possible Cause | Solution |
|---|---|---|
| Poor Print Quality / Streaks | Clogged printhead nozzles, low ink levels, incorrect print settings. | Perform printhead cleaning cycles. Check ink levels and refill if necessary. Verify print resolution and color settings in software. |
| White Ink Settling | White ink circulation system not active or malfunctioning. | Ensure the white ink circulation and stirring system is running. Check for any blockages in the circulation lines. |
| Paper Jams / Film Wrinkling | Improper film loading, misaligned press wheels, debris in paper path. | Reload film correctly. Adjust press wheels for even pressure. Clear any obstructions from the paper path. |
| Printer Not Responding | Loose USB connection, software error, power issue. | Check USB cable connection. Restart printer and computer. Verify power supply. Reinstall printer drivers if necessary. |
7. Specifications
| Feature | Detail |
|---|---|
| Brand | Subtransfer |
| Model Name | XP600 |
| Printing Technology | Direct to Film (DTF) |
| Printhead | XP600 Single Printhead |
| Maximum Print Resolution | 720 x 1440 dpi |
| Maximum Media Size | A3 (13-inch width) |
| Connectivity Technology | USB 2.0 |
| Printer Output | Color |
| Product Dimensions (D x W x H) | 31" x 18" x 18" |
| Operating System Compatibility | Windows 10/11 |
| Special Feature | Automatic White Ink Anti-Precipitation System (Clog-Free) |
| Power Requirement | 110V (for units smaller than 24x32 inches) or 220V (for units 24x32 inches or larger) |
| GTIN / UPC | 768825091015 |
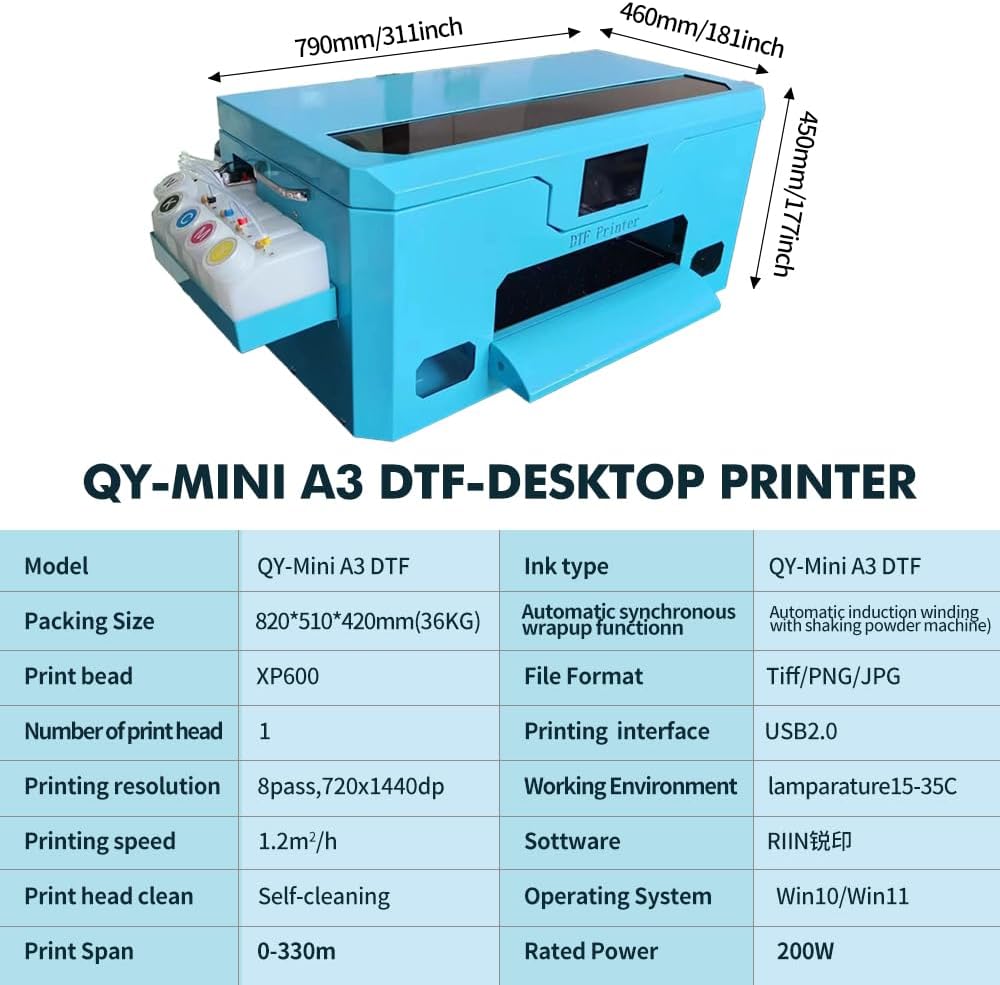
Image 7.1: Diagram illustrating the dimensions of the QY-Mini A3 DTF-Desktop Printer.
8. Warranty and Support
8.1 Warranty Information
The Subtransfer A3 XP600 DTF Printer comes with a 1-Year Limited Warranty. This warranty covers manufacturing defects and ensures the product is free from defects in materials and workmanship under normal use during the warranty period.
For specific terms and conditions of the warranty, please refer to the warranty card included with your product or contact Subtransfer customer support.
8.2 Customer Support
For technical assistance, troubleshooting, or warranty claims, please contact Subtransfer customer support. Contact details can typically be found on the product packaging or the official Subtransfer website.