1. Introduction
The Saker Cordless Tile Vibration Tool (Model SK-7019A) is a portable, handheld device designed for efficient and precise tile installation. This tool combines powerful suction with adjustable vibration to ensure optimal adhesion and leveling of various tile types on different surfaces. Its cordless design, digital display, and multiple speed settings enhance user convenience and work efficiency. This manual provides essential information for safe operation, setup, maintenance, and troubleshooting.

Figure 1: Saker Cordless Tile Vibration Tool with included accessories.
2. Safety Information
Always read and understand all safety warnings and instructions before operating this tool. Failure to follow these instructions may result in electric shock, fire, and/or serious injury.
2.1 General Safety Warnings
- Work Area Safety: Keep your work area clean and well-lit. Cluttered or dark areas invite accidents.
- Electrical Safety: Do not expose power tools to rain or wet conditions. Water entering a power tool will increase the risk of electric shock.
- Personal Safety: Always wear appropriate personal protective equipment, including eye protection, gloves, and sturdy footwear. Avoid loose clothing or jewelry.
- Tool Use and Care: Do not force the tool. Use the correct tool for your application. Disconnect the battery pack from the tool before making any adjustments, changing accessories, or storing power tools.
2.2 Battery Safety
- Use only the charger specified by the manufacturer to recharge. A charger that is suitable for one type of battery pack may create a risk of fire when used with another battery pack.
- Do not use battery packs that are damaged or modified. Damaged or modified batteries may exhibit unpredictable behavior resulting in fire, explosion, or risk of injury.
- Do not expose a battery pack or tool to fire or excessive temperature. Exposure to fire or temperature above 130°C (265°F) may cause explosion.
- Follow all charging instructions and do not charge the battery pack or tool outside the temperature range specified in the instructions. Improperly charging or at temperatures outside the specified range may damage the battery and increase the risk of fire.
3. Package Contents
Verify that all items listed below are included in your package. If any items are missing or damaged, please contact Saker customer support.
- 1 x Cordless Tile Vibration Tool
- 2 x 1.5Ah 22V Lithium-Ion Batteries
- 1 x Battery Charger
- 1 x User Manual (this document)
- 1 x Storage Bag

Figure 2: Included components in the Saker Cordless Tile Vibration Tool package.
4. Product Overview
Familiarize yourself with the components of your Saker Cordless Tile Vibration Tool.

Figure 3: Key components of the Saker Cordless Tile Vibration Tool.
- Power Switch: Activates or deactivates the tool.
- Lifting Rod: Engages and disengages the suction cup mechanism.
- Lock Bolt: Secures the lifting rod in position.
- Suction Cup: Creates a vacuum seal on the tile surface for lifting and vibration.
- Power Button (Start-up): Initiates the vibration function.
- Vibration Adjust (+/-): Buttons to increase or decrease the vibration speed.
- Level Bubble: Integrated bubble level for checking tile alignment.
- Digital Display: Shows the current vibration speed level.
5. Setup
5.1 Charging the Batteries
- Connect the charger to a standard power outlet.
- Insert a 22V battery into the charger. Ensure it is seated correctly.
- Allow the battery to charge fully. The charger's indicator light will typically change color or turn off when charging is complete. A full charge takes approximately 2 hours.
- Remove the battery from the charger once fully charged.
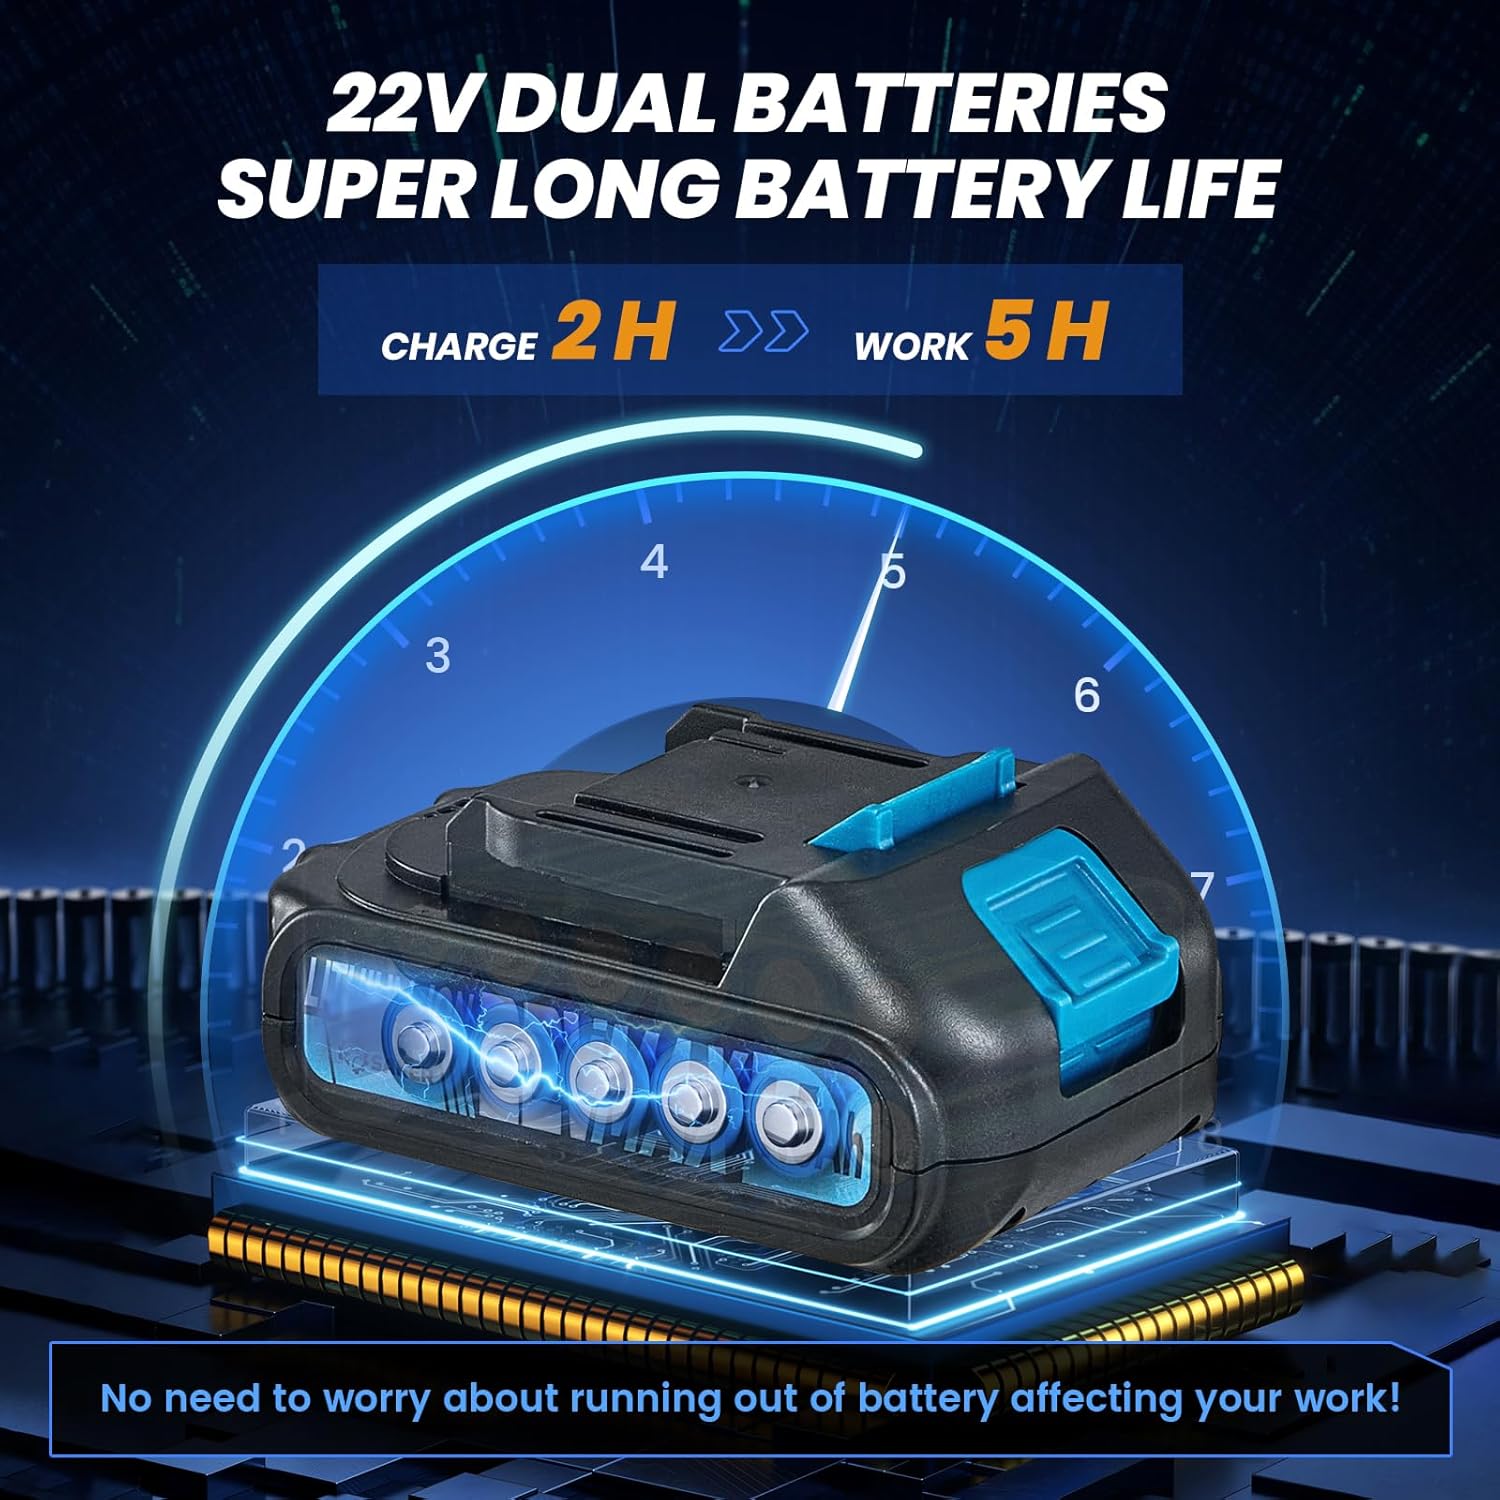
Figure 4: Charging the 22V Lithium-Ion battery.
5.2 Battery Installation
- Ensure the tool's power switch is in the OFF position.
- Align the charged battery with the battery slot at the base of the tool handle.
- Slide the battery into the slot until it clicks securely into place.
- To remove the battery, press the release button (if present) and slide the battery out.

Figure 5: Installing the battery into the tool.
6. Operating Instructions
6.1 Powering On/Off
Locate the main power switch on the tool's handle. Flip the switch to the 'ON' position to power on the tool. Flip it to 'OFF' when not in use or when changing batteries.

Figure 6: Engaging the main power switch.
6.2 Attaching to Tile (Suction Function)
- Ensure the tile surface is clean and dry for optimal suction.
- Place the suction cup flat onto the tile surface.
- Press down firmly on the tool and engage the Lifting Rod (refer to Figure 3) to create a vacuum seal. The Lock Bolt can be used to maintain suction.
- Verify that the tile is securely held by the suction cup before lifting or moving. The tool can absorb tiles with a load-bearing capacity of over 130 pounds.

Figure 7: Engaging the lifting rod for suction.
6.3 Adjusting Vibration Speed
- With the tool powered on, press the 'Start-up' Power Button (refer to Figure 3) to begin vibration.
- Use the '+' and '-' buttons on the control panel to adjust the vibration speed. There are 5 levels of adjustment, up to 18000r/min.
- The Digital Display will show the current vibration level. Adjust the speed based on the tile size, type, and adhesive thickness.

Figure 8: Control panel for vibration adjustment.
6.4 Vibrating the Tile for Adhesion
- After applying adhesive to the surface and placing the tile, attach the tool's suction cup to the tile.
- Activate the vibration function and gently move the tool across the tile surface. This helps to spread the adhesive evenly, remove air pockets, and ensure a strong bond.
- Use the integrated Level Bubble to check for proper alignment and flatness during the process.
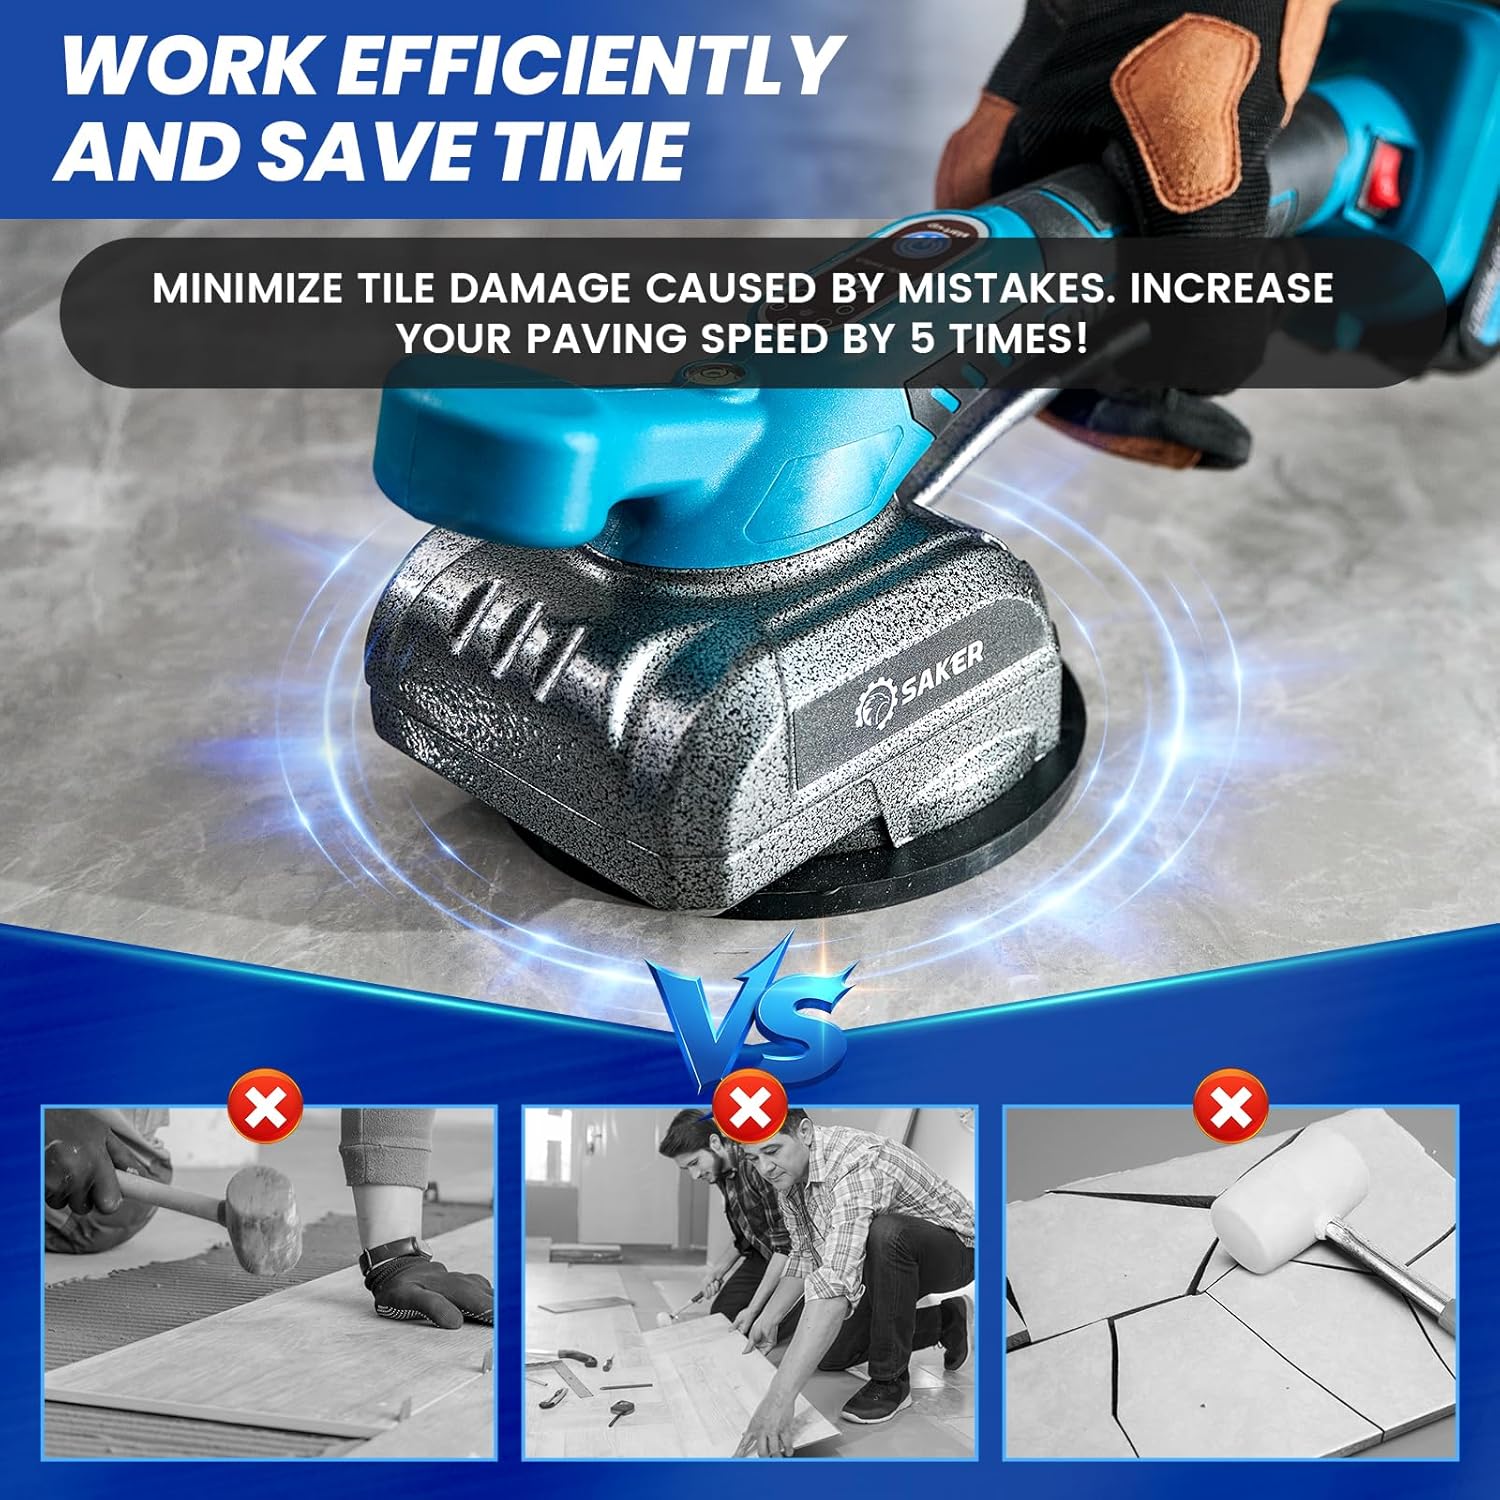
Figure 9: Using the tool to vibrate and level tiles.
6.5 Removing the Tool
To release the suction, disengage the Lifting Rod. Carefully lift the tool from the tile surface.
7. Maintenance
7.1 Cleaning
- Always ensure the tool is powered off and the battery is removed before cleaning.
- Wipe the tool body with a clean, damp cloth. Do not use harsh chemicals or abrasive cleaners.
- Clean the suction cup thoroughly after each use to remove any adhesive residue or debris. A clean suction cup ensures optimal performance.
7.2 Battery Care and Storage
- Store batteries in a cool, dry place away from direct sunlight and extreme temperatures.
- For long-term storage, charge batteries to approximately 50% capacity.
- Avoid fully discharging batteries, as this can reduce their lifespan.
7.3 General Inspection
- Regularly inspect the tool for any signs of damage, wear, or loose components.
- Ensure all moving parts operate smoothly.
- If any damage is found, discontinue use and contact customer support for repair or replacement.
8. Troubleshooting
This section addresses common issues you might encounter with your Saker Cordless Tile Vibration Tool.
| Problem | Possible Cause | Solution |
|---|---|---|
| Tool does not turn on. | Battery not charged or improperly installed. Main power switch is off. | Ensure battery is fully charged and correctly inserted. Flip the main power switch to 'ON'. |
| Poor or no suction. | Suction cup is dirty or damaged. Tile surface is wet or uneven. Lifting rod not fully engaged. | Clean the suction cup. Ensure tile surface is clean and dry. Fully engage the lifting rod and lock bolt. |
| Vibration is weak or inconsistent. | Low battery charge. Incorrect speed setting. | Charge the battery. Adjust the vibration speed using the '+' button. |
| Battery not charging. | Charger not connected. Faulty battery or charger. | Ensure charger is properly plugged in. Try a different outlet. Contact customer support if issue persists. |
9. Specifications
| Feature | Specification |
|---|---|
| Brand | Saker |
| Model | SK-7019A |
| Voltage | 22 Volts |
| Battery Type | Lithium Ion |
| Number of Batteries | 2 (1.5Ah) |
| Item Weight | 5.17 pounds |
| Product Dimensions (LxWxH) | 14.29" x 7.17" x 5.67" |
| Max Load Capacity | Over 130 pounds |
| Max Tile Size | 59" x 59" |
| Vibration Speed | 5 levels, up to 18000 r/min |
| Material | Alloy Steel |
10. Warranty and Support
The Saker Cordless Tile Vibration Tool comes with a limited warranty. Please refer to the warranty card included in your package for specific terms and conditions. For any quality problems, questions about the product, or technical support, please contact Saker customer service. Keep your purchase receipt as proof of purchase for warranty claims.


