1. Introduction
This manual provides essential information for the safe and efficient operation, maintenance, and troubleshooting of your GENMAX GM10500XiT Tri Fuel Open Frame Inverter Generator. Please read all instructions carefully before operating the generator.
Safety Precautions
- Always operate the generator outdoors in a well-ventilventilated area to prevent carbon monoxide poisoning.
- Keep children and pets away from the generator.
- Do not operate the generator in rain or wet conditions.
- Ensure proper grounding before operation.
- Refer to the full safety guidelines in the user manual for comprehensive information.
2. Product Overview
The GENMAX GM10500XiT is a versatile tri-fuel inverter generator designed for various power needs, offering stable power output for sensitive electronics.
Key Features:
- Tri-Fuel Capability: Operates on Gasoline, LPG (Propane), and Natural Gas.
- Inverter Technology: Provides clean power (THD ≤3%) suitable for sensitive electronics.
- CO Sensor: Automatically shuts down the generator if hazardous levels of carbon monoxide are detected.
- 2-Wire Auto GEN Start: Allows for automatic starting and stopping via an external intelligent control system.
- Digital Display: Provides real-time operational parameters including hours, voltage, load, and frequency.
- Multiple Starting Options: Features one-button electric start, remote start, and recoil start.
- Portability: Equipped with foldable handles and never-deflating tires for easy transport.
Generator Components Diagram

Figure 2.1: Control Panel Layout
The control panel includes a digital display, main switch, low idle switch, engine start/stop button, DC 12V outlet, USB ports, auto gen start switch and port, parallel connection ports, AC 120V 20A outlets, AC 120/240V 30A outlet, AC 120/240V 50A outlet, circuit breaker, CO alert indicator, and ground terminal.

Figure 2.2: Detailed Control Panel
3. What's in the Box
Your GENMAX GM10500XiT generator comes with the following accessories:

Figure 3.1: Included Accessories
- Automatic START/STOP Cable (1)
- NEMA L14-30P Bonding Plug (1)
- NG Air Intake Connector (1)
- NG Quick Connector (1)
- NG Hose (1)
- LPG Hose (1)
- Rain Cover (1)
- Spark Plug Socket Wrench (1)
- Dual-Purpose Screwdriver (1)
- Wrench (2)
- Oil Funnel (1)
- Remote Control Key (1)
4. Setup
4.1 Assembly
Attach the wheels, support legs, and handles to the generator frame. Ensure all bolts and nuts are securely tightened.
4.2 Adding Engine Oil
Your unit has been shipped without engine oil. Add oil prior to starting or damage will occur. Engine will not start or will shut off if low oil is detected.
- Place the generator on a level surface.
- Slowly unscrew and remove the oil dipstick located near the battery.
- Using the provided oil funnel, add SAE 10W-30 engine oil until the oil level is at the proper mark on the dipstick. The capacity is 1.7 L (1.8 Qt / 57.5 Oz).
- Reinsert the dipstick, but do not tighten it, and remove it again to check the oil level. The oil should be between the minimum and maximum marks.
- After refueling, tighten the oil dipstick and wipe off any surrounding oil.

Figure 4.1: Magnetic Oil Dipstick
4.3 Adding Gasoline
- Ensure the generator is turned off and cooled down.
- Remove the fuel tank cap.
- Slowly add unleaded gasoline (87 minimum octane) to the fuel tank. Be careful not to overfill. Do not exceed the filter red line. When refueling, do not remove the fuel filter from the refueling port.
- Securely replace the fuel tank cap.
4.4 Connecting LPG Tank (Propane)
- Ensure the generator is turned off and cooled down.
- Remove the safety plug or cap from the LPG tank valve.
- Attach the other end of the provided LPG hose to the LPG connector on the tank.
- Screw the adapter onto the LPG/NG inlet on the generator.
- Tighten the LPG hose to the LPG/NG inlet of the generator.
- Open the cylinder valve on the LPG cylinder to start the flow of propane.
4.5 Connecting Natural Gas (NG) Supply Line
- Ensure the generator is turned off and cooled down.
- Screw the Natural Gas Adapter onto the natural gas supply line.
- Connect the natural gas hose to the natural gas supply line.
- Tighten the other end of the natural gas hose to the LPG/NG inlet of the generator.
- Open the valve on the natural gas supply line to start the flow of natural gas.
4.6 Connecting the Battery
- Connect the positive (+) and negative (-) electrodes of the battery to the corresponding terminals on the generator.
- Ensure connections are secure.
5. Operation
5.1 Starting the Generator
Before starting, ensure the generator is on a level surface, has sufficient fuel and oil, and all electrical loads are disconnected.
- Turn the fuel switch to "ON".
- Turn the Fuel Source Switch to the desired fuel position (Gasoline, LPG, or NG).
- Ensure the AUTO GEN START Switch is in the "OFF" position.
- Place the Circuit Breaker Switch in the "ON" position.
- Choose your starting method:
Push Button Start:
- Press the Main Switch to "ON".
- Press the start button for 1-3 seconds, then release, to start the generator.
Remote Start:
- Press the Main Switch to "ON".
- Push and hold the ON button on the remote start key fob for one second.
Recoil Start:
- Press the Main Switch to "ON".
- Firmly grasp and pull the recoil handle slowly until you feel resistance, let it retract then pull swiftly.
After about 5 seconds, the CO alarm light completes its self-check. Once the generator is running normally (1-2 minutes), you can connect the required equipment.
If the generator is running normally but there is no output, check if the green light on the GFCI socket is on. If the green light is not on, please press the RESET button after the generator starts to make the green light on.

Figure 5.1: 2-Wire Auto GEN Start
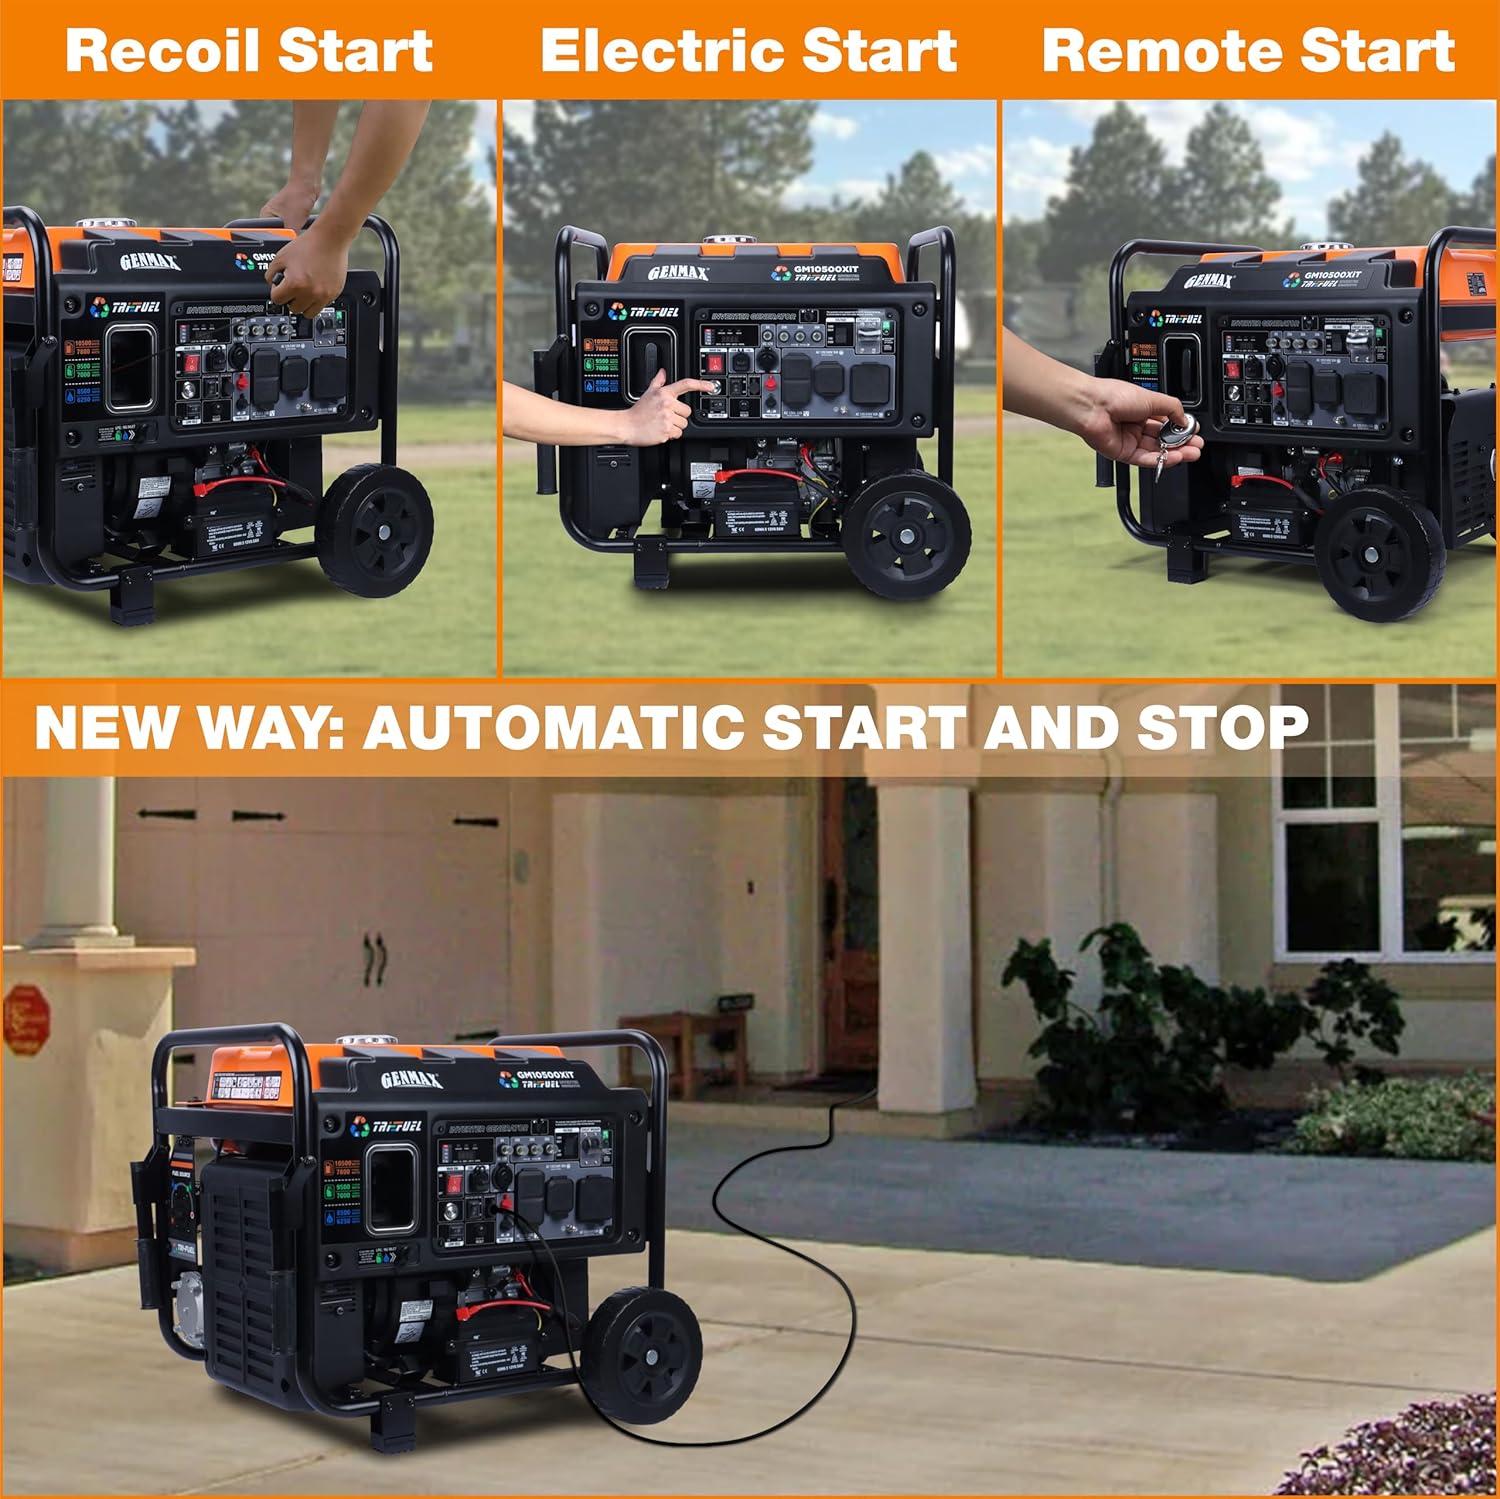
Figure 5.2: Multiple Starting Methods
5.2 Shutting Down the Generator
- Turn off and unplug all connected electrical loads.
- Choose your stopping method:
Button Stop:
- Press the start/stop button for 1-3 seconds to turn off the generator.
Remote Stop:
- Press the "OFF" button on the remote control for 1-3 seconds.
Long-term Storage Shutdown:
- If you do not use the generator for more than 7 days (168 hours), please press the main switch to the "OFF" position, which can prevent the battery from running out.
- Turn the Fuel Source Switch to the "OFF" position.
- Turn the fuel switch to "OFF".
6. Maintenance
Regular maintenance is crucial for the longevity and optimal performance of your generator. Always ensure the generator is off and cooled before performing any maintenance.
6.1 Engine Oil Change
- Place an oil pan (or suitable container) under the oil drain bolt.
- Remove the oil drain bolt and allow the oil to drain completely.
- After the oil has drained completely, replace the oil drain bolt.
- Follow the procedure of "Adding Engine Oil" to add new engine oil and check the oil level.
6.2 Spark Plug Inspection
- Pull out the spark plug cap.
- Unscrew the spark plug from the generator using the spark plug wrench included with this product.
- Inspect the spark plug for wear, carbon buildup, or damage. The spark plug gap should be 0.7-0.8mm. Adjust if necessary.
- Reinstall the spark plug and replace the spark plug cap.
6.3 Cleaning/Replacing the Air Filter
- Remove screws to remove the cover plate of the air cleaner.
- Remove the air filter element.
- Clean the components with cleaning agent.
- After cleaning, wrap the components in a cloth and screw them dry.
- Drip a few drops of oil to foam filter element and squeeze off excess oil.
- Return the air filter element to its original position. Reinstall the air filter cover.
6.4 Long-Term Storage
- The generator needs to discharge the residual fuel from the carburetor for long-term storage.
- Disconnect the battery cable when storing for a long time to avoid battery power loss.
7. Troubleshooting
If your generator experiences issues, refer to the following common troubleshooting steps. For more detailed information, consult the full user manual.
Common Issues:
- Generator will not start: Check fuel level, oil level, spark plug, and battery connection. Ensure the correct fuel type is selected.
- No power output: Check circuit breakers on the control panel. Ensure all loads are within the generator's capacity.
- CO Alert activated: Move the generator to a well-ventilated outdoor area. Allow it to cool down before restarting.
8. Specifications
| Specification | Value |
|---|---|
| Brand | GENMAX |
| Model Name | GM10500XiT |
| Starting Wattage (Gasoline) | 10500 Watts |
| Running Wattage (Gasoline) | 7800 Watts |
| Starting Wattage (LPG) | 9500 Watts |
| Running Wattage (LPG) | 7000 Watts |
| Starting Wattage (Natural Gas) | 8500 Watts |
| Running Wattage (Natural Gas) | 6250 Watts |
| Fuel Type | Tri Fuel (Gasoline, Propane, Natural Gas) |
| Engine Type | Internal Combustion Engine with Inverter |
| Oil Type | SAE 10W-30 |
| Oil Capacity | 1.7 L (1.8 Qt / 57.5 Oz) |
| Tank Volume | 4.5 Liters (10.5 Gallons) |
| Product Dimensions | 27.12"L x 25.27"W x 23.62"H |
| Item Weight | 120.7 pounds |
| Total Power Outlets | 2 (plus USB and DC 12V) |
9. Warranty and Support
The GENMAX GM10500XiT generator comes with a 1-year limited warranty from the date of purchase. This warranty covers defects in materials and workmanship under normal use.
For warranty claims, technical support, or any questions regarding your generator, please contact GENMAX customer service. Free lifetime technical support from experts is available.
Refer to the full user manual for complete warranty details and contact information.


