
1. Introduction
This manual provides essential instructions for the safe operation, installation, maintenance, and troubleshooting of your VEVOR KC-503 Tire Changer Machine. Please read this manual thoroughly before operating the machine to ensure proper use and to prevent injury or damage.
The VEVOR KC-503 is a robust tire changer designed for efficient mounting and dismounting of tires on various vehicles, including sedans, SUVs, and pickup trucks. It features a 2.0HP copper motor, a pneumatic assist arm, and pedal-operated controls for ease of use.
2. Safety Instructions
Always prioritize safety when operating the tire changer. Failure to follow these instructions may result in serious injury or equipment damage.
- Read the Manual: Understand all operating procedures and safety warnings before use.
- Personal Protective Equipment (PPE): Always wear safety glasses, gloves, and appropriate footwear. Avoid loose clothing or jewelry that could get caught in moving parts.
- Work Area: Ensure the work area is clean, well-lit, and free from obstructions. Keep bystanders, especially children, away from the machine during operation.
- Power Supply: Connect the machine to a grounded power outlet with the correct voltage (AC120V 60Hz). Do not use extension cords unless absolutely necessary and ensure they are rated for the machine's power requirements.
- Air Supply: Ensure the air compressor connected to the machine is capable of providing the required pressure and is properly maintained.
- Machine Stability: Ensure the tire changer is placed on a level, stable surface and securely anchored if required.
- Tire Inflation: Never over-inflate tires. Use the integrated pressure gauge and follow tire manufacturer recommendations. Stand clear of the tire during inflation.
- Moving Parts: Keep hands and feet clear of all moving parts, including the clamping jaws, assist arm, and bead breaker.
- Maintenance: Disconnect power and air supply before performing any maintenance or adjustments.
- Qualified Personnel: Only trained and authorized personnel should operate or service this equipment.
3. Setup and Assembly
This section outlines the steps for assembling and preparing your VEVOR KC-503 Tire Changer Machine for first use.
3.1 Unpacking and Inspection
- Carefully unpack all components from the shipping crate.
- Inspect all parts for any signs of shipping damage. Report any damage to the carrier immediately.
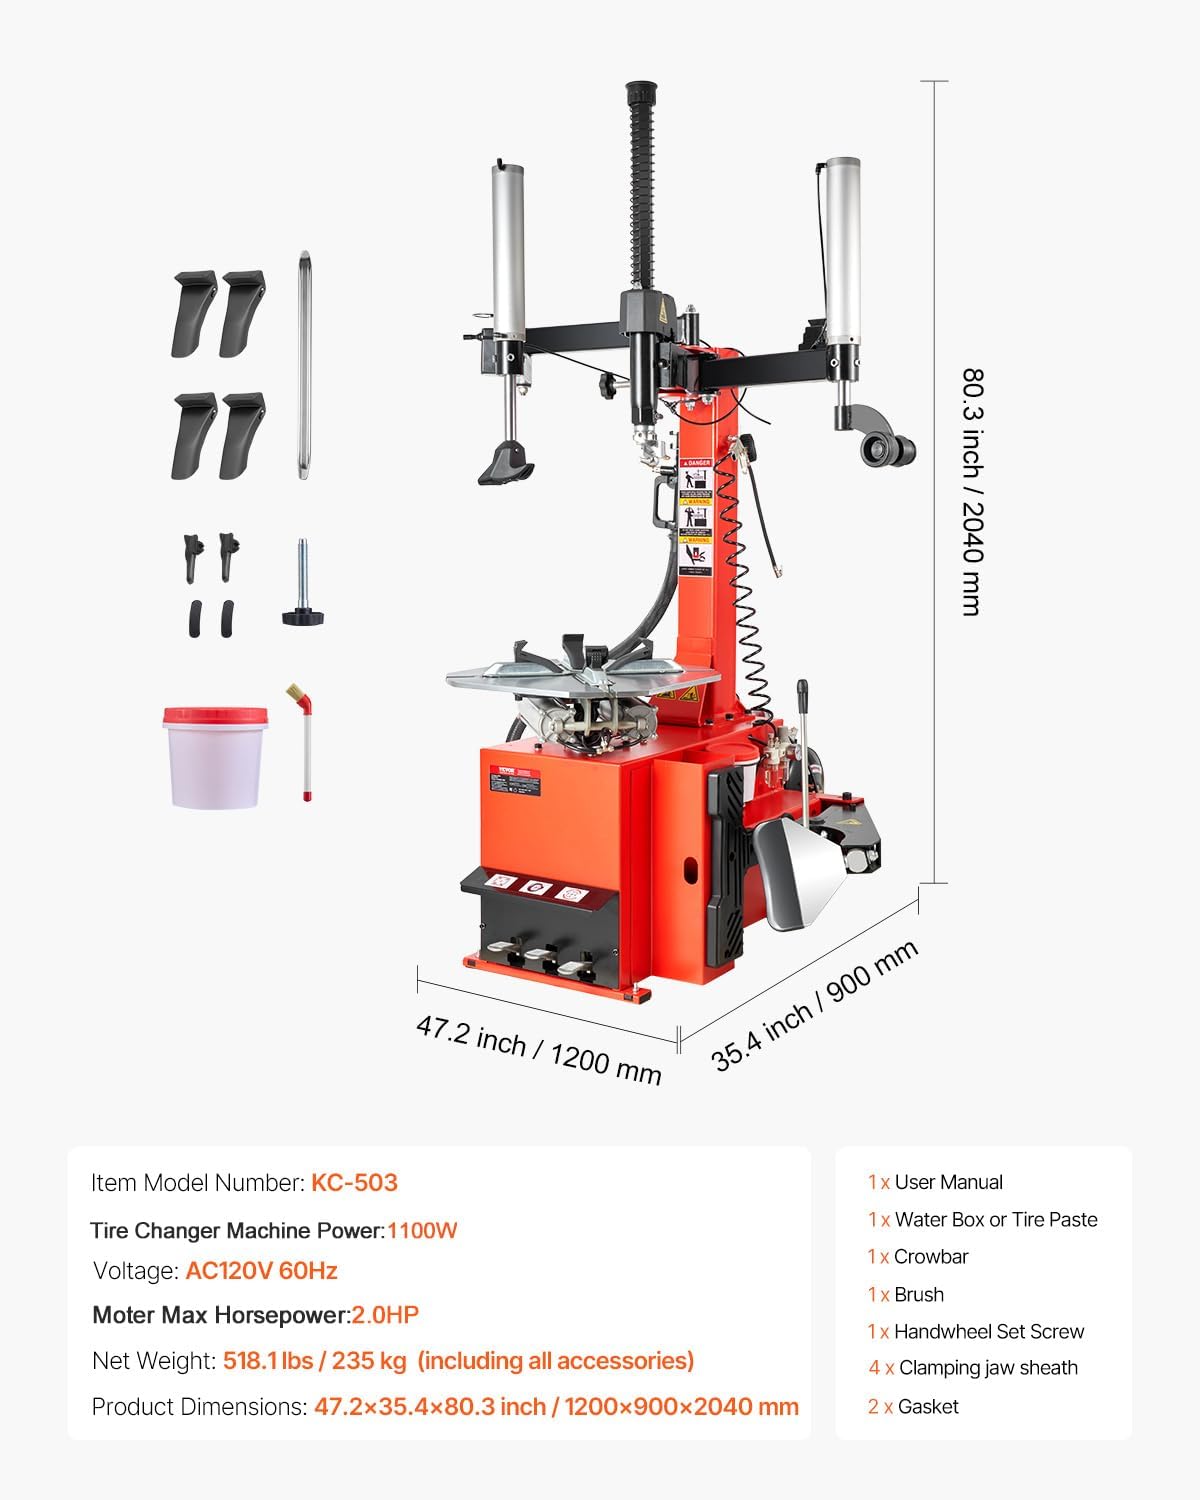
- Verify that all items listed in the "What's in the Box" section are present.
3.2 Component Identification
Familiarize yourself with the main components of the tire changer:
- Main Column/Tower
- Turntable/Work Plate with Clamping Jaws
- Bead Breaker Shovel
- Pneumatic Assist Arm (if applicable to your model)
- Control Pedals (Clamping, Rotation, Bead Breaker)
- Air Pressure Gauge and Inflation Tank
- Mount/Demount Head (Bird Beak)
3.3 Assembly Steps
- Secure the Machine: Position the tire changer on a solid, level concrete floor. It is recommended to anchor the machine to the floor using appropriate fasteners for stability during operation.
- Install the Main Column: Attach the main column to the base unit, ensuring all bolts are securely tightened.
- Mount the Assist Arm: If your model includes a pneumatic assist arm, attach it to the main column as per the specific instructions provided in the separate assembly diagram (if any).
- Connect Air Lines: Connect the air supply line from your compressor to the machine's air inlet. Ensure all pneumatic connections are secure and leak-free. The machine is equipped with a 1.0Mpa inflation tank and air filter.
- Electrical Connection: Connect the power cord to a grounded AC120V 60Hz power outlet.
- Initial Checks: Before operation, perform a functional check of all pedals and moving parts to ensure smooth movement and proper response.

4. Operating Instructions
This section details the procedures for mounting and dismounting tires using the VEVOR KC-503 Tire Changer Machine.
4.1 General Operation Overview
The machine is controlled via foot pedals, which activate the clamping jaws, turntable rotation, and bead breaker. The pneumatic assist arm aids in handling stiff or low-profile tires.

4.2 Dismounting a Tire
- Deflate Tire: Remove the valve core to completely deflate the tire.
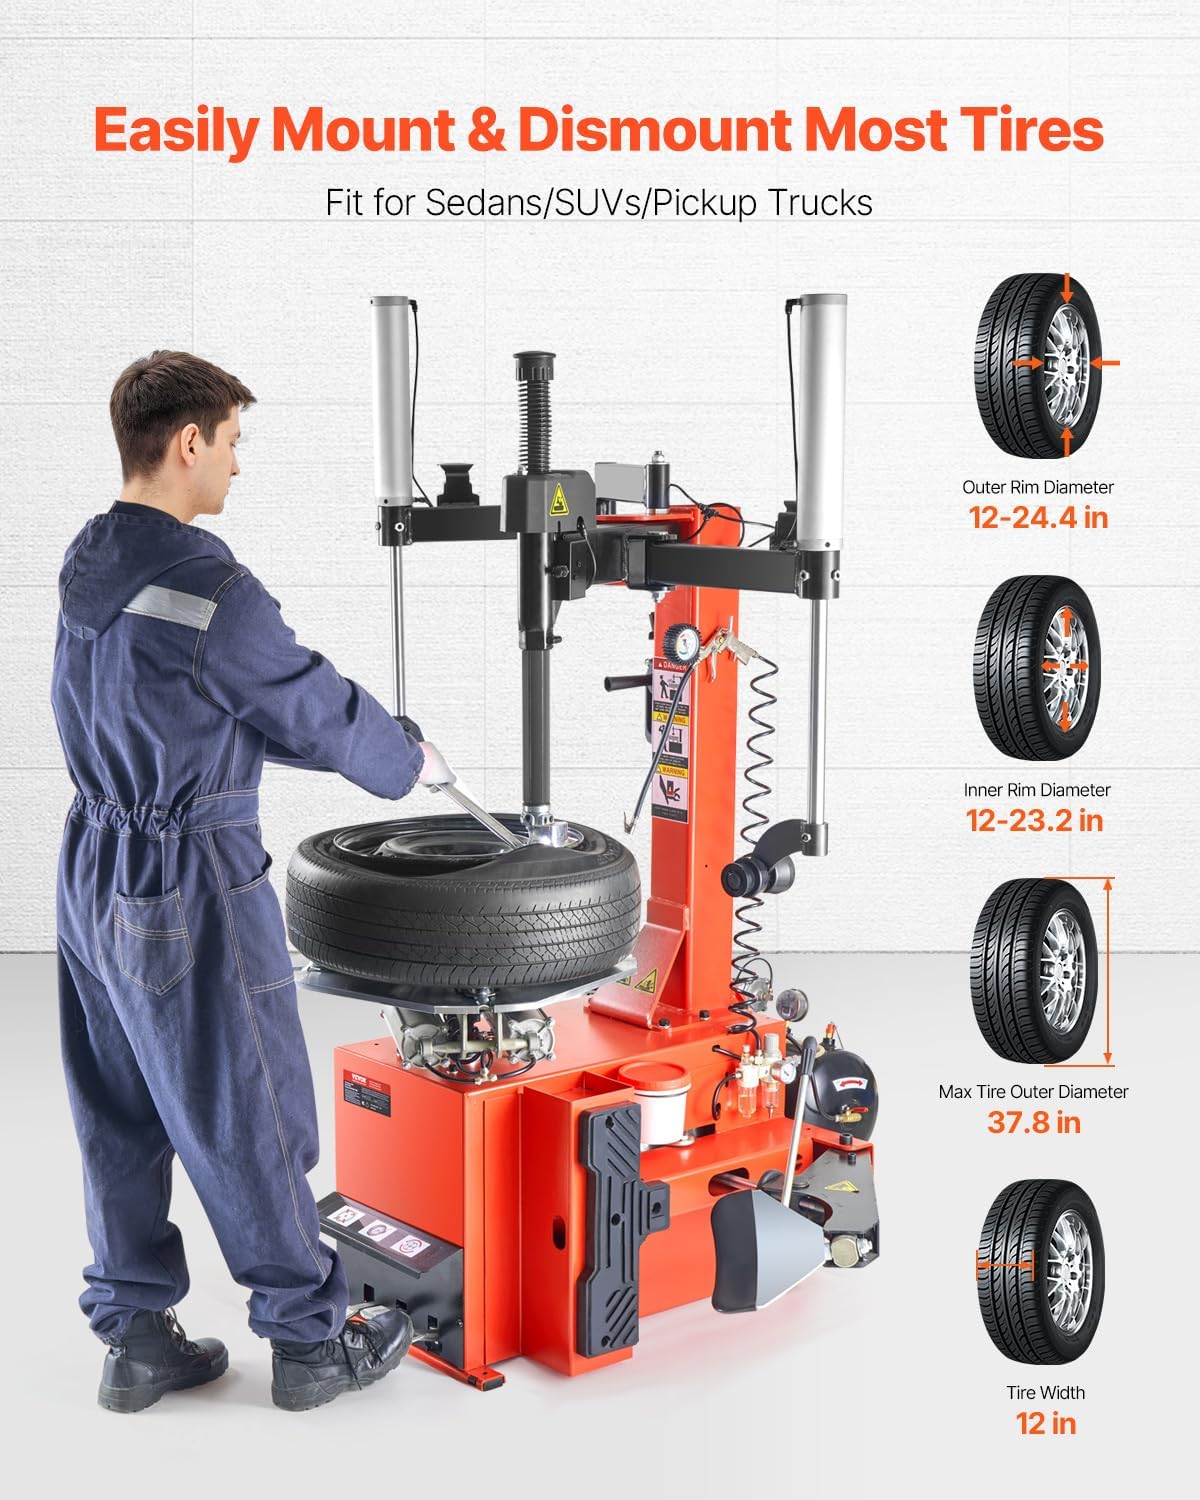
- Break Beads: Position the wheel on the bead breaker arm. Use the bead breaker pedal to press the bead breaker shovel against the tire sidewall, separating the tire bead from the rim. Repeat for both sides of the tire.
- Clamp Wheel: Place the wheel onto the turntable. Use the clamping pedal to activate the clamping jaws, securing the wheel firmly to the turntable. Ensure the jaws are properly positioned to avoid damaging the rim. The clamping jaw sheath features upgraded covers to increase friction and safeguard the rim.
- Position Mount/Demount Head: Adjust the mount/demount head (bird beak) so it is just above the rim edge. The alloy bird beak has a full protective pad to prevent scratches.
- Leverage Tire: Use a tire lever (crowbar) to lift the top bead of the tire over the mount/demount head.
- Rotate Turntable: Activate the turntable rotation pedal to rotate the wheel, allowing the mount/demount head to peel the tire bead off the rim.
- Remove Bottom Bead: Once the top bead is off, repeat the process for the bottom bead, using the tire lever and turntable rotation.
- Remove Tire: Once both beads are dismounted, remove the tire from the rim.
4.3 Mounting a Tire
- Lubricate Beads: Apply tire lubricant (tire paste) to both tire beads and the rim edges.
- Clamp Wheel: Secure the rim to the turntable using the clamping jaws.
- Position Bottom Bead: Place the bottom bead of the tire over the mount/demount head. Use the turntable rotation pedal to guide the bead onto the rim. The universal tire shovel design conforms to the tire's curvature, with added padding to avoid damage.
- Position Top Bead: For the top bead, use the pneumatic assist arm to apply downward pressure on the tire sidewall, guiding the bead over the mount/demount head as the turntable rotates. This assists with installation, especially for tough tires.
- Inflate Tire: Once both beads are seated, connect an air hose to the tire valve. Use the integrated air pressure gauge to inflate the tire to the manufacturer's recommended pressure. Ensure the 1.0Mpa inflation tank is connected to your compressor.
- Check for Leaks: After inflation, check for any air leaks around the tire beads.
4.4 Tire Compatibility
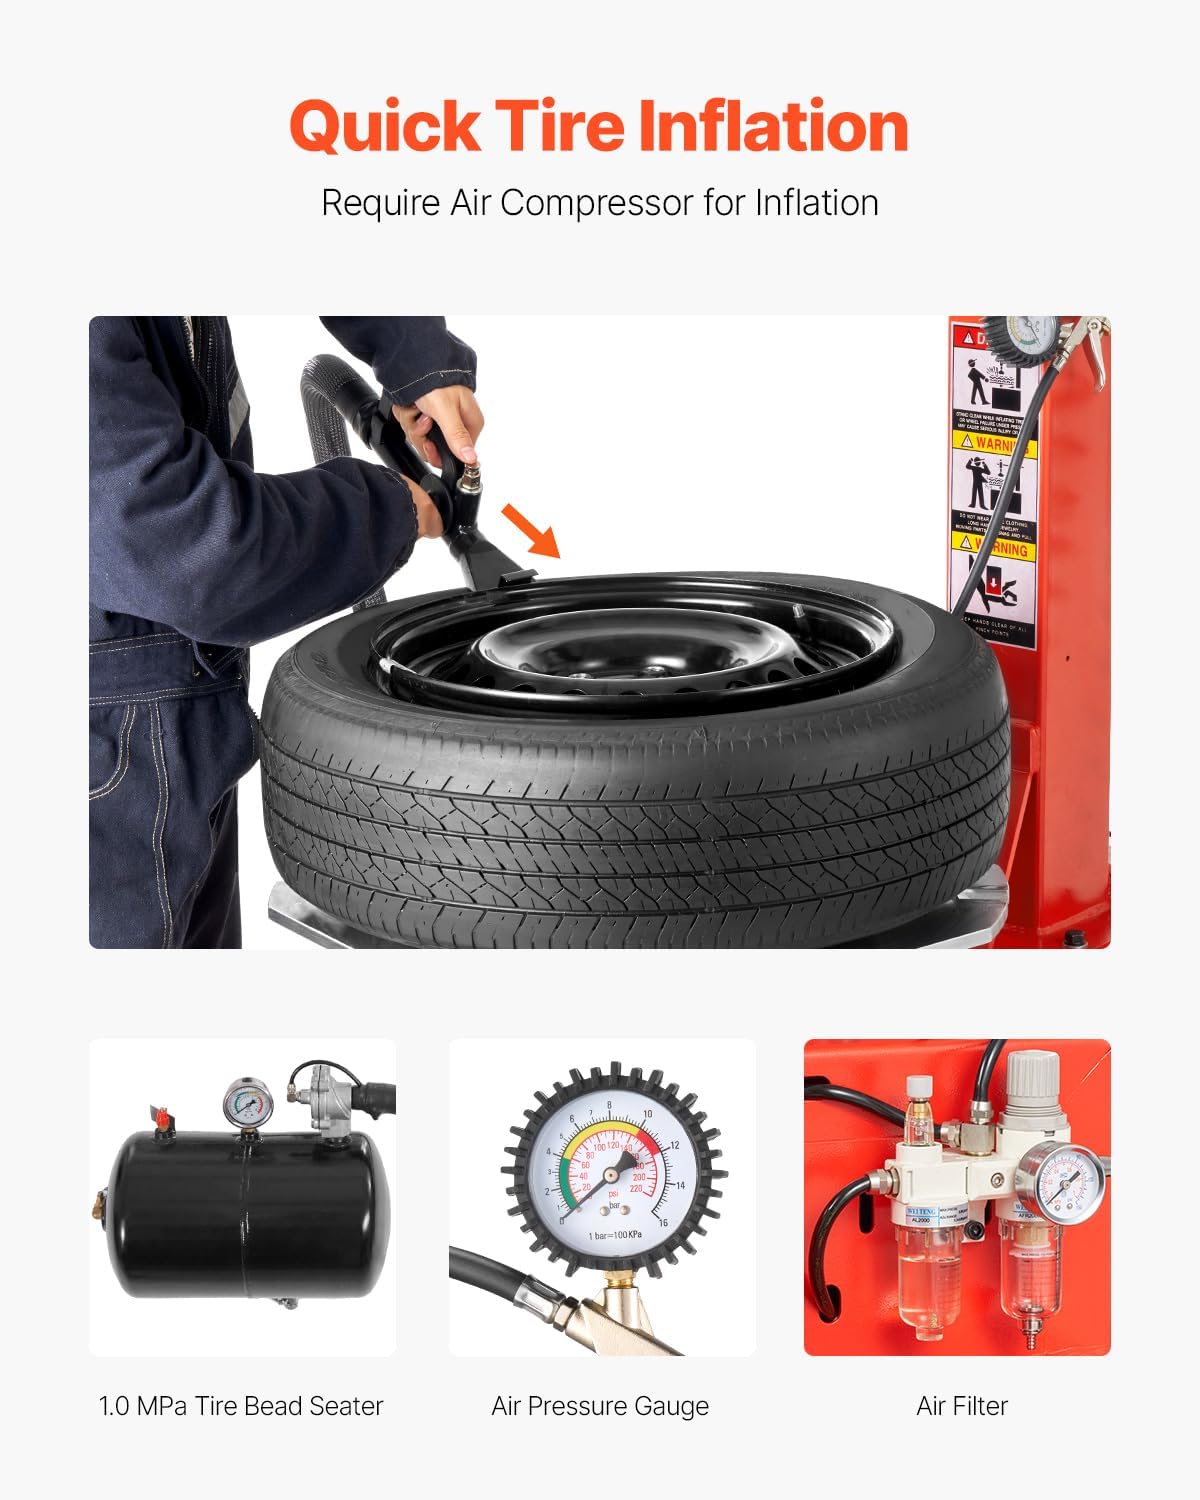
The VEVOR KC-503 Tire Changer is compatible with a wide range of tire sizes:
- Outer Rim Diameter: 12-24.4 inches
- Inner Rim Diameter: 12-23.2 inches
- Maximum Tire Outer Diameter: 37.8 inches
- Maximum Tire Width: 12 inches
It is suitable for cars, SUVs, pickup trucks, and other passenger vehicles.
5. Maintenance
Regular maintenance ensures the longevity and safe operation of your tire changer. Always disconnect power and air supply before performing maintenance.
- Lubrication: Periodically lubricate all moving parts, including the clamping jaws, assist arm pivots, and turntable mechanism, with appropriate grease or oil.
- Air Filter: Regularly check and drain the water from the air filter/regulator. Replace the filter element if it becomes clogged.
- Hoses and Connections: Inspect all air hoses and electrical connections for wear, damage, or leaks. Replace any damaged components immediately.
- Fasteners: Check all bolts and fasteners for tightness. Re-tighten as necessary.
- Mount/Demount Head: Inspect the mount/demount head and protective pads for wear. Replace if worn to prevent rim damage.
- Cleaning: Keep the machine clean and free from dirt, grease, and tire debris.
6. Troubleshooting
This section provides solutions to common issues you might encounter with your tire changer.
| Problem | Possible Cause | Solution |
|---|---|---|
| Machine does not power on. | No power supply; tripped circuit breaker; faulty wiring. | Check power cord connection; reset circuit breaker; inspect wiring (by qualified personnel). |
| Turntable does not rotate. | Motor issue; pedal malfunction; mechanical obstruction. | Check motor connection; inspect pedal mechanism; clear any obstructions. |
| Clamping jaws do not operate. | No air pressure; air leak; pedal malfunction; dirty jaws. | Check air supply and connections; clean and lubricate jaws; inspect pedal. |
| Bead breaker is ineffective. | Insufficient air pressure; worn bead breaker shovel; improper positioning. | Ensure adequate air pressure; inspect and replace shovel if worn; adjust tire position. |
| Air leaks from connections. | Loose fittings; damaged O-rings or hoses. | Tighten all fittings; replace damaged O-rings or hoses. |
If you encounter issues not listed here or if the suggested solutions do not resolve the problem, please contact customer support.
7. Specifications
| Feature | Detail |
|---|---|
| Model Number | KC-503 (BTJ-2) |
| Motor Power | 2.0 HP (1100W) Copper Motor |
| Voltage | AC120V 60Hz |
| Outer Rim Diameter | 12 - 24.4 inches |
| Inner Rim Diameter | 12 - 23.2 inches |
| Max Tire Outer Diameter | 37.8 inches |
| Max Tire Width | 12 inches |
| Inflation Tank Pressure | 1.0 MPa |
| Item Weight | 518 pounds (235 kg) |
| Product Dimensions (L x W x H) | 47.24 x 35.43 x 77.17 inches (1200 x 900 x 2040 mm) |
8. Warranty and Support
VEVOR is committed to providing quality products. For specific warranty details, please refer to the warranty card included with your product or visit the official VEVOR website.
8.1 Returns and Protection Plans
- This product typically includes a 30-day easy return policy. Please retain original packaging for any returns.
- Extended protection plans (e.g., 2-Year or 3-Year Protection Plans) may be available for purchase separately. Refer to your purchase documentation for details.
8.2 Customer Support
For technical assistance, parts, or warranty claims, please contact VEVOR customer support through their official channels. Have your model number (KC-503) and purchase information ready when contacting support.
You can often find support contact information on the VEVOR website or in the user manual included in the box.


