
1. Product Overview
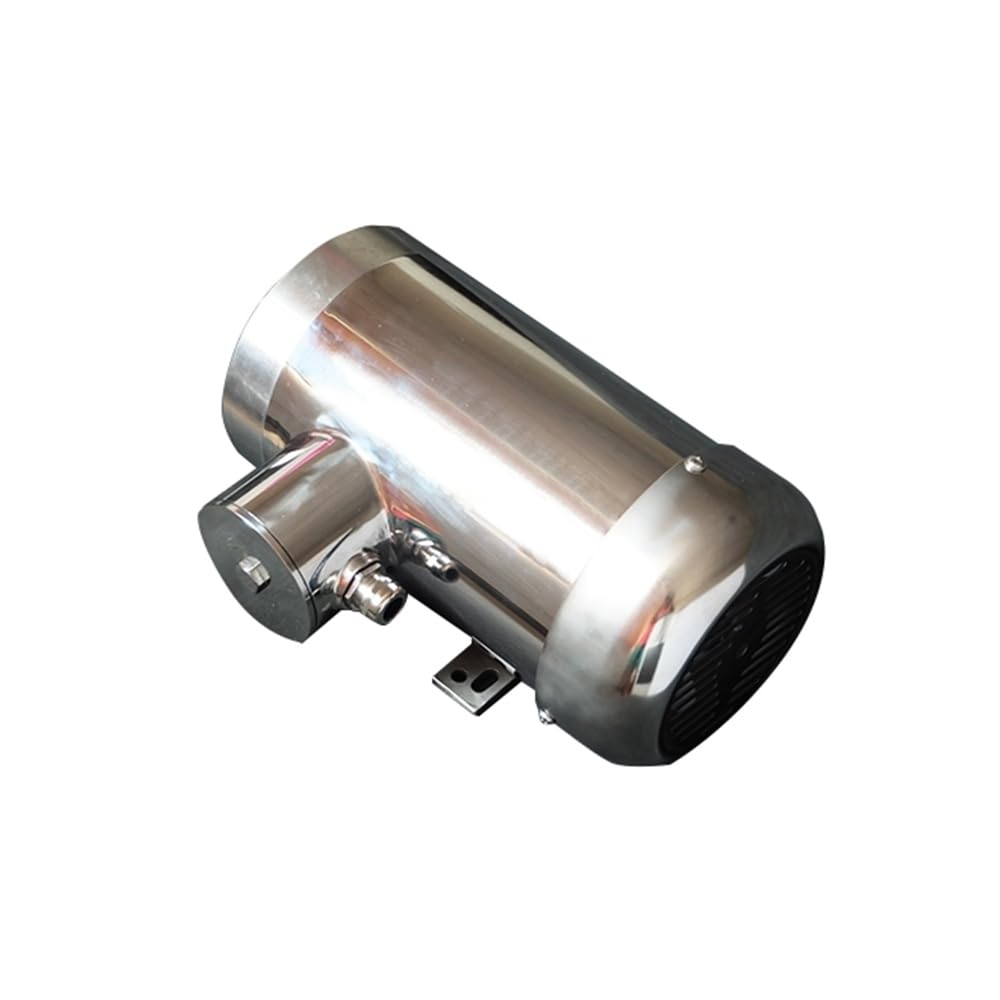
This manual provides essential information for the safe and efficient installation, operation, and maintenance of your ATO 2hp (1.5kW) Stainless Steel Motor. This 3-phase motor operates at 208-230V and is designed for environments requiring high hygiene, such as meat, poultry, fish, dairy, and beverage industries.
Key Features:
- Stainless Steel Construction: Durable and easy to clean and sanitize enclosures, ensuring long-lasting performance in harsh industrial conditions.
- Waterproof Rating: IP65 protection against water, making these motors suitable for clean-in-place (CIP) washdown procedures, essential for maintaining hygiene in food processing.
- Encapsulated Windings: Prevents water and moisture from reaching the windings, ensuring reliable operation and longevity.
- Energy Efficiency: Low surface temperature and high efficiency contribute to reduced operating costs, enhancing overall cost-effectiveness and sustainability.

2. Safety Information
Read all safety instructions carefully before installing, operating, or performing maintenance on the motor. Failure to comply with these instructions may result in serious injury or equipment damage.
- Electrical Hazard: Ensure power is disconnected and locked out before any installation or maintenance work. Only qualified personnel should perform electrical connections.
- Rotating Parts: Keep hands, clothing, and tools clear of rotating parts during operation.
- Hot Surfaces: The motor surface may become hot during operation. Allow adequate cooling time before handling.
- Proper Grounding: Always ensure the motor is properly grounded according to local electrical codes.
- Environmental Conditions: Do not operate the motor outside its specified environmental conditions (e.g., temperature, humidity, IP rating).
3. Setup and Installation
Proper installation is crucial for the motor's performance and longevity. Refer to the technical drawings for mounting dimensions.
3.1 Component Identification
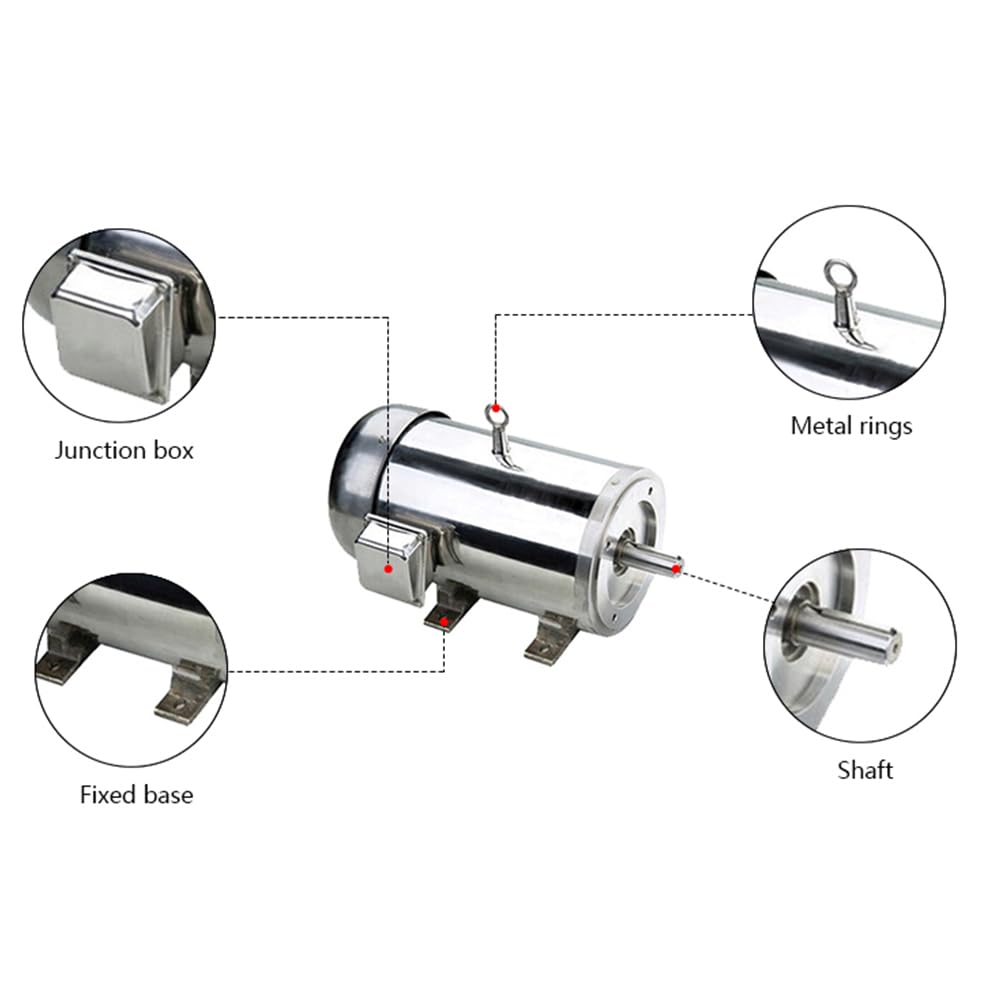
- Junction Box: Houses electrical connections.
- Metal Rings: Used for safe lifting and positioning of the motor.
- Fixed Base: Provides stable mounting points for securing the motor.
- Shaft: The rotating output component that connects to the driven equipment.
3.2 Mounting
The motor supports B3 (foot-mounted), B5 (flange-mounted), and B14 (face-mounted) configurations. Choose the appropriate mounting type for your application.
- Ensure the mounting surface is flat, rigid, and capable of supporting the motor's weight and operational forces.
- Align the motor shaft with the driven equipment precisely to prevent vibration and premature wear.
- Secure the motor using appropriate bolts and washers for the chosen mounting type (B3, B5, or B14). Tighten all fasteners to the manufacturer's recommended torque specifications.

3.3 Electrical Connection
- Verify that the power supply voltage (208-230V, 3-phase) matches the motor's rated voltage.
- Open the motor's junction box.
- Connect the three-phase power lines (L1, L2, L3) to the corresponding motor terminals.
- Connect the ground wire to the designated ground terminal.
- Ensure all connections are secure and insulated. Close the junction box cover tightly to maintain the IP65 rating.
4. Operating Instructions
Before starting the motor, perform a final check of all connections and mounting.
- Ensure the driven equipment is free from obstructions and ready for operation.
- Apply power to the motor. The motor should start smoothly without excessive noise or vibration.
- Monitor the motor during the initial run for any unusual sounds, overheating, or performance issues.
- If the motor runs in the wrong direction, disconnect power immediately and reverse two of the three-phase power leads.
- For continuous operation, ensure adequate ventilation around the motor to prevent overheating.
5. Maintenance
Regular maintenance ensures optimal performance and extends the lifespan of your stainless steel motor.
5.1 Routine Checks
- Visual Inspection: Periodically check for any signs of damage, corrosion, or loose connections.
- Noise and Vibration: Listen for unusual noises and feel for excessive vibration, which may indicate misalignment or bearing issues.
- Temperature: Monitor the motor's surface temperature. Excessive heat can indicate overload or cooling issues.
5.2 Cleaning
The IP65 rating allows for washdown procedures. Use appropriate cleaning agents for stainless steel surfaces. Avoid high-pressure jets directly on seals or electrical connections, even with IP65 protection.
5.3 Lubrication
This motor features sealed bearings that are typically lubricated for life and do not require routine re-lubrication. Consult a qualified technician if bearing noise or performance issues arise.
6. Troubleshooting
This section provides solutions to common operational issues. For problems not listed here, contact technical support.
| Problem | Possible Cause | Solution |
|---|---|---|
| Motor does not start | No power supply; Incorrect wiring; Overload; Blown fuse/tripped breaker | Check power supply; Verify wiring connections; Reduce load; Reset breaker/replace fuse |
| Motor runs hot | Overload; Insufficient ventilation; High ambient temperature; Bearing issues | Reduce load; Ensure proper airflow; Check ambient temperature; Inspect bearings |
| Excessive noise or vibration | Misalignment; Loose mounting; Worn bearings; Unbalanced load | Check alignment; Tighten mounting bolts; Inspect/replace bearings; Balance load |
| Motor runs in wrong direction | Incorrect phase sequence | Disconnect power and reverse any two of the three-phase power leads. |
7. Specifications
| Parameter | Value |
|---|---|
| Model | IEC-802 |
| Rated power | 2hp (1.5kW) |
| Rated voltage | 208V~230V/460V |
| Number of pole | 2P |
| Phase | 3 phase |
| Cooling method | TEFC |
| Frequency | 50/60Hz |
| Rated speed | 2950r/min |
| Stainless steel | 304 |
| Protection grade | IP65 |
| Insulation class | Class F |
| Protect Feature | Waterproof |
| Efficiency | IE 4 |
| Weight | 39kg |
| Certificate | CE, UL |
7.1 Mounting Dimensions (mm)
| Mounting type | Frame size | A | A/2 | B | C | D | E | F | G | H | K | M | N | P | R | S | T | Flange Hole | Shaft Hole | AB | AC | AD |
|---|---|---|---|---|---|---|---|---|---|---|---|---|---|---|---|---|---|---|---|---|---|---|
| B3 | 125 | 62.5 | 100 | 50 | 19 | 40 | 6 | 15.5 | - | 80 | - | - | 144 | - | - | - | - | M6 | 150 | 156 | 135 | |
| B14 | 80 | - | - | - | 19 | 40 | 6 | 15.5 | - | 100 | 80 | 120 | 0 | M6 | 3 | 4 | M6 | - | 144 | 135 | ||
| B5 | - | - | - | - | 19 | 40 | 6 | 15.5 | - | 165 | 130 | 200 | 0 | 12 | 3.5 | 4 | M6 | - | 144 | 135 |
8. Warranty
This ATO Stainless Steel Motor comes with a 12-month warranty from the date of purchase. The warranty covers defects in materials and workmanship under normal use and service. It does not cover damage resulting from improper installation, misuse, unauthorized modifications, or natural wear and tear. For warranty claims, please retain your proof of purchase.
Return Policy: A refund or replacement may be available within 30 days of purchase, subject to the seller's return policy.
9. Support
For technical assistance, spare parts, or further inquiries, please contact ATO customer support through the official website or your point of purchase. When contacting support, please provide the motor model number and a detailed description of the issue.
Manufacturer: ATO
Item model number: 3-phase 208~230V