1. Introduction to Google Pixel 9 Pro
The Google Pixel 9 Pro is an advanced smartphone designed for optimal performance and user experience. Featuring the powerful Google Tensor G4 chip, it integrates cutting-edge AI capabilities for enhanced photography, video, and daily tasks. This device operates on Android 14 and is designed to receive 7 years of major software updates, ensuring long-term reliability and access to the latest features.

Figure 1: Front and back view of the Google Pixel 9 Pro.
This manual provides essential information for setting up, operating, and maintaining your Pixel 9 Pro, ensuring you can fully utilize its capabilities.
2. Device Overview
The Pixel 9 Pro features a sleek design with a durable construction. Key physical components include:
- Display: 6.3-inch LTPO OLED with a punch-hole front camera.
- Rear Camera Bar: Houses the triple camera system and flash.
- Side Buttons: Power button and volume rockers.
- Ports: USB Type-C port for charging and data transfer.
- SIM Tray: Located on the side for carrier SIM card.

Figure 2: Side view of the Google Pixel 9 Pro, highlighting physical buttons and ports.
3. Setup
3.1 Initial Device Setup
- Power On: Press and hold the Power button on the side of the device until the Google logo appears.
- Follow On-Screen Prompts: The device will guide you through selecting your language, connecting to Wi-Fi, and signing in with your Google account.
- Data Transfer: You will have the option to transfer data from an old device during setup.
3.2 SIM Card Installation
The Google Pixel 9 Pro supports physical SIM cards and eSIM. For physical SIM installation:
- Locate the SIM tray on the side of the device.
- Insert the SIM ejector tool (usually included with the phone) into the small hole on the SIM tray.
- Gently push until the tray ejects.
- Place your Nano-SIM card into the tray with the gold contacts facing down.
- Carefully reinsert the tray into the device.
This device is carrier unlocked, offering flexibility to choose your preferred network provider.
4. Operating Your Device
4.1 Basic Navigation
- Touchscreen: Navigate through menus and apps by tapping, swiping, and pinching on the 6.3-inch LTPO OLED display.
- Home Screen: Access your apps and widgets from the customizable home screen.
- Notifications: Swipe down from the top of the screen to view notifications and quick settings.
4.2 AI Features with Gemini
The Pixel 9 Pro leverages Google's Gemini AI for various intelligent features:
- AI Assistant: Hold the power button to activate Gemini for quick access to information, task management, and more.
- Smart Photography: AI enhances photo and video quality, offering features for expert edits.
4.3 Charging
The device supports both wired and wireless charging. For optimal charging, use compatible chargers.
Video 1: Demonstration of a magnetic wireless car charger compatible with the Google Pixel 9 Pro.
Ensure the charging cable is securely connected to the USB Type-C port on the phone and a power source. For wireless charging, place the device on a compatible wireless charging pad.
5. Maintenance
5.1 Software Updates
Your Pixel 9 Pro is designed to receive 7 years of major Android OS and security updates. Ensure your device is connected to Wi-Fi and has sufficient battery life before installing updates. You will be notified when updates are available.
5.2 Cleaning and Care
- Use a soft, lint-free cloth to clean the screen and body.
- Avoid abrasive materials or harsh chemicals.
- The device has an IP68 rating for water and dust resistance, but it is not waterproof. Avoid intentional submersion.
6. Troubleshooting
6.1 Common Issues
- Device Unresponsive: Press and hold the Power button for about 10-15 seconds to force a restart.
- Charging Problems: Ensure the charging cable and adapter are functioning correctly and securely connected. Use the included charger or a compatible fast charger.
- Network Connectivity: Verify your SIM card is correctly inserted and your carrier plan is active. As a carrier-unlocked device, ensure compatibility with your chosen network.
6.2 Factory Reset
If you experience persistent software issues, a factory reset may resolve them. This will erase all data on your device, so ensure you back up important information first. Navigate to Settings > System > Reset options > Erase all data (factory reset).
7. Specifications
| Feature | Detail |
|---|---|
| Model Name | Pixel 9 Pro |
| Item Model Number | GR83Y |
| Display | 6.3" LTPO OLED, 1280x2856px, 495 PPI, 120Hz, HDR10+ |
| Processor | Google Tensor G4 (4 nm), Octa-core (1x3.1 GHz Cortex-X4 & 3x2.6 GHz Cortex-A720 & 4x1.92 GHz Cortex-A520), Mali-G715 MC7 |
| RAM | 16 GB |
| Storage | 128 GB |
| Rear Camera | 50MP, f/1.7 (wide) + 48MP, f/2.8 (telephoto) + 48 MP, f/1.7, 123° (ultrawide) |
| Front Camera | 42MP, f/2.2 |
| Battery | 4700mAh, 24 Hours Talk Time, Wireless Charging |
| Operating System | Android 14 (with 7 Major Software Updates) |
| Connectivity | Bluetooth 5.3, Wi-Fi, USB Type-C, NFC, GPS, 5G (SA/NSA/Sub6/mmWave) |
| Dimensions | 6 x 4 x 2 inches |
| Weight | 10.2 ounces |
| Color | Obsidian |
| Water & Dust Resistance | IP68 |
8. Warranty and Support
This Google Pixel 9 Pro is a professionally renewed device. It comes with a 90-day refund/replacement return policy. For specific warranty details and support, please refer to the documentation provided with your renewed device or contact the seller directly.
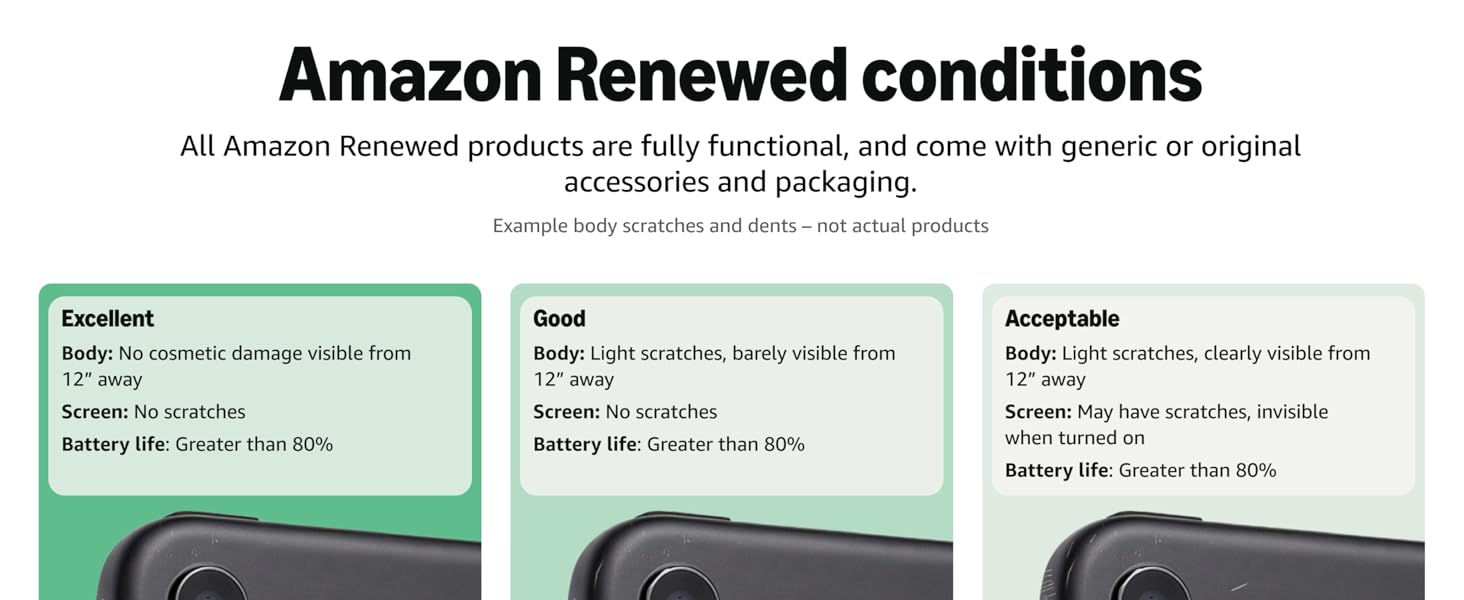
Figure 3: Overview of Amazon Renewed product conditions.
For technical assistance or further inquiries, please visit the official Google Pixel support website or consult your carrier's support resources.