Introduction
Thank you for choosing the Vormooi V71 Digital Voice Recorder. This professional audio recorder is designed for high-fidelity sound capture, offering extensive storage, long battery life, and versatile recording options. This manual provides detailed instructions to help you get the most out of your device, from initial setup to advanced features.

The Vormooi V71 Digital Voice Recorder, showcasing its compact design, included external microphone, and 64GB SD card for expanded storage.
What's in the Box
Upon opening the package, please ensure all the following components are present:
- 1 x Vormooi V71 Digital Voice Recorder
- 1 x 3.5mm External Microphone
- 1 x 64GB SD Card (pre-installed or separate)
- 1 x USB-C Data Cable
- 1 x 3.5mm Transcription Cable
- 1 x USB-C to USB-C Cable
- 1 x Lanyard
- 1 x User Manual

An illustration of all items included in the Vormooi V71 Digital Voice Recorder package, detailing the recorder, external microphone, various cables, and the 64GB SD card.
Product Overview
Familiarize yourself with the Vormooi V71's physical components and controls.

Detailed diagram of the Vormooi V71 recorder, highlighting its USB-C port, lock/unlock switch, previous/rewind buttons, TF card slot, menu button, power/play button, 3.5mm jack, record/save switch, volume controls, next/fast forward buttons, and return/delete button.
Key Components:
- 2.15" Color Screen: Displays menus, recording status, and file information.
- Built-in Microphones: Dual microphones for clear audio capture.
- Built-in Speaker: For direct playback of recordings and music.
- USB-C Port: For charging and data transfer to a computer.
- 3.5mm Jack: For connecting external microphone or headphones.
- TF Card Slot: For inserting a microSD card to expand storage.
Controls:
- Record/Save Switch (Right Side): Slide up to start recording, slide down to save.
- Lock/Unlock Switch (Left Side): Prevents accidental button presses.
- Power/Play Button (Front): Long press to power on/off, short press to play/pause.
- Menu Button (Front): Accesses main menu and settings.
- PREV/NEXT Buttons (Front): Navigate menus, skip tracks, or fast-forward/rewind (long press).
- DEL/BACK Button (Front): Go back in menus or delete files (long press).
- Volume +/- Buttons (Right Side): Adjust playback volume.
Setup
1. Charging the Device
Before first use, fully charge the recorder. Connect the supplied USB-C cable to the recorder's USB-C port and the other end to a USB power adapter (not included) or a computer's USB port. The battery indicator on the screen will show charging status. A full charge takes approximately 2 hours and provides up to 110 hours of continuous recording at 512kbps.

The Vormooi V71 recorder highlighting its impressive 110-hour continuous recording capability and 1100mAh battery, which fully charges in 2 hours.
2. Inserting/Formatting the SD Card
The device comes with 32GB built-in memory and a 64GB SD card, providing a total of 96GB storage. If the SD card is not pre-installed, gently insert it into the TF card slot until it clicks into place. For optimal performance, it is recommended to format the SD card directly on the device. Navigate to System Settings > Format Device and confirm. This will erase all data on the SD card.
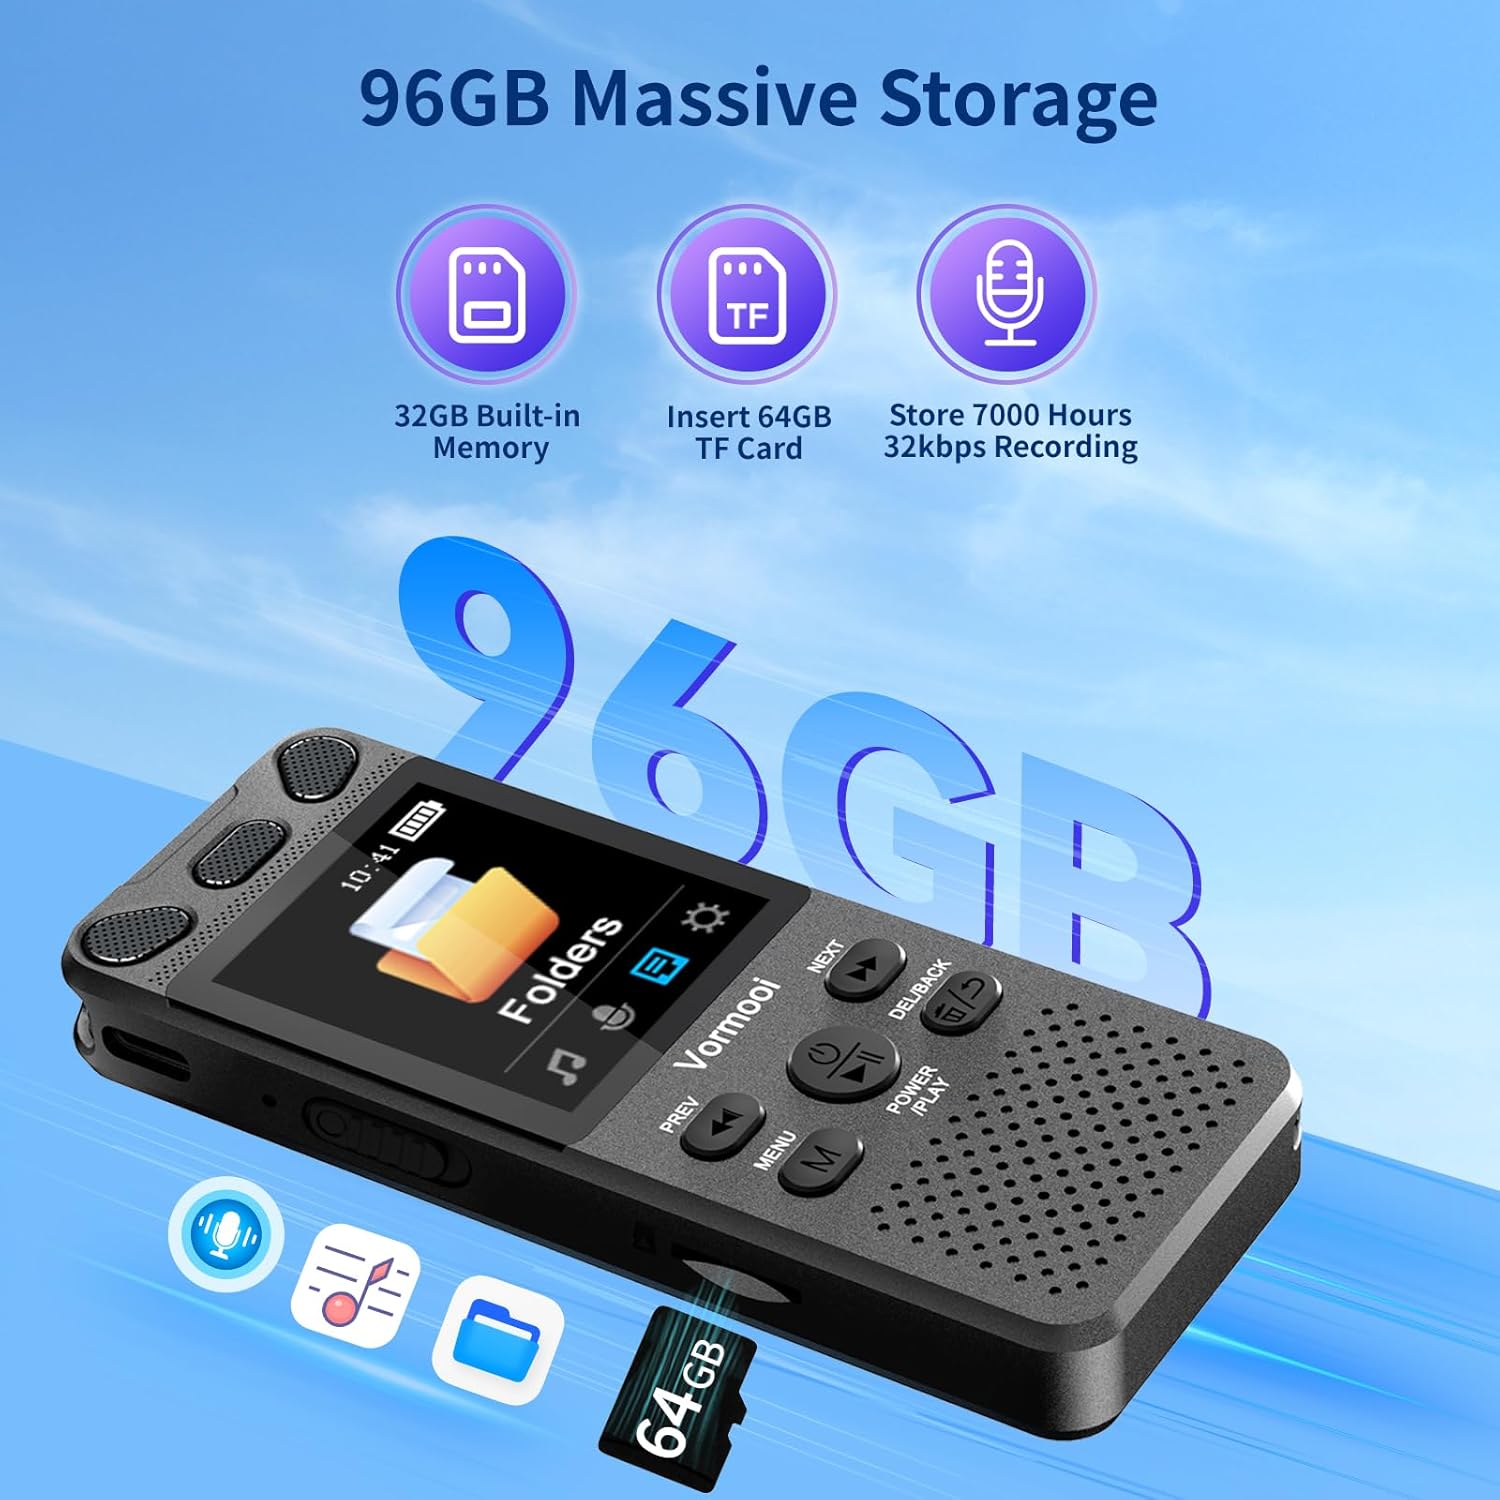
An image demonstrating the Vormooi V71's 96GB storage capacity, combining 32GB built-in memory with an additional 64GB TF card, capable of storing 7000 hours of 32kbps recordings.
3. Initial Power-On and Language Selection
Long press the Power/Play button to turn on the device. If prompted, select your preferred language from the menu. You can change the language later in System Settings > Language Set.
Operating Instructions
1. Basic Recording (One-Touch Record/Save)
The V71 features a convenient one-touch recording function:
- To start recording, simply slide the Record/Save switch (red button on the right side) upwards. The device will immediately begin recording.
- To save the recording, slide the Record/Save switch downwards. The recording will be saved automatically.

The Vormooi V71 recorder demonstrating its one-touch record/save slider and highlighting its 1536K clear sound quality, powered by a 2159 intelligent noise cancellation chip.
2. Voice Activated Recording (AVR)
AVR mode allows the recorder to automatically start recording when sound is detected and pause when there is no sound, saving memory and power.
- From the main menu, navigate to Recording Library > AVR Mode.
- Set AVR On/Off to "On".
- Adjust AVR Sensitivity Level (1-6) as needed. A higher level requires louder sound to trigger recording.
- Start recording as usual using the Record/Save switch. The device will now operate in AVR mode.

An overview of the Vormooi V71's advanced features, including voice activation, the 2159 intelligent noise reduction DSP chip, 110 hours of long recording time, a 2.15-inch clear color screen, and the versatile line-in function.
3. External Microphone Recording
For professional-grade close-range recording or to reduce friction noise, use the included 3.5mm external microphone.
- Plug the 3.5mm jack of the external microphone into the recorder's 3.5mm port.
- Navigate to Recording Library > Recording From and select "External Microphone".
- Start recording using the Record/Save switch.

The Vormooi V71 Digital Voice Recorder being used with its external microphone, demonstrating its capability for clear audio capture in various settings.
4. Line-in Recording
The line-in function allows you to record audio directly from other devices like phones, PCs, or MP3 players using the 3.5mm transcription cable.
- Connect one end of the 3.5mm transcription cable to the audio output of your external device and the other end to the recorder's 3.5mm port.
- Navigate to Recording Library > Recording From and select "Line-in".
- Start recording using the Record/Save switch.
5. Playback
To play back recordings or music:
- From the main menu, select Recordings Library for voice recordings or Music Library for music files.
- Use the PREV/NEXT buttons to navigate through files.
- Press the Power/Play button to start or pause playback.
- Adjust volume using the Volume +/- buttons on the right side.
A-B Repeat:
This feature allows you to repeat a specific segment of an audio file. During playback, press the M (Menu) button, then select "A-B Repeat". Press Power/Play at the start point (A) and again at the end point (B) of the desired segment.
Variable Speed Playback:
Adjust playback speed to suit your needs (e.g., for transcribing lectures). In the Music Library or Recordings Library playback options, select "Variable Speed Playback" and adjust the speed using the PREV/NEXT buttons.
6. Managing Recordings (Transfer to PC)
To transfer files to your computer:
- Connect the recorder to your computer using the USB-C data cable.
- The recorder will appear as a removable disk drive on your computer.
- Open the drive to access your recordings (usually in a folder named "RECORD" or similar).
- Drag and drop files to your computer.
To delete files directly on the device, navigate to the file in the Recordings Library or Folders, long press the DEL/BACK button, and confirm deletion.
7. Password Protection
Protect your privacy with a 6-digit password.
- Go to System Settings > Password Settings.
- Select Switch On/Off to enable the password.
- Choose Password Change to set your desired 6-digit password. Remember your password, as there is no recovery option.
Maintenance
- Keep the device dry and away from extreme temperatures.
- Clean the device with a soft, dry cloth. Do not use liquid cleaners.
- Avoid dropping or subjecting the device to strong impacts.
- For optimal battery life, charge the device regularly and avoid fully discharging it frequently.
- If the device becomes unresponsive, try a soft reset by long-pressing the power button until it turns off, then restart.
Troubleshooting
| Problem | Possible Cause | Solution |
|---|---|---|
| Device does not turn on. | Low battery; device frozen. | Charge the device. Long press the Power/Play button for 10 seconds to force restart. |
| Cannot record. | Storage full; incorrect recording source selected; device locked. | Delete old files or format SD card. Check Recording From setting. Unlock the device using the left-side switch. |
| Poor recording quality. | Microphone too far; high noise reduction level; low bitrate. | Move closer to sound source. Adjust Noise Reduction settings. Increase Recording Bitrate in settings. Consider using external microphone. |
| Cannot connect to PC. | Faulty cable; driver issue; password enabled. | Try a different USB-C cable. Ensure the device is unlocked. If password is set, enter it when prompted on the device or PC. |
| SD card not recognized. | Improperly inserted; incorrect format. | Reinsert the SD card. Format the SD card using the device's System Settings. |
Specifications
| Feature | Detail |
|---|---|
| Model | V71 |
| Brand | Vormooi |
| Dimensions | 10 x 3.9 x 1.26 cm (3.94 x 1.54 x 0.50 inches) |
| Weight | 98 grams (3.46 oz) |
| Display | 2.15-inch Color Screen |
| Internal Memory | 32 GB |
| Expandable Memory | 64 GB SD Card included (supports up to 128GB) |
| Total Storage Capacity | 96 GB |
| Battery Capacity | 1100 mAh Lithium-ion |
| Continuous Recording Time | Up to 110 hours (at 512kbps) |
| Charging Time | Approx. 2 hours |
| Recording Formats | WAV, MP3 (PCM 32-1536 Kbps) |
| Playback Formats | MP3, WMA, WAV, FLAC, APE, OGG |
| Noise Reduction | DSP Technology (2159 professional chip) |
| Interface | USB-C |
| Compatible Devices | PC, MP3 Player, Smartphone (for line-in) |
Warranty and Support
Vormooi is committed to providing high-quality products and excellent customer service. Your Vormooi V71 Digital Voice Recorder comes with a comprehensive warranty.
- 2-Year Replacement Service: If the device fails due to non-human factors within 2 years of purchase, Vormooi offers a replacement or full refund.
- Lifetime Technical Assistance: Vormooi provides lifetime technical support for your product.
- 24-Hour Email Response: Expect a response to your inquiries within 24 hours via email.
For any questions, technical assistance, or warranty claims, please contact Vormooi customer support through your Amazon station letter or the after-sales email provided in your product packaging. Please have your purchase details ready when contacting support.

Vormooi is dedicated to providing responsible and reliable after-sales support, including lifetime technical assistance and a 2-year replacement service.


