
1. Introduction
The Dasqua 5911-0001 Telescoping Gage Set is designed for precise internal measurements of holes, slots, and bores. This 6-piece set features rigid handles, a satin chrome finish, and self-centering, double-action contact points for consistent and accurate readings. The gages are supplied in a protective fitted case for convenient storage and transport.
2. Safety Information
- Always handle precision measuring tools with care to avoid damage.
- Keep gages clean and free from dirt, oil, or debris, which can affect accuracy.
- Store the gages in their fitted case when not in use to protect them from impact and environmental factors.
- This product may expose you to chemicals known to the State of California to cause cancer and birth defects or other reproductive harm. For more information go to www.P65Warnings.ca.gov.
3. Product Components
The Dasqua 5911-0001 set includes six telescoping gages and a durable fitted case for organized storage.
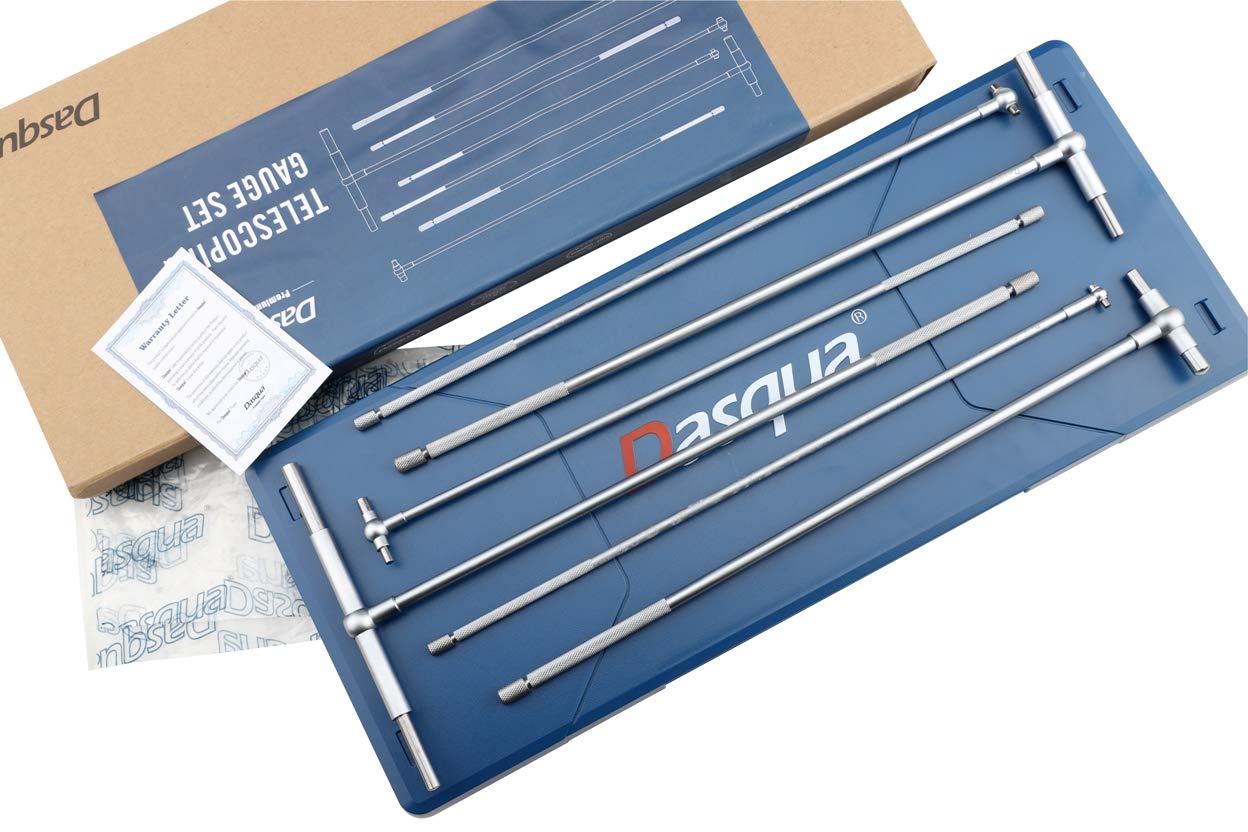
Figure 3.1: The complete Dasqua 6 Piece 12" Long Telescoping Gage Set in its protective blue fitted case.
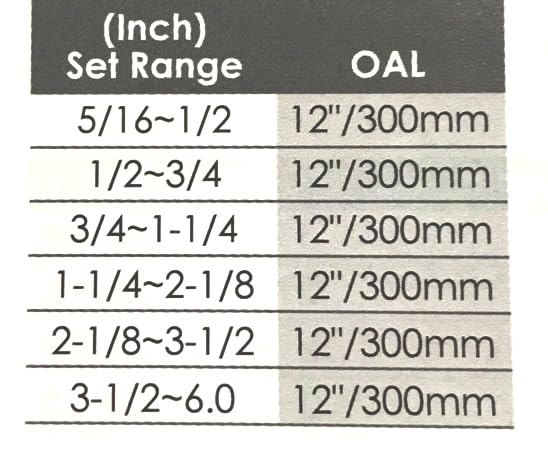
Figure 3.2: Individual telescoping gages from the set, showcasing their varying sizes.
4. Setup
- Unpack the telescoping gage set from its packaging.
- Inspect each gage for any signs of damage or manufacturing defects.
- Familiarize yourself with the different sizes of gages and their respective measuring ranges.
5. Operating Instructions
Telescoping gages are used to transfer an internal measurement to an external measuring device, such as a micrometer or caliper.
- Select the Correct Gage: Choose a telescoping gage whose measuring range encompasses the approximate size of the hole or slot you intend to measure.
- Compress and Insert: Gently compress the two contact points of the gage and insert it into the bore or slot.
- Expand and Lock: Release the contact points, allowing them to expand beyond the internal diameter. Then, slowly retract the gage while maintaining a slight angle, allowing the contact points to self-center and expand to the true diameter. Lock the gage by tightening the knurled screw at the end of the handle. The constant spring tension ensures a uniform feel during this process.
- Remove and Measure: Carefully remove the locked gage from the workpiece. Use an external micrometer or caliper to measure the distance across the locked contact points. This reading represents the internal dimension of the hole or slot.

Figure 5.1: Proper technique for using a telescoping gage to capture an internal measurement.

Figure 5.2: Detail of the hardened tool steel contact points, precision ground for accurate measurement.
6. Maintenance
- After each use, wipe down the gages with a clean, lint-free cloth to remove any dust, oil, or fingerprints.
- For long-term storage, apply a thin coat of rust preventative oil to the metal surfaces.
- Always store the gages in their original fitted case to prevent physical damage and exposure to corrosive elements.
- Do not force the telescoping action; if it feels stiff, clean the mechanism thoroughly.
7. Troubleshooting
- Inaccurate Readings: Ensure the gage is clean and free of debris. Verify that the contact points are fully expanded and locked before removing the gage. Confirm that the external measuring device (micrometer/caliper) is calibrated and used correctly.
- Stiff Telescoping Action: Clean the gage thoroughly, especially around the sliding mechanism. A small amount of light machine oil can be applied if necessary, but avoid over-lubrication.
- Gage Not Holding Position: Ensure the knurled screw is tightened sufficiently to lock the contact points in place after expansion.
8. Specifications
The Dasqua 5911-0001 Telescoping Gage Set provides a comprehensive range for internal measurements.
- Set Type: 6 Piece 12" Long Telescoping Gage Set
- Finish: Satin Chrome
- Handle: Rigid, with smooth movement
- Contact Points: Hardened tool steel, precision ground on a radius of the smallest hole the gage will enter.
- Features: Self-centering, double-action, constant spring tension.
Measuring Ranges and Overall Lengths (OAL):

Figure 8.1: Detailed measuring ranges and overall lengths for each gage in the set.
| Gage Size (Inch) | Measuring Range (Inch) | Overall Length (OAL) |
|---|---|---|
| A | 5/16 - 1/2 | 12" / 300mm |
| B | 1/2 - 3/4 | 12" / 300mm |
| C | 3/4 - 1 1/4 | 12" / 300mm |
| D | 1 1/4 - 2 1/8 | 12" / 300mm |
| E | 2 1/8 - 3 1/2 | 12" / 300mm |
| F | 3 1/2 - 6 | 12" / 300mm |
9. Warranty Information
Warranty details for your Dasqua 5911-0001 Telescoping Gage Set are included with the product in the form of a warranty notice card. Please refer to this document for specific terms, conditions, and duration of the warranty. Retain your proof of purchase for any warranty claims.

Figure 9.1: The telescoping gage set in its case, showing the included warranty notice card.
10. Support
For further assistance, technical support, or inquiries regarding your Dasqua 5911-0001 Telescoping Gage Set, please contact Dasqua customer service or visit the official Dasqua website. Contact information can typically be found on the product packaging or the warranty documentation.