
Ricoh IM C4500
Contents
RICOH IM C4500 - Color Laser Multifunction Copier User Manual
Comprehensive Guide for Setup, Operation, and Maintenance
1. Introduction to the RICOH IM C4500
The RICOH IM C4500 is a high-performance color laser multifunction copier designed for demanding office environments. It offers robust capabilities including copying, printing, and scanning, with a rapid output of up to 45 pages per minute (ppm) in both color and monochrome. This device features automatic duplexing for efficient two-sided operations, network connectivity, and Wi-Fi for flexible placement and usage. It comes equipped with pre-installed Postscript 3 Supplement for enhanced compatibility and functionality.
This manual provides detailed instructions to help you set up, operate, and maintain your RICOH IM C4500, ensuring optimal performance and longevity.
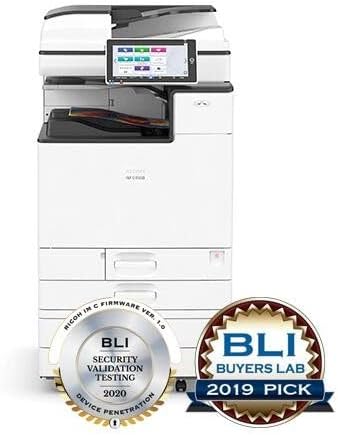
Image 1.1: Front view of the RICOH IM C4500 Color Laser Multifunction Copier. The image shows the main unit with its control panel, paper trays, and output tray. Two award seals are visible at the bottom: a silver seal for "BLI Security Validation Testing 2020" and a gold seal for "BLI Buyers Lab 2019 Pick." This image illustrates the overall design and recognized quality of the device.
2. Setup and Installation
Follow these steps carefully to ensure proper setup of your RICOH IM C4500.
2.1 Unpacking and Placement
- Carefully remove the copier from its packaging. Retain all packaging materials for future transport or service.
- Place the copier on a sturdy, level surface capable of supporting its weight (approximately 29.1 x 26.3 x 47.5 inches). Ensure adequate space around the unit for ventilation and access to trays and covers.
- Remove all protective tapes and packing materials from the exterior and interior of the machine, including inside the paper trays and toner compartments.
2.2 Power Connection
- Connect the power cord securely to the power inlet on the back of the copier.
- Plug the other end of the power cord into a grounded electrical outlet. Avoid using extension cords or power strips if possible.
- Press the main power switch, usually located on the side or back of the unit, to turn on the copier. The control panel will illuminate.
2.3 Initial Configuration and Network Setup
- Follow the on-screen prompts on the control panel to complete the initial setup, including language selection, date, and time.
- Network Connection:
- Wired (Ethernet): Connect an Ethernet cable from your network router/switch to the LAN port on the copier. The copier will typically obtain an IP address automatically via DHCP.
- Wireless (Wi-Fi): From the control panel, navigate to Network Settings, select Wi-Fi, and follow the instructions to connect to your wireless network. You may need to enter your Wi-Fi password.
- Driver Installation: Install the appropriate printer drivers on your computers. Drivers can usually be found on the Ricoh support website by searching for "RICOH IM C4500 drivers."
3. Operating Instructions
This section covers the basic operations of your RICOH IM C4500.
3.1 Loading Paper
The RICOH IM C4500 features 4 paper trays and supports various paper sizes including Letter, Legal (Bypass), and 12 x 18. The maximum input sheet capacity is up to 4,700 pages (total across all trays).
- Pull out the desired paper tray until it stops.
- Adjust the paper guides to match the size of the paper you are loading.
- Load the paper stack with the print side facing up (or as indicated by the tray diagram). Do not overload the tray.
- Gently push the paper tray back into the copier until it clicks into place.
- If prompted on the control panel, confirm the paper size and type.
3.2 Copying Documents
- Place your original document face-down on the scanner glass or face-up in the Automatic Document Feeder (ADF).
- On the control panel, select the "Copy" function.
- Adjust settings such as number of copies, color/black & white, duplex (two-sided), and zoom as needed. The copier supports automatic duplexing.
- Press the "Start" button to begin copying.
3.3 Printing Documents
- From your computer, open the document you wish to print.
- Select "Print" from the application's menu (e.g., File > Print).
- Choose the RICOH IM C4500 from the list of available printers.
- Adjust print settings such as paper size, orientation, number of copies, and duplex printing (automatic). The maximum print resolution is 1200x1200 dpi.
- Click "Print" to send the job to the copier.
3.4 Scanning Documents
The RICOH IM C4500 features a flatbed scanner and an Automatic Document Feeder (ADF).
- Place your original document on the scanner glass or in the ADF.
- On the control panel, select the "Scan" function.
- Choose your desired scan destination (e.g., Scan to Email, Scan to Folder, Scan to USB).
- Configure scan settings such as color/black & white, resolution, and file format.
- Press the "Start" button to begin scanning.
4. Maintenance
Regular maintenance ensures the longevity and optimal performance of your RICOH IM C4500.
4.1 Replacing Toner Cartridges
The RICOH IM C4500 uses Black, Cyan, Magenta, and Yellow toner cartridges.
- When a toner cartridge is low or empty, a message will appear on the control panel.
- Open the front cover of the copier.
- Locate the empty toner cartridge. Press the release lever and pull the cartridge straight out.
- Unpack the new toner cartridge and gently shake it a few times to distribute the toner.
- Insert the new cartridge into the slot until it clicks firmly into place.
- Close the front cover.
4.2 Cleaning the Copier
- Exterior: Wipe the exterior surfaces with a soft, damp, lint-free cloth. Do not use abrasive cleaners or solvents.
- Scanner Glass: Gently wipe the scanner glass with a soft cloth dampened with glass cleaner. Ensure no residue is left behind.
- ADF Rollers: Periodically clean the ADF rollers with a lint-free cloth lightly dampened with water or isopropyl alcohol to prevent paper feeding issues.
5. Troubleshooting
This section provides solutions to common issues you might encounter with your RICOH IM C4500.
| Problem | Possible Cause | Solution |
|---|---|---|
| Paper Jam | Incorrectly loaded paper, foreign object in paper path, worn rollers. | Open all covers and trays. Carefully remove any jammed paper following the instructions on the control panel. Ensure paper is loaded correctly. |
| Poor Print Quality (Streaks, Fades) | Low toner, dirty print head/drum unit, incorrect paper type. | Check toner levels and replace if necessary. Perform a print head cleaning or drum calibration from the control panel. Ensure correct paper type is selected. |
| Copier Not Responding | Power issue, network connectivity problem, software error. | Check power cable connection. Verify network cable or Wi-Fi connection. Restart the copier by turning it off and on. Check for error messages on the control panel. |
| Cannot Scan to PC | Network configuration issue, firewall blocking, incorrect scan settings. | Verify network connectivity between copier and PC. Check PC firewall settings. Ensure scan destination settings (e.g., folder path, IP address) are correct. |
6. Specifications
Key technical specifications for the RICOH IM C4500.
| Feature | Detail |
|---|---|
| Model Name | IM C4500 |
| Brand | Ricoh |
| Printing Technology | Laser |
| Printer Output | Color |
| Max Print Speed (Color/Monochrome) | 45 ppm |
| Max Print Resolution | 1200 x 1200 dpi |
| Max Copy Resolution (Color/B&W) | 1200x1200 dpi |
| Scanner Type | Flatbed |
| Duplex Printing | Automatic |
| Connectivity Technology | Wi-Fi, USB |
| Number of Trays | 4 |
| Max Input Sheet Capacity | Up to 4,700 pages |
| Supported Sheet Sizes | Letter, Legal (Bypass), 12 x 18, Various sizes |
| Ink Color | Black, Cyan, Magenta, Yellow (Toner) |
| Product Dimensions | 29.1 x 26.3 x 47.5 inches |
| Included Components | Toner Cartridges |
7. Warranty and Support
Your RICOH IM C4500 comes with a limited warranty and support options.
7.1 Warranty Information
This renewed product is covered by a 90-day limited warranty. Please refer to the warranty documentation provided with your purchase for specific terms and conditions. This warranty typically covers defects in materials and workmanship under normal use.
7.2 Customer Support
For technical assistance, troubleshooting beyond this manual, or warranty claims, please contact the seller or Ricoh customer support. Have your product model (IM C4500) and serial number ready when contacting support.
- Seller Support: Refer to your purchase documentation for contact information for "Depot4Buyers" or the specific seller from whom you purchased the renewed unit.
- Ricoh Official Support: For general product information and driver downloads, visit the official Ricoh website.
Ask a question about this manual
Ask about setup, troubleshooting, compatibility, parts, safety, or missing instructions. Manuals+ will review the question and use this page’s manual context to help answer it.