
1. Introduction
This manual provides comprehensive instructions for the installation, configuration, and operation of your Real HD 8 Port 2.5Gb Web Managed Ethernet Network Switch. This device is designed to enhance network performance for various applications, including 4K video streaming, gaming, and NAS systems, by providing high-speed 2.5 Gigabit Ethernet connectivity.

Image 1.1: Real HD 8 Port 2.5Gb Web Managed Ethernet Network Switch.
2. Product Overview
The Real HD 8 Port 2.5Gb Web Managed Ethernet Network Switch (Model SW8-25G-MG) is a high-performance network device featuring 8 x 2.5 Gigabit RJ45 ports and 1 x 10G SFP+ uplink port. It offers advanced web-managed features for secure and efficient network control.
Key Features:
- 8 x 2.5G RJ45 Ports: Provides high-speed connectivity for multiple devices.
- 1 x 10G SFP+ Port: Offers a high-bandwidth uplink for connecting to core networks or servers.
- Web Managed Interface: Allows for secure setup and configuration of network parameters such as VLAN, QoS, security, and multicast.
- Fanless Design: Ensures quiet operation, suitable for office and home environments.
- Durable Metal Housing: Provides robust protection and efficient heat dissipation.
- 4KV Lightning Protection: Enhances device safety in various environments.
- 60Gbps Bandwidth: Supports high data transfer rates across the network.
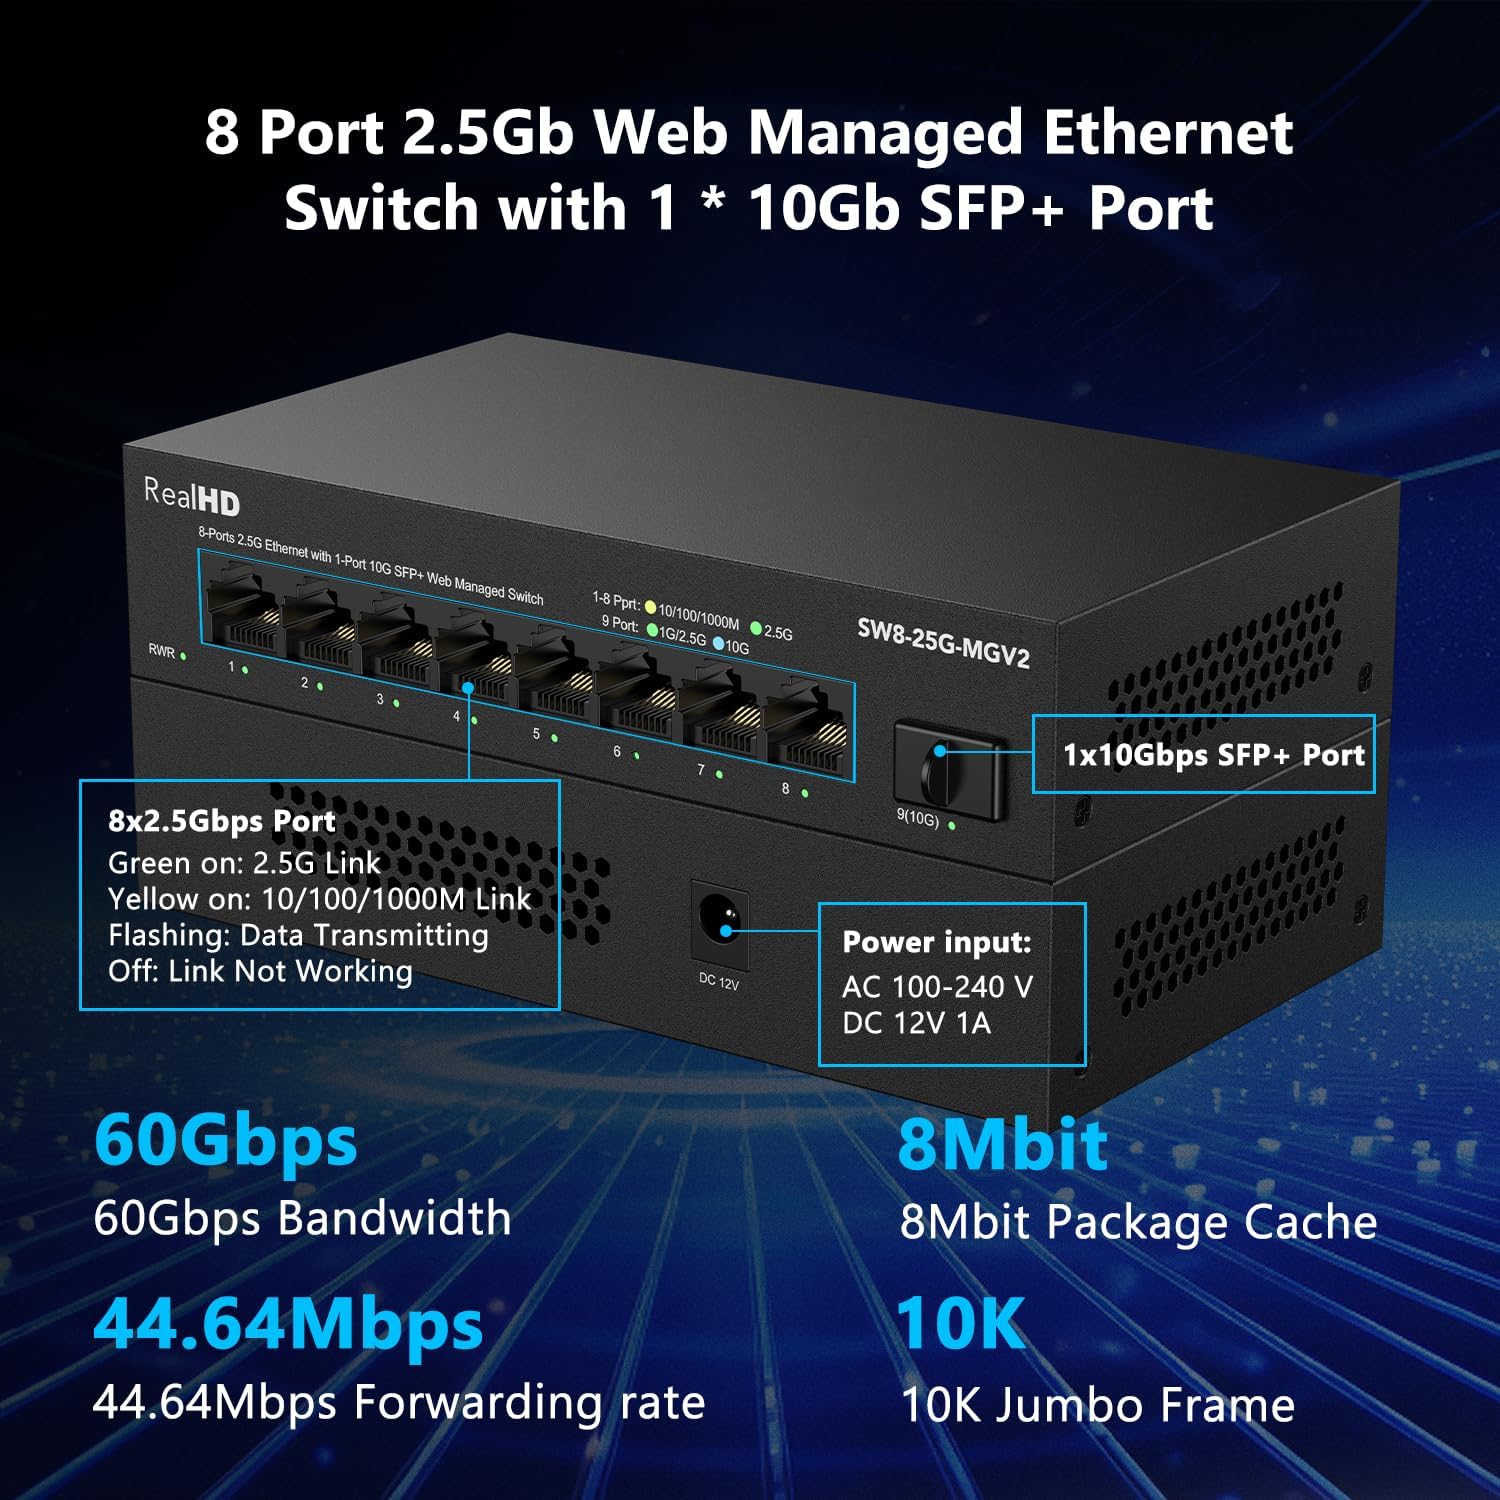
Image 2.1: Front view of the switch with port descriptions and key specifications.
3. Setup Instructions
3.1 Package Contents
Verify that your package contains the following items:
- Real HD 8 Port 2.5Gb Web Managed Ethernet Network Switch
- Power Adapter (AC 100-240V to DC 12V 1A)
- User Manual
3.2 Physical Installation
- Power Connection: Connect the provided power adapter to the DC 12V port on the switch and then plug it into a power outlet. The Power LED (PWR) on the front panel should illuminate.
- Network Cable Connection: Connect your network devices (e.g., computers, NAS, Wi-Fi 6 routers) to the RJ45 ports (1-8) using Ethernet cables. For optimal 2.5Gbps speed, use CAT6 or higher-level pure copper Ethernet cables.
- SFP+ Uplink (Optional): If using the 10G SFP+ port, insert a compatible SFP+ module (not included) and connect it to your core network device using an appropriate fiber optic cable.

Image 3.1: Example of physical connections for the switch.
3.3 Initial Web Management Access
To access the web management interface:
- Ensure your computer is connected to one of the switch's RJ45 ports.
- Open a web browser and enter the default IP address: 192.168.2.1
- When prompted, enter the default login credentials:
User Name: admin
Password: admin - You will then be able to configure the switch settings. It is recommended to change the default password for security purposes.

Image 3.2: Default login information for web management.
4. Operating Instructions
The web management interface provides comprehensive control over the switch's functions. Below are some key features you can configure:
4.1 VLAN Configuration
Virtual Local Area Networks (VLANs) allow you to segment your network into smaller, isolated broadcast domains. This enhances security and network efficiency. The switch supports various VLAN functions to build a well-managed and secure network.

Image 4.1: VLAN for enhanced network security.
4.2 Quality of Service (QoS)
QoS allows network administrators to prioritize specific types of traffic. This is crucial for applications like voice and video, ensuring they receive sufficient bandwidth and minimal latency for a fluent online experience.

Image 4.2: QoS for fluent online experience.
4.3 Link Aggregation (LACP)
Link Aggregation combines multiple network connections in parallel to increase throughput beyond what a single link could achieve, and to provide redundancy. For Static Link Aggregation with NAS devices, select "Balance XOR" in the configuration.
4.4 IGMP Snooping
IGMP Snooping optimizes multicast traffic delivery, preventing it from flooding the entire network. This is particularly beneficial for applications such as IPTV, ensuring a better network experience.

Image 4.3: IGMP Snooping for multicast optimization.
4.5 Other Management Features
The web interface also allows configuration of:
- Jumbo Frame support
- Loop detection and prevention
- Spanning Tree Protocol (STP/RSTP) settings
- MAC address table management

Image 4.4: Basic management features for network efficiency.
5. Maintenance
To ensure optimal performance and longevity of your Real HD Network Switch, follow these maintenance guidelines:
- Keep Clean: Regularly clean the exterior of the switch with a soft, dry cloth. Avoid using liquid cleaners or aerosols.
- Ventilation: Ensure the switch is placed in a well-ventilated area to prevent overheating. Do not block the ventilation holes.
- Cable Management: Keep network cables organized and free from kinks or excessive bending to prevent signal degradation.
- Firmware Updates: Periodically check the manufacturer's website for firmware updates to ensure your device has the latest features and security patches.
6. Troubleshooting
If you encounter issues with your Real HD Network Switch, refer to the following common troubleshooting steps:
6.1 No Power
- Verify the power adapter is securely connected to both the switch and a working power outlet.
- Check if the power outlet is functional by plugging in another device.
6.2 No Network Connectivity
- Ensure Ethernet cables are properly connected to both the switch and your devices. Check the link/activity LEDs on the switch ports.
- Confirm that your devices' network adapters are enabled and configured correctly.
- Restart the switch and connected devices.
6.3 Slow Network Speed
- Cable Type: Ensure you are using CAT6 or higher-level pure copper Ethernet cables for 2.5Gbps connections.
- Device Compatibility: For the entire network to operate at 2.5Gbps, all connected devices (network cards, routers, etc.) must support 2.5Gbps speeds. The network speed will be limited by the slowest device in the chain.
- Traffic Load: High network traffic can impact performance. Check for bandwidth-intensive applications.

Image 6.1: Understanding 2.5Gbps network speed requirements.
6.4 Cannot Access Web Management Interface
- Confirm your computer's IP address is in the same subnet as the switch (default 192.168.2.x).
- Ensure no firewall or antivirus software is blocking access.
- Try resetting the switch to factory defaults (refer to the full product manual for specific instructions on factory reset).
7. Specifications
| Feature | Description |
|---|---|
| Brand | Real HD |
| Model Number | SW8-25G-MG |
| Number of Ports | 8 x 2.5G RJ45, 1 x 10G SFP+ |
| Switch Type | Web Managed |
| Data Transfer Rate | 60 Gigabits Per Second (Bandwidth) |
| Interface | RJ45, SFP+ |
| Case Material | Metal |
| Color | Black |
| Operating Temperature | -20 to 50 Degrees Celsius |
| Compatible Devices | Camera, Desktop, Gaming Console, Laptop, Printer |
8. Warranty and Support
8.1 Product Warranty
This Real HD Network Switch comes with a 1-year warranty from the date of purchase, covering manufacturing defects.
8.2 Technical Support
For technical assistance, please contact Real HD's local tech support. Our Chicago-based team is available from 9 AM to 5 PM CST. Refer to your product packaging or the official Real HD website for specific contact details.