
1. Introduction
This manual provides detailed instructions for the installation, operation, and maintenance of the Hanchen HCRO-400G Booster Pump Complete Kit for Home Reverse Osmosis (RO) Water Purification Systems. This kit is designed to enhance the performance of your RO system by increasing water pressure, leading to improved filtration efficiency and reduced wastewater.
Please read this manual thoroughly before installation and operation to ensure proper use and longevity of the product.
2. Package Contents
Verify that all components listed below are present in your package:
- HCRO-400G RO Booster Pump
- High Pressure Switch
- 24V Power Adapter
- Connection Wire
- 1/4" Quick Connect Fitting
- 1/4" Water Pipe

Image: All components included in the Hanchen HCRO-400G RO Booster Pump Kit, including the pump, power adapter, high pressure switch, connection wires, and various quick-connect fittings.

Image: A diagram illustrating the individual components and their quantities within the package, including the booster pump, DC 24V adapter, 1/4" water tube, connection wire, 1/4" high pressure switch, and various 1/4" quick connectors (I-type and L-type).
3. Specifications
| Model | HCRO-400G |
| Brand | Hanchen |
| Item Weight | 5.21 pounds |
| Package Dimensions | 9.09 x 6.54 x 5.2 inches |
| Suitable RO System Flow Rate | Up to 200 GPD |
| Inlet Water Pressure Boost | From 40 psi to 80-100 psi |
| Pressure Setting Bypass | 125 PSI |
| Inlet and Outlet Size | 1/4" Quick Connect |
4. Setup and Installation
The Hanchen HCRO-400G Booster Pump Kit features a quick-connection design for simplified installation. Follow these steps for proper setup:
4.1 Pre-Installation Checks
- Ensure your existing RO water purification system is compatible with a booster pump and 1/4" connections.
- Turn off the water supply to your RO system and depressurize the lines.
- Unpack all components and verify against the package contents list.
4.2 Connection Steps
- Identify Connection Points: The booster pump is typically installed before the RO membrane, after the pre-filters. The high-pressure switch is usually installed on the purified water line, often after the RO membrane and before the storage tank.
- Install Booster Pump: Connect the inlet of the booster pump to the outlet of your RO system's pre-filters using the provided 1/4" quick-connect fittings and water pipe. Connect the outlet of the booster pump to the inlet of your RO membrane housing.
- Install High Pressure Switch: Integrate the high-pressure switch into the purified water line. This switch detects when the RO storage tank is full and signals the pump to shut off.
- Electrical Connection: Connect the booster pump to the 24V power adapter using the provided connection wire. The system is designed for quick, plug-and-play electrical connection without complex wiring.
- Secure Components: Mount the booster pump and high-pressure switch securely in a suitable location, ensuring they are stable and not subject to excessive vibration. The pump features shock-absorbing rubber feet for vibration damping.
Image: Illustration of the quick-connect power adapter, demonstrating the simple plug-and-play connection for the booster pump, eliminating the need for complex wiring.

Image: A schematic diagram showing the complete installation of the Hanchen booster pump, high-pressure switch, and power adapter within a typical reverse osmosis water purification system, including connections to the RO unit, storage tank, and water supply.

Image: A close-up view of the shock-absorbing rubber feet on the booster pump, designed to reduce vibration and noise during operation.
5. Operating Instructions
The Hanchen HCRO-400G Booster Pump is designed for automatic operation once correctly installed.
5.1 Initial Start-up
- After completing all connections, slowly turn on the water supply to your RO system. Check for any leaks.
- Plug in the 24V power adapter to an electrical outlet. The pump will automatically start if the water pressure is below the set threshold and the high-pressure switch indicates a need for water.
- Allow the system to run for a few minutes to purge air from the lines.
5.2 Automatic Operation
- The booster pump will automatically activate when the incoming water pressure is insufficient (e.g., below 40 psi) to optimize the RO filtration process.
- It will boost the water pressure to an optimal range of 80-100 psi, improving the efficiency of your RO membrane.
- The sensitive high-pressure switch will detect when the RO storage tank is full and automatically shut off the pump, preventing over-pressurization and conserving energy.
- When water is drawn from the RO system and the tank pressure drops, the high-pressure switch will signal the pump to restart, maintaining consistent water production.
Image: A diagram illustrating the automatic stop function. The high-pressure switch monitors the water level in the RO storage tank (1) and, once full, sends a signal (2) to shut down the booster pump (3), protecting the system and conserving energy.
Image: Visual representation of the booster pump's function, showing it increases inlet water pressure from below 40 PSI to an optimal range of 70-80 PSI for efficient RO system operation.

Image: A side-by-side comparison showing increased water flow from a faucet after the installation of the booster pump, indicating faster filtered water delivery.
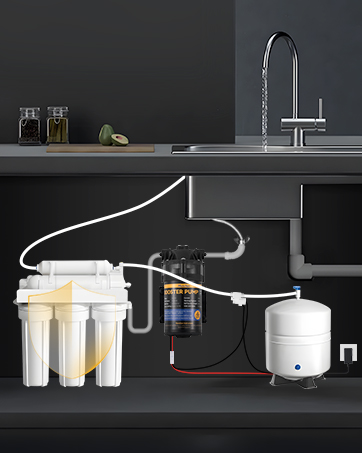
Image: A symbolic image of a glass globe with water and plants, representing the environmental benefit of reduced wastewater generation due to optimized RO system pressure from the booster pump.
6. Maintenance
Regular maintenance ensures the optimal performance and longevity of your Hanchen HCRO-400G Booster Pump.
- Leak Checks: Periodically inspect all connections for any signs of leaks. Tighten fittings if necessary.
- System Cleanliness: Keep the pump and surrounding area clean and free from dust or debris.
- Filter Replacement: Ensure your RO system's pre-filters and RO membrane are replaced according to the manufacturer's recommendations. Clogged filters can affect pump performance.
- Power Supply: Verify that the 24V power adapter is securely connected and free from damage.
- Pressure Monitoring: If your RO system includes a pressure gauge, monitor the system pressure to ensure it operates within the expected range (80-100 psi with the booster pump active).
7. Troubleshooting
Refer to the following common issues and solutions before contacting technical support.
| Problem | Possible Cause | Solution |
|---|---|---|
| Pump not turning on | No power; High-pressure switch engaged (tank full); Low-pressure switch not activated (no water supply) | Check power connection; Verify RO tank is not full; Ensure water supply to RO system is open. |
| Low water pressure from faucet | Clogged filters; Faulty pump; Insufficient incoming water pressure | Replace RO filters; Check pump for proper operation; Verify main water supply pressure. |
| Pump runs continuously | Leaking system; Faulty high-pressure switch; RO tank not building pressure | Inspect for leaks and repair; Test/replace high-pressure switch; Check RO tank air pressure and bladder. |
| Excessive noise or vibration | Loose mounting; Air in pump; Obstruction | Ensure pump is securely mounted; Bleed air from system; Check for foreign objects. |
8. Warranty and Support
Hanchen Instrument products are covered by a 1-year limited warranty. For technical assistance, troubleshooting beyond this manual, or warranty claims, please contact Hanchen Instrument customer support.
Contact information can typically be found on the product packaging or the official Hanchen website.