1. Introduction
Thank you for choosing the Vormooi 96GB Voice Recorder. This device is designed for high-quality audio recording with extensive storage and user-friendly features. Please read this manual carefully to ensure proper use and to maximize the potential of your new voice recorder.

Figure 1: Vormooi 96GB Voice Recorder and accessories.
2. Getting Started (Setup)
2.1 What's in the Box
Upon unboxing your Vormooi Voice Recorder, please verify that all components are present:
- 1 x Vormooi 96GB Digital Voice Recorder (32GB built-in memory)
- 1 x 64GB TF Memory Card (pre-installed)
- 1 x 3.5mm External Microphone
- 1 x 3.5mm Line-in Cable
- 1 x USB C to USB C Cable
- 1 x USB C Cable (for charging/data transfer)
- 1 x Lanyard
- 1 x User Manual (this document)
- 1 x Quick Start Guide

Figure 2: All items included in the product package.
2.2 Charging the Device
The Vormooi Voice Recorder is equipped with an 1100mAh battery, providing up to 110 hours of continuous recording on a full charge. It takes approximately 2 hours to fully charge the device.
- Connect the provided USB-C cable to the USB-C port on the recorder.
- Connect the other end of the USB-C cable to a USB power adapter (not included) or a computer's USB port.
- The battery icon on the screen will indicate charging status.
Video 1: Demonstrates how to charge the Vormooi V71 Voice Recorder using the USB-C port. The video shows connecting the device to a power strip and a laptop for charging, highlighting the charging indicator on the screen.

Figure 3: The recorder's USB-C port supports two charging methods, allowing for full charge in 2 hours for 110 hours of continuous recording.
2.3 Power On/Off
To power on or off the device, long press the central Power/Play button.
Video 2: Demonstrates powering the device on and off by long-pressing the Power/Play button. The screen displays "WELCOME" upon startup.
2.4 Lock/Unlock Buttons
To prevent accidental operations during recording or transport, use the physical lock switch on the side of the device.
- Push the switch up to lock all buttons. A lock icon will appear on the screen.
- Push the switch down to unlock the buttons. The lock icon will disappear.

Figure 4: The dedicated lock switch prevents unintended button presses.
2.5 Setting Language
To change the device language:
- From the main menu, navigate to System settings.
- Select Language.
- Choose your desired language from the list.
Video 3: Guide on how to set the language on the Vormooi V71 Voice Recorder. It shows navigating through the system settings to the language option and selecting from available languages.
2.6 Setting Date & Time
Ensure the correct date and time are set for accurate file organization:
- From System settings, select Date and time.
- Choose Date settings to set the year, month, and day. Use the volume buttons (+/-) to adjust values.
- Choose Time settings to set the hour and minute. Use the volume buttons (+/-) to adjust values.
Video 4: Instructions on setting the date and time on the Vormooi V71 Voice Recorder. It demonstrates navigating to the date and time settings and adjusting the values.
2.7 Memory and SD Card
The recorder comes with 32GB of built-in memory and an additional 64GB TF card, providing a total of 96GB storage, capable of saving over 7000 hours of 32kbps recordings.
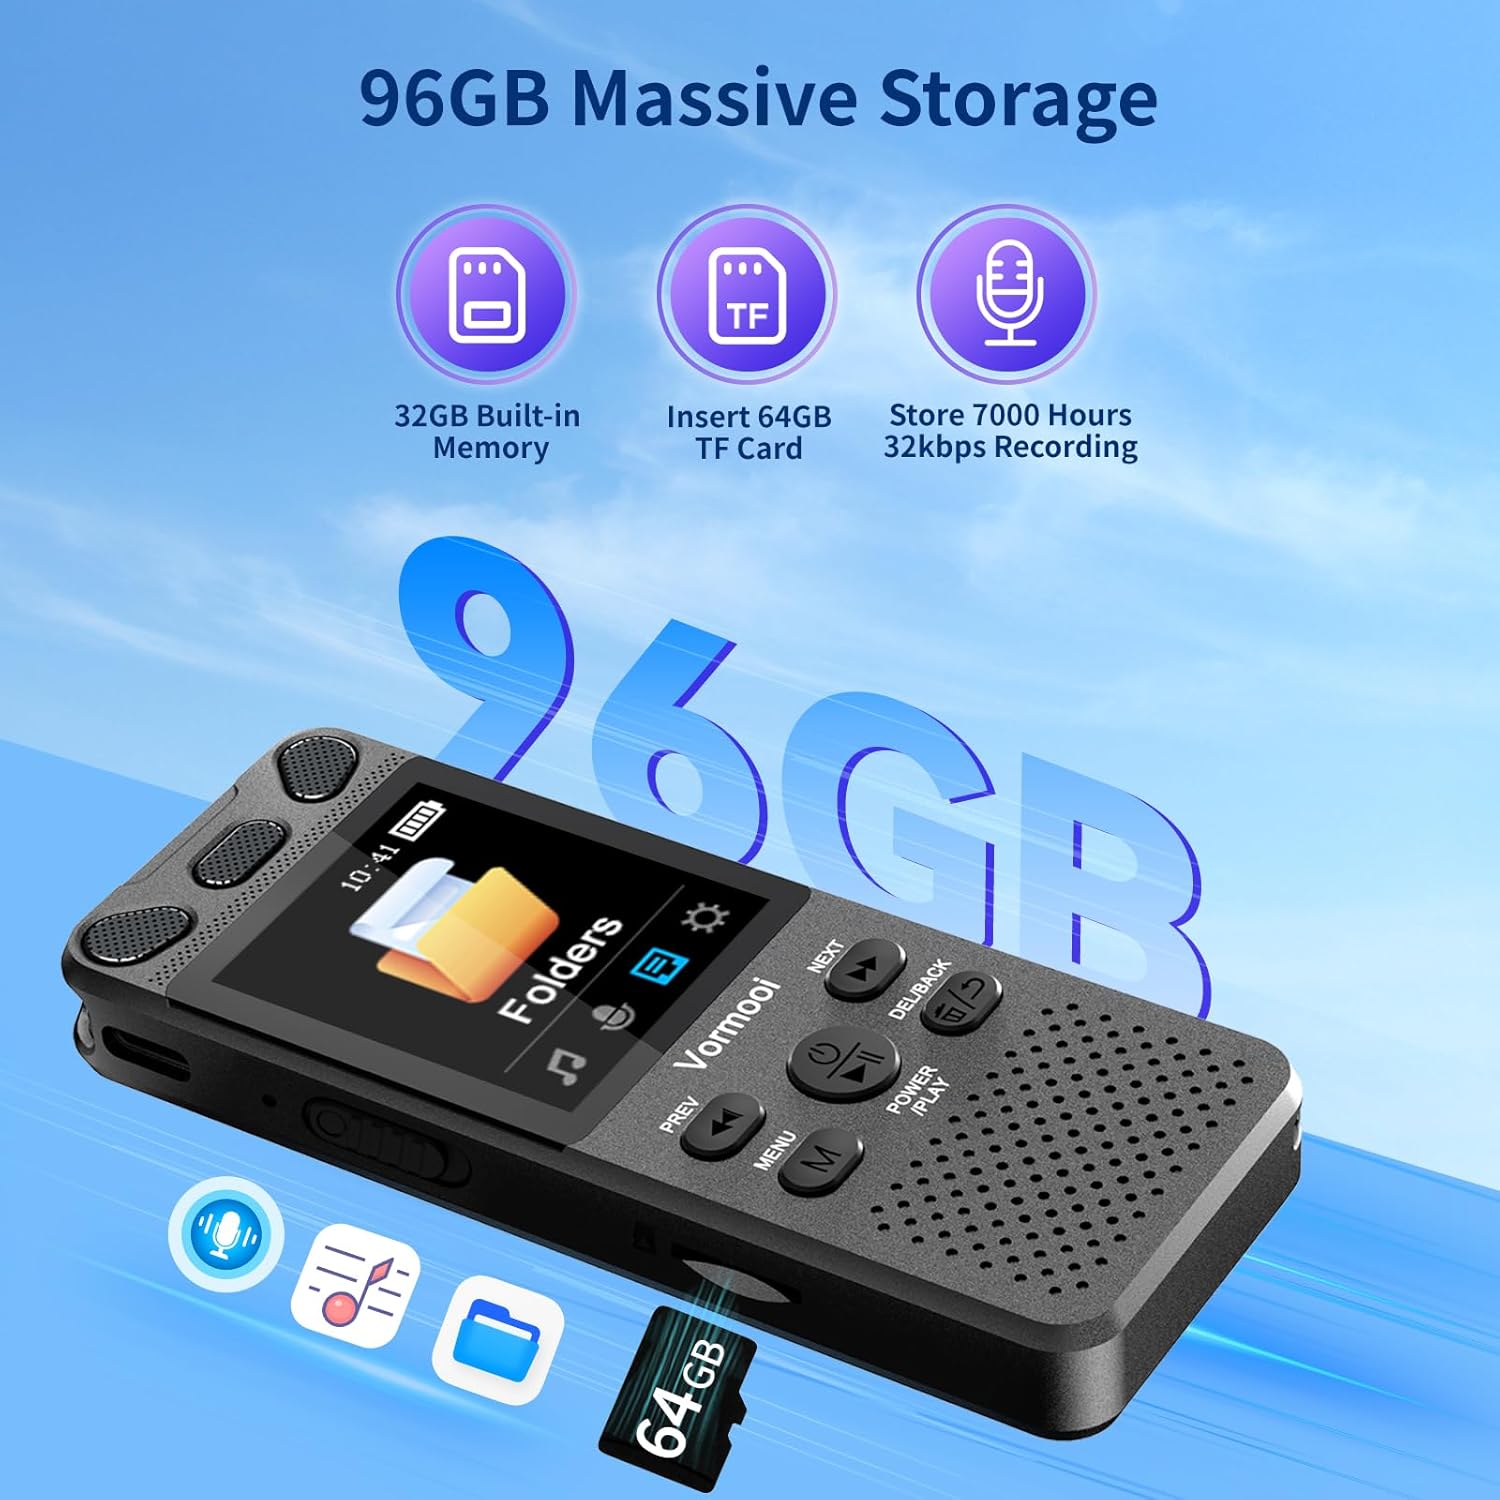
Figure 5: Overview of the recorder's substantial storage capacity.

Figure 6: The device supports memory card expansion for increased storage.
3. Operating the Recorder
3.1 One-Touch Recording
The Vormooi Voice Recorder features a convenient one-touch recording function:
- To start recording, simply slide the REC button upwards. The recording will begin automatically.
- To save the recording, slide the REC button downwards. The recording will be saved.

Figure 7: One-touch record/save functionality for quick and easy operation.
Video 5: Demonstrates the one-touch recording feature, showing how to start and save recordings by sliding the REC button. It also shows the recording information displayed on the screen.
3.2 Microphone Recording
The recorder supports multiple recording modes, including its built-in omni-directional microphone and an external microphone.
- Internal Microphone: The built-in microphone offers 360° omni-directional recording with 1536Kbps HD sound quality and advanced noise reduction.
- External Microphone: For enhanced clarity, especially in interviews or specific scenarios, connect the included 3.5mm external microphone.
Note: Before using the external microphone, go to [Recording settings] -> [Recording from] and change to [External microphone].

Figure 8: Using the external microphone for clear and real sound quality.
Video 6: Demonstrates recording with the external microphone, showing how to connect it and clip it to clothing for optimal sound capture.
3.3 Playback
To play back your recordings:
- From the Recordings Library, select the desired file.
- Short press the Power/Play button to start or pause playback.
Video 7: Shows how to play and pause recordings using the Power/Play button. The video also demonstrates fast forward and rewind functions.
3.4 Fast Forward/Rewind
During playback, you can quickly navigate through your recordings:
- Long press the NEXT button to fast forward.
- Long press the PREV button to rewind.
3.5 A-B Repeat
The A-B Repeat function allows you to loop a specific segment of an audio file:
- During playback, short press the MENU (M) button to set the start point (A).
- Short press the MENU (M) button again to set the end point (B).
- The device will automatically play the audio within the A-B range repeatedly.
Video 8: Demonstrates the A-B repeat function, showing how to set start and end points for looping audio segments.
3.6 Voice Activated Recording (VOR)
The voice-activated recording feature allows the device to start recording automatically when sound is detected and pause when silence occurs, saving storage space.
- Access VOR settings through the menu to enable or disable this feature and adjust sensitivity levels.

Figure 9: Voice Activation is one of the key features for efficient recording.
3.7 Connecting to a Computer
You can easily transfer or backup your recorded files by connecting the recorder to a computer:
- Use the provided USB-C cable to connect the recorder to your computer.
- The recorder will appear as a removable disk drive on your computer.
- You can then drag and drop files to transfer them.
Video 9: Demonstrates connecting the Vormooi V71 Voice Recorder to a laptop for backing up and transferring files. The video shows the device appearing as a drive on the computer.
4. Maintenance
4.1 Formatting Device Memory/SD Card
To clear all data from the internal memory or the SD card:
- From System settings, navigate to Format device.
- You will have options to format internal memory or the SD card.
- Confirm your selection. Warning: All data will be permanently deleted. Proceed with caution.
Video 10: Demonstrates how to format the device's internal memory or the SD card. It shows navigating through the system settings to the format option and confirming the deletion of all data.
4.2 General Care
- Keep the device dry and away from extreme temperatures.
- Avoid dropping or subjecting the device to strong impacts.
- Clean the device with a soft, dry cloth. Do not use harsh chemicals or abrasive cleaners.
- Store the device in a safe place when not in use.
5. Troubleshooting
| Problem | Possible Cause | Solution |
|---|---|---|
| Device does not power on. | Low battery; device frozen. | Charge the device fully. If frozen, long press the Power/Play button for 10 seconds to force restart. |
| Cannot record. | Memory full; device locked; incorrect microphone setting. | Delete old files or format memory. Unlock the device. Check recording settings for microphone selection. |
| Poor recording quality. | Distance from source; high background noise; incorrect settings. | Move closer to the sound source. Adjust noise reduction settings. Use external microphone if needed. |
| Cannot connect to computer. | Faulty cable; driver issue; incorrect connection mode. | Try a different USB-C cable. Ensure the device is powered on. Try a different USB port on your computer. |
| Playback issues (no sound, distorted). | Low volume; corrupted file; speaker/headphone issue. | Increase volume. Try playing another file. Test with headphones. |
6. Specifications
- Brand: Vormooi
- Model: V71
- Memory Storage Capacity: 96 GB (32GB internal + 64GB TF card)
- Battery Average Life: 110 Hours
- Battery Cell Composition: Lithium Ion
- Charging Time: Approx. 2 hours
- Audio Quality: 1536Kbps HD
- Microphone Format: Built-In (Omni-directional) & External 3.5mm
- Hardware Interface: USB Type C
- Compatible Devices: MP3 Player, Personal Computer, Smartphone
- Media Format: MP3 Audio, WAV
- Standing Screen Display Size: 2.15 Inches
- Product Dimensions: 10 x 3.9 x 1.26 cm
- Item Weight: 98 Grams
7. Warranty and Support
Vormooi is committed to providing excellent customer service and product support.
- Lifetime Technical Support: Our dedicated support team is available to assist you with any technical queries or issues you may encounter.
- 2 Years Replacement Service: Enjoy peace of mind with our 2-year replacement service for eligible product defects.
- 24 Hours Rapid Response: The Vormooi support team aims to respond and resolve your problems within 24 hours on weekdays.
For support, please refer to the contact information provided in your Quick Start Guide or visit the official Vormooi store on Amazon.

Figure 10: Vormooi's commitment to customer support.


