
1. Introduction
This manual provides detailed instructions for the safe and effective use of your BILIPALA DM50G Laser Distance Measuring Tool. This device is designed for precise distance, area, and volume measurements, featuring a green laser for enhanced visibility and multiple measurement modes. Please read this manual thoroughly before operating the device and retain it for future reference.
2. Safety Information
WARNING: Laser Radiation. Avoid direct eye exposure.
- This device emits a Class 2 laser. Do not stare into the laser beam.
- Do not aim the laser beam at people or animals.
- Do not modify the laser device. Unauthorized modifications can increase laser radiation.
- Keep the device out of reach of children.
- Use the device only for its intended purpose as described in this manual.
- Avoid using the device in explosive environments or near flammable materials.
- Protect the device from extreme temperatures, strong vibrations, and mechanical shock.
3. Package Contents
Verify that all items are present in the package:
- 1x BILIPALA DM50G Laser Distance Meter
- 2x 1.5V AA Batteries
- 1x Carrying Bag
- 1x Wrist Strap
- 1x Multi-language User Manual (this document)
4. Product Overview
The BILIPALA DM50G is a compact and durable laser distance measuring tool designed for various applications. It features a bright green laser, a backlit LCD, and an intuitive button layout for ease of use.
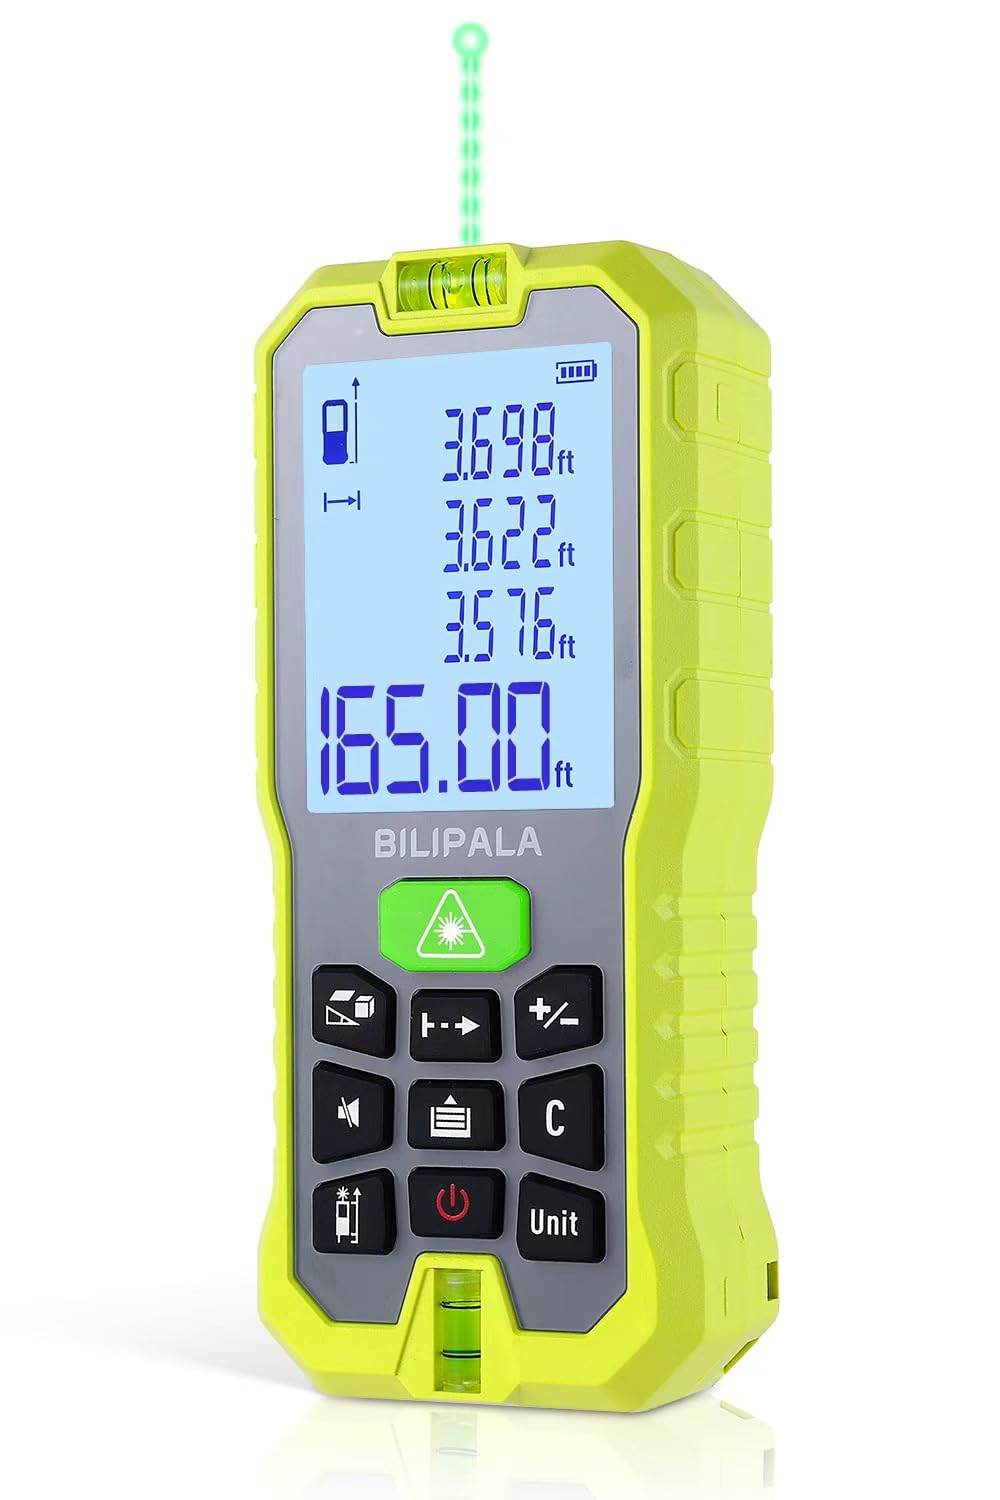
Figure 1: Front view of the BILIPALA DM50G Laser Distance Measuring Tool, showing the display and keypad.
4.1 Key Features
- Green Laser Technology: Provides a laser point up to 4 times brighter than standard red beams for improved visibility.
- High Accuracy: ±2mm precision for reliable measurements.
- Multiple Measurement Modes: Distance, Area, Volume, Continuous Measurement, Pythagorean (2-point, 3-point), Addition/Subtraction.
- Backlit LCD: Large, easy-to-read display for clear visibility in various lighting conditions.
- Durable Design: IP54 rated for dust and splash protection.

Figure 2: Internal view illustrating the green laser technology, highlighting its brightness and precision.
5. Setup
5.1 Battery Installation
- Locate the battery compartment cover on the rear of the device.
- Slide or unclip the cover to open the compartment.
- Insert the two 1.5V AA Alkaline batteries, ensuring correct polarity (+/-) as indicated inside the compartment.
- Close the battery compartment cover securely.
6. Operating Instructions
6.1 Power On/Off
- Power On: Press the [ON/MEAS] button once to turn on the device. The laser will activate.
- Power Off: Press and hold the [OFF] button for approximately 2 seconds to turn off the device. The device will also auto-shutoff after 150 seconds of inactivity.
6.2 Unit Switching
The device supports multiple units of measurement. To switch between units (e.g., meters, feet, inches):
- While the device is on, press the [UNIT] button repeatedly to cycle through available units.

Figure 3: Examples of the display showing various measurement units and formats.
6.3 Measurement Reference Point
The device can measure from its front edge or its rear edge. This is indicated by an icon on the display.
- Press the [REF] button to toggle the measurement reference point.
- Ensure the correct reference point is selected for accurate measurements.
6.4 Single Distance Measurement
- Turn on the device.
- Aim the laser at the target point.
- Press the [ON/MEAS] button once. The measured distance will appear on the display.
6.5 Continuous Measurement (Tracking)
This mode allows for dynamic measurement, displaying the maximum and minimum distances as you move the device.
- Press the [FUNC] button until the continuous measurement icon appears.
- Press [ON/MEAS] to start. Move the device slowly. The display will update in real-time.
- Press [ON/MEAS] again to stop.
6.6 Area Measurement
- Press the [FUNC] button until the area measurement icon appears.
- Measure the first side (e.g., length) by pressing [ON/MEAS].
- Measure the second side (e.g., width) by pressing [ON/MEAS].
- The device will automatically calculate and display the area.
6.7 Volume Measurement
- Press the [FUNC] button until the volume measurement icon appears.
- Measure the length, width, and height sequentially by pressing [ON/MEAS] after each measurement.
- The device will automatically calculate and display the volume.
6.8 Pythagorean Measurement
This mode allows indirect measurement of heights or distances using the Pythagorean theorem.

Figure 4: Illustrates the use of the laser distance meter for outdoor measurements, such as building dimensions.
6.8.1 2-Point Pythagorean Mode (Indirect Height)
- Press the [FUNC] button until the 2-point Pythagorean icon appears.
- Measure the hypotenuse (distance from device to top of object) by pressing [ON/MEAS].
- Measure the base (distance from device to bottom of object) by pressing [ON/MEAS].
- The device will calculate and display the height.
6.8.2 3-Point Pythagorean Mode (Indirect Height with two hypotenuses)
- Press the [FUNC] button until the 3-point Pythagorean icon appears.
- Measure the first hypotenuse (device to top of object) by pressing [ON/MEAS].
- Measure the second hypotenuse (device to middle point) by pressing [ON/MEAS].
- Measure the base (device to bottom of object) by pressing [ON/MEAS].
- The device will calculate and display the height.
6.9 Addition/Subtraction
To add or subtract measurements:
- Perform a measurement.
- Press the [+] or [-] button.
- Perform the next measurement. The result will be added or subtracted from the previous value.
- Repeat as needed.
6.10 Memory Function
The device stores up to 20 sets of measurement data.
- Press the [MEM] button to view stored measurements.
- Use the arrow buttons (if available) to navigate through the memory.
6.11 Bubble Spirit Levels
The integrated bubble spirit levels assist in ensuring the device is held horizontally or vertically for more accurate measurements.

Figure 5: Close-up of the device display showing the digital bubble spirit levels for precise alignment.
7. Maintenance
- Cleaning: Use a soft, damp cloth to clean the device. Do not use abrasive cleaners or solvents. Clean the laser lens with a soft cloth, similar to cleaning camera lenses.
- Storage: When not in use for extended periods, remove the batteries to prevent leakage. Store the device in its carrying bag in a cool, dry place, away from direct sunlight and extreme temperatures.
- Battery Replacement: Replace batteries when the low battery indicator appears on the display.
8. Troubleshooting
| Problem | Possible Cause | Solution |
|---|---|---|
| Device does not turn on | Low or dead batteries; Incorrect battery installation | Replace batteries; Check battery polarity |
| Inaccurate measurements | Incorrect reference point; Unstable surface; Obstruction in laser path; Extreme environmental conditions | Verify reference point; Ensure stable measurement; Clear laser path; Avoid measuring in direct sunlight or highly reflective surfaces if possible |
| Laser beam not visible | Bright ambient light; Long distance measurement | Use in lower light conditions; Use a laser target plate for longer distances or bright environments |
| Display error message | Measurement out of range; Internal error | Ensure target is within 0.05m to 50m range; Restart device; If error persists, contact support |
9. Specifications
| Feature | Specification |
|---|---|
| Model Number | DH-US-LDM |
| Measuring Range | 0.05m - 50m (165ft) |
| Accuracy | ±2mm |
| Laser Type | Class 2, Green Laser |
| Measurement Speed | 0.5s |
| Units of Measurement | m / ft / in |
| Memory Storage | 20 data sets |
| Auto Shut-off | 150 seconds (laser and device) |
| Power Supply | 2 x 1.5V AA Alkaline Batteries |
| IP Rating | IP54 (Dust and Splash Protected) |
| Material | Plastic |
| Item Weight | 249 g |
| Dimensions (L x W x H) | 49mm x 30mm x 125mm |
10. Warranty and Support
BILIPALA provides a 24-month warranty for this product, covering manufacturing defects and material faults from the date of purchase. This warranty does not cover damage caused by misuse, unauthorized modification, accident, or normal wear and tear.
For technical assistance, warranty claims, or any questions regarding your BILIPALA DM50G Laser Distance Measuring Tool, please contact BILIPALA customer support. Lifetime customer support is available to assist you.
Please refer to the contact information provided with your purchase documentation or visit the official BILIPALA website for support details.