1. Introduction
The FlashQ Q20III is a compact, full-featured wireless flash unit designed for photographers seeking portability and versatility. It features a detachable radio transmitter, integrated LED lighting, and a tiltable flash head, making it suitable for various lighting scenarios. This manual provides detailed instructions for setting up, operating, and maintaining your FlashQ Q20III.

Figure 1.1: The FlashQ Q20III main body, showcasing its compact design and control panel. The flash features power level indicators, flash and video light controls, and a mode button.
2. Package Contents
Please verify that all items listed below are included in your package:
- 1 x FlashQ Q20III main body (Batteries not included)
- 1 x FlashQ Transmitter (with built-in rechargeable lithium battery)
- 1 x Diffuser panel (-1.3 EV)
- 1 x Color gel holder
- 1 x Color gel pack (7 colors)
- 1 x Protective pouch
- 1 x USB charging cable
- 1 x User manual (this document)
3. Setup
3.1. Battery Installation
The FlashQ Q20III main body requires two AA-size batteries. For optimal performance and faster recycling times, rechargeable Ni-MH batteries are highly recommended. The FlashQ Transmitter has a built-in rechargeable lithium battery.
- Locate the battery compartment on the FlashQ Q20III main body.
- Insert two AA batteries, ensuring correct polarity (+/-).
- Close the battery compartment securely.
3.2. Charging the Transmitter and Main Body
The FlashQ Q20III main body and its detachable transmitter can be charged via USB Type-C.
- Main Body: If using rechargeable Ni-MH AA batteries, connect the USB charging cable to the USB Type-C port on the Q20III main body and to a standard USB power source. The unit will charge the installed Ni-MH batteries.
- Transmitter: Connect the USB charging cable to the USB Type-C port on the FlashQ Transmitter and to a standard USB power source. The status indicator on the transmitter will show charging status.
3.3. Attaching the Transmitter
The FlashQ Transmitter can be attached to the dedicated socket on the Q20III main body or used wirelessly.

Figure 3.1: Detailed diagram of the FlashQ Q20III main body and its detachable transmitter, highlighting key components and controls such as the tiltable flash head, USB-C charging ports, flash power controls, and mode buttons.
3.4. Attaching to Camera
The FlashQ Q20III is compatible with most cameras featuring a standard ISO hot shoe, including Sony Multi Interface Shoe (MIS).
- Slide the hot shoe mount of the Q20III (or the transmitter if using wirelessly) onto your camera's hot shoe.
- Secure the unit by tightening the locking mechanism on the hot shoe mount.
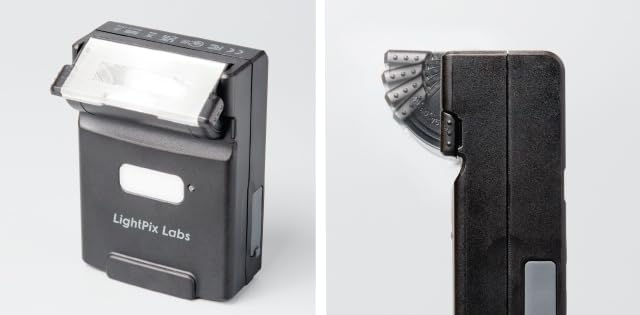
Figure 3.2: The FlashQ Q20III mounted on a camera, demonstrating its compact size and how it appears when attached. The image shows the flash head and the integrated LED video light.
4. Operating Instructions
4.1. Power On/Off
To power on the FlashQ Q20III, slide the ON/OFF switch located on the main body. The transmitter also has a power button.
4.2. Flash Modes and Power Control
The Q20III offers manual flash control and optical slave modes.
- Manual Flash: Adjust flash power from 1/64 to 1/1 in 7 steps using the flash power control buttons. The Guide Number is 66ft (at ISO 100) with 32mm (Full-Frame) coverage.
- Optical Slave (S1/S2): Use the mode button to select S1 or S2 mode. These modes allow the Q20III to trigger when it detects another flash firing.
4.3. LED Video Light
The integrated LED video light can be adjusted in 7 steps, providing a maximum output of 60 lux at 1m. It also functions as a modeling light.
- Use the video light control buttons to adjust the brightness.
- The LED color temperature is 5500K±300K with a CRI of 95.
4.4. Flash Head Tilting
The flash head can be tilted up to 90 degrees with click-stops at 0°, 45°, 60°, 75°, and 90°. This allows for bounce flash photography.
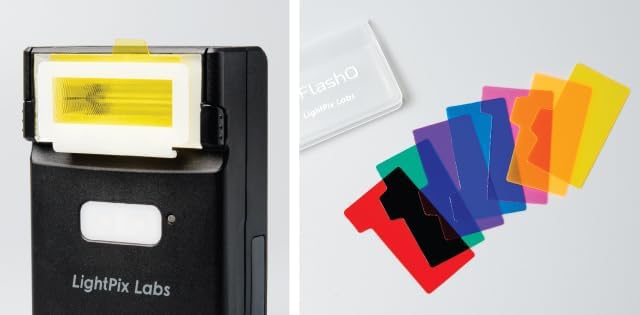
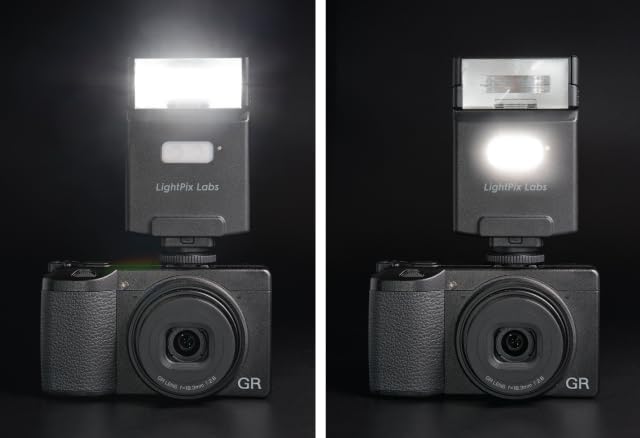

Figure 4.1: The FlashQ Q20III supports various light modifiers. Top image shows a color gel inserted into the flash head. Middle image displays the diffuser panel and color gel holder. Bottom image shows the diffuser panel attached to the flash head, softening the light output.
4.5. Wireless Operation
The detachable 2.4GHz radio transmitter allows for wireless triggering and power adjustment of the Q20III. It can control up to 8 flashes simultaneously within a 32ft operating range.
- Attach the transmitter to your camera's hot shoe.
- Position the Q20III main body off-camera.
- Ensure both units are powered on and set to the same wireless channel (refer to the full user manual for channel setting details).
Figure 4.2: The FlashQ Q20III's versatility is enhanced by its detachable transmitter. The top image shows the complete unit, while the bottom image highlights the separate flash head and transmitter components, allowing for off-camera flash setups.
5. Maintenance
- Keep the unit clean and free from dust. Use a soft, dry cloth for cleaning.
- Avoid exposing the unit to extreme temperatures, humidity, or direct sunlight.
- Remove batteries if the unit will not be used for an extended period to prevent leakage.
- Store the unit in its protective pouch when not in use.
6. Troubleshooting
| Problem | Possible Cause | Solution |
|---|---|---|
| Flash not firing. | Low or dead batteries; incorrect camera settings; unit not powered on; hot shoe connection issue. | Replace/recharge batteries. Check camera flash settings. Ensure unit is ON. Re-seat on hot shoe. |
| LED video light not working. | Low battery; LED mode not selected; brightness set to minimum. | Recharge batteries. Select LED mode. Increase brightness. |
| Wireless trigger not working. | Transmitter/receiver not paired; out of range; interference; transmitter battery low. | Ensure both units are ON and paired. Reduce distance. Check for obstructions. Recharge transmitter. |
| Slow recycling time. | Low battery power; using alkaline batteries instead of Ni-MH. | Recharge/replace batteries. Consider using Ni-MH batteries for faster recycling. |
7. Technical Specifications
| Feature | Detail |
|---|---|
| Guide Number | 66ft (at ISO 100) |
| Focal Length Coverage | 32mm (Full-Frame) |
| Manual Flash Power | 7 steps adjustable, 1/64 to 1/1 |
| LED Video Light Output | 7 steps adjustable, Max. 60 lux at 1m |
| Wireless Frequency | 2.4GHz low-power digital radio |
| Wireless Operating Range | 32ft |
| Flash Head Tilt Angle | Up to 90° (click-stops at 0°, 45°, 60°, 75°, 90°) |
| Optical Slave Modes | S1 / S2 |
| Modeling Light | Yes (via LED) |
| Transmitter Battery Life | 80 hours operation, 120 days standby |
| Main Body Batteries | Two AA-size alkaline / rechargeable Ni-MH batteries |
| Recycling Time (1/1 full power) | 7 sec. (alkaline) / 6 sec. (Ni-MH) |
| Number of Flashes | 100 - 2000 flashes (alkaline) |
| LED Lighting Time (full power) | Approx. 1 hour (Ni-MH batteries) |
| Flash Color Temperature | 5600K±200K |
| LED Color Temperature | 5500K±300K, CRI 95 |
| Charging Port | USB Type-C |
| Dimensions (with Transmitter) | 2.3(W) x 4.0(H) x 1.1(D) inches |
| Weight (without battery) | 4oz |
| Compatible Mountings | Standard ISO hot shoe (Fujifilm, Leica, Ricoh, Pentax, Sony, Canon, Nikon, Lumix, Four Thirds) |
| Flash Sync Speed | 1/200 |
8. Warranty and Support
For warranty information and technical support, please refer to the official LightPix Labs website or contact their customer service directly. Keep your purchase receipt as proof of purchase for warranty claims.
LightPix Labs Official Website: www.lightpixlabs.com
For further assistance, please contact LightPix Labs customer support.


