Product Overview
The XSPANDER Garage Door Keypad Opener is a wireless keyless entry system designed for convenient access to your garage. It features a weatherproof flip-up protective cover and backlit numbers for easy visibility in various conditions. This keypad is powered by a battery and offers broad compatibility with various garage door opener brands and learn button types.

Image: The XSPANDER Garage Door Keypad Opener, shown with its protective cover open, revealing the numeric keypad. Included mounting screws and anchors are visible below the keypad. This image highlights the product's design and included accessories.
Key Features:
- Widely Applicable: Compatible with LiftMaster garage door openers manufactured since January 1993, including Security+ 2.0 (yellow learn button), 315 MHz Security+ (purple learn button), 390 Security+ (red learn button), and 390 MHz Billion Code (green learn button).
- Applicable Brands: Works with 315 MHz or 390 MHz Craftsman, LiftMaster, and Chamberlain models manufactured after January 1, 1993. Ensure your garage door opener has a red/orange, yellow, purple, or green learn button.
- User-Friendly Design: Features a weatherproof flip-up protective cover and backlit numbers for clear visibility in the dark.
- Wireless Operation: Completely wireless design, powered by an included battery.
- Durable Construction: Made from high-quality materials and subjected to strict quality testing for reliability.

Image: An XSPANDER 877LM 877Max Garage Door Opener Keypad mounted on a wall next to a garage door. Text overlays highlight its features: "Completely Wireless", "Waterproof Cover", "Backlit Keypad", "Control Up To 3 Door Openers", and "Temporary 4 digit PIN to allow access to visitors."
Compatibility
This keypad is designed to be compatible with a wide range of garage door openers. To ensure compatibility, verify the color of the learn button on your garage door opener. The keypad supports red/orange, yellow, purple, and green learn buttons.
Compatible Learn Button Types:
- Yellow Learn Button: Security+ 2.0 (manufactured since January 1993)
- Purple Learn Button: 315 MHz Security+
- Red/Orange Learn Button: 390 MHz Security+
- Green Learn Button: 390 MHz Billion Code
Specific Model Fitment Examples:
The keypad is compatible with numerous models from Craftsman, LiftMaster, and Chamberlain. Examples include:
- Craftsman (Purple): 139.18451, 139.18452, 139.18453, 139.18473, 139.1849, 139.5314, 139.53753, 139.5391, 139.53914, etc.
- Craftsman (Red): 139.53661, 139.53662, 139.53663, 139.53664, 139.5367, 139.53671, 139.53672, 139.53673, 139.53674, 139.53675, etc.
- Craftsman (Green): 139.18803, 139.18805, 139.18814, 139.18815, 139.1883, 139.1885, 139.18851, 139.18855, 139.18859, 139.1886, etc.
- LiftMaster (Yellow): 8010, 8065, 8075, 8155, 8160, 8165, 8355, 8360, 8365, 8500, 8550, 8557, 8587, 84501, 84602, 85503, 87504, 87802.
- LiftMaster (Purple): 1345, 1346, 1355, 1356, 3110, 3130, 3220, 3240, 3245, 3255, 3265, 3275, 3280, 3500, 3575, 3585, 3595, 3800, 3840, 3850, ATS2113X, HCT501130, LGO50113R, LGO20113XR.
- LiftMaster (Red/Orange): 985, 1000SDR, 1240R, 1245R, 1246R, 1255R, 1256R, 1265, 1280R, 2000SDR, 2110, 2220, 2245, 2255, 2265, 2575, 2580, 2589, AST211R, AST211X.
- LiftMaster (Green): 1240, 1245, 1245l, 1246, 1250, 1255, 1256, 1260, 1260LK, 1270, 1280, 1000SD, 2000SD, 215WD, 220WD, 315WD, 320WD, AST211.
- Chamberlain (Yellow): HD220, HD420ev, hd520ev, hd750wf, hd920ev, hd930ev, hd950wf, LW260c, LW2200, lw3000ev, lw5000ev, lw9000wf, pd220, pd222, pd612ev, pd752kev, pd762ev, wd832kev, etc.
- Chamberlain (Purple): 248735, 248754, 48930D, CG40D, CG42D, HD200D, HD600D, HD800D, HD900D, LW2000, LW3000, LW3500, PD210D, PD212D, PD420D, PD422D, PD432D, PD612KLD, PD752D, PD758D, etc.
- Chamberlain (Red/Orange): 1200, 2200, 4200, 4620, 4640, 6200, 7220, 7320, 7420, 7902, 8200, 9200, 9902, 9950, 9960, CG40, PD210, PD212, PD420, PD610, pd612, PD752, PD785S, WD822K, WD912K, WD922K.
- Chamberlain (Green): 1100, 2100, 4100, 4600, 5100, 7200, 8100, 8700, 710WHC, 711WHC, PD100, PD200, PD600.
Installation
Before programming, install the battery and prepare the Keyless Entry for mounting.
- Select a location to mount the Keyless Entry at a minimum height of 5 feet (1.5 m) out of the reach of children.
- Remove battery cover and battery.
- Mark the top mounting hole and drill 1/8 inch (3.2 mm) pilot hole.
- Install the top screw, allowing 1/8 inch (3.2 mm) to protrude above the surface. Position the Keyless Entry over the top screw.
- Mark the bottom hole and drill 1/8 inch (3.2 mm) pilot hole. Install the bottom screw. Do not overtighten to avoid cracking the plastic housing.
- Reinstall battery and replace cover.
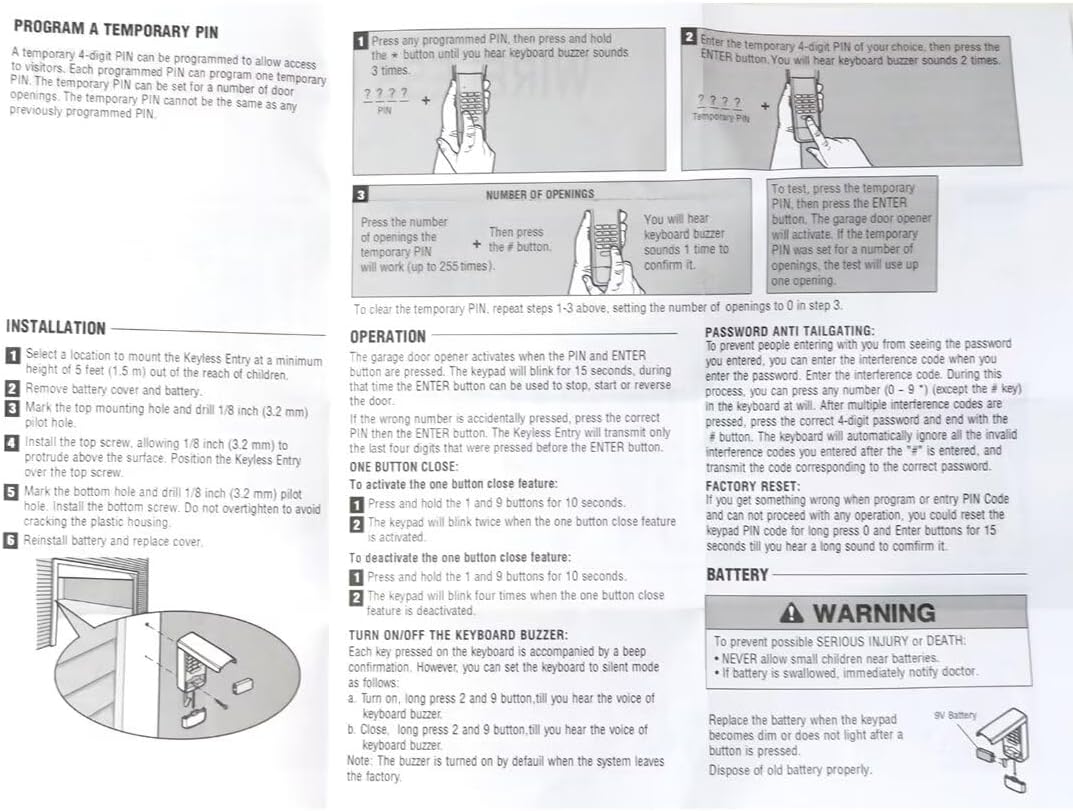
Image: A detailed diagram showing the installation steps for the keypad, including marking and drilling pilot holes, and securing the keypad with screws. This image also contains programming instructions for initial and temporary PINs, and troubleshooting tips.
Programming and Operation
Program Initial PIN:
This process sets your primary 4-digit personal identification number (PIN) for the keypad.
- Locate the Learn button on your garage door opener. The location may vary depending on your model (refer to your opener's manual if needed).
- Press and hold the * and # buttons on the keypad until the lights on the keypad stop blinking.
- Enter a 4-digit personal identification number (PIN) of your choice. Then press the # button.
- Press the Learn button on the garage door opener. The Learn LED will light within 30 seconds.
- Enter the 4-digit PIN programmed in step 2, then press and release the ENTER button until the garage door opener lights flash or two clicks are heard.
- To test, press the ENTER button. The garage door will activate.

Image: A step-by-step visual guide for programming the initial PIN on the XSPANDER keypad, including identifying the learn button on the garage door opener and the sequence of button presses on the keypad.
Change an Existing PIN:
- Press the programmed PIN that you want to change.
- Press and hold the # button until you hear the keypad buzzer sound 2 times and LED flashes 2 times.
- Enter the new 4-digit PIN of your choice. The keypad buzzer will sound 1 time and LED will flash 1 time. Then press the ENTER button.
- To test: Input the new PIN, then press the ENTER button. The garage door will activate.
Program a Temporary PIN:
A temporary 4-digit PIN can be programmed to allow access to visitors. Each programmed PIN can program one temporary PIN. The temporary PIN can be set for a number of door openings. The temporary PIN cannot be the same as any previously programmed PIN.
- Press any programmed PIN, then press and hold the * button until you hear the keypad buzzer sound 3 times.
- Enter the temporary 4-digit PIN of your choice, then press the ENTER button. You will hear the keypad buzzer sound 2 times.
- Press the number of openings (up to 255 times), then press the # button. You will hear the keypad buzzer sound 1 time to confirm it.
To clear the temporary PIN, repeat steps 1-3 above, setting the number of openings to 0 in step 3.

Image: A person's hand entering a code on the XSPANDER keypad, with text indicating "Temporary password" and its use for allowing temporary access to maintenance personnel or meter readers.
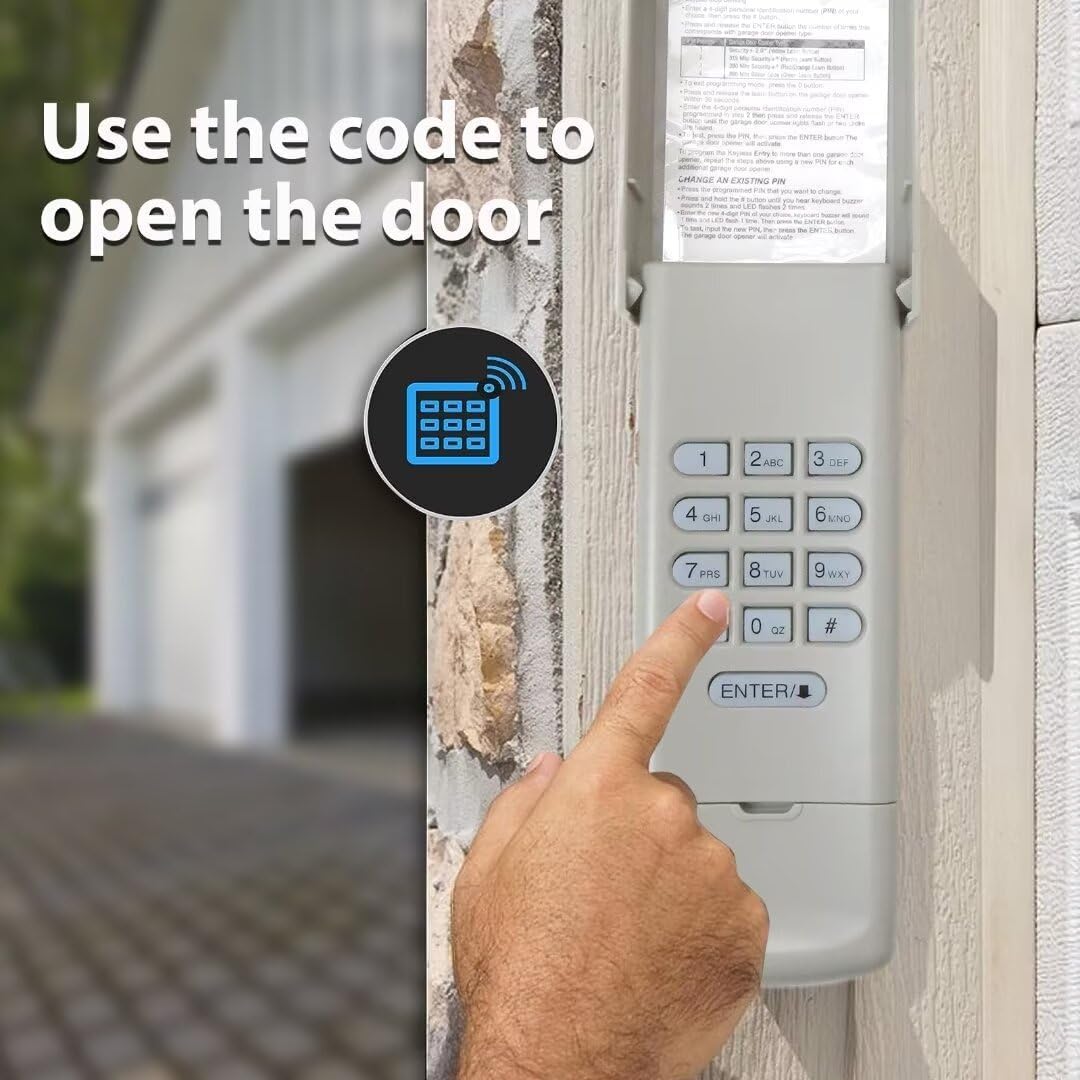
Image: A hand pressing the ENTER button on the XSPANDER keypad, with an icon representing wireless communication, illustrating the action of using the code to open the garage door.
Operation:
The garage door opener activates when the PIN and ENTER button are pressed. The keypad will blink for 15 seconds, during which time the ENTER button can be used to stop, start, or reverse the door.
If the wrong number is accidentally pressed, press the correct PIN then the ENTER button. The Keyless Entry will transmit only the last four digits that were pressed before the ENTER button.
One Button Close Feature:
- To activate the one button close feature:
- Press and hold the 1 and 9 buttons for 10 seconds.
- The keypad will blink twice when the one button close feature is activated.
- To deactivate the one button close feature:
- Press and hold the 1 and 9 buttons for 10 seconds.
- The keypad will blink four times when the one button close feature is deactivated.
Turn On/Off the Keypad Buzzer:
Each key pressed on the keyboard is accompanied by a beep confirmation. However, you can set the keyboard to silent mode as follows:
- To turn on: Long press 2 and 9 buttons till you hear the voice of keypad buzzer.
- To turn off: Long press 2 and 9 buttons till you hear the voice of keypad buzzer.
Note: The buzzer is turned on by default when the system leaves the factory.
Maintenance
Battery Replacement:
Replace the battery when the keypad becomes dim or does not light after a button is pressed. Dispose of old battery properly.
The keypad uses a 9V battery.

Image: The XSPANDER keypad mounted on a brick wall, with checkmarks next to "WATERPROOF COVER", "SAFE AND DURABLE", and "BACKLIT KEYPAD", emphasizing its robust design and features.
Troubleshooting
Password Anti-Tailgating:
To prevent people entering with you from seeing the password you entered, you can enter the interference code when you enter the password. Enter the interference code. During this process, you can press any number (0 - 9) except the (#) key in the keypad at will. After the interference codes are pressed, press the correct 4-digit password and end with the (#) key. The keyboard will automatically ignore all the invalid interference codes you entered after the "#" is entered, and transmit the code corresponding to the correct password.
Factory Reset:
If you get something wrong when program or entry PIN Code and can not proceed with any operation, you could reset the keypad PIN code for long press 0 and ENTER buttons for 15 seconds till you hear a long sound to confirm it.
Specifications
| Attribute | Detail |
|---|---|
| Manufacturer | XSPANDER |
| Part Number | GDFBA-5351-11 |
| Item Weight | 1.76 ounces |
| Country of Origin | China |
| Special Features | Ergonomic |
| Batteries Included? | No (but required for operation, 9V battery) |
| ASIN | B0DMZ8T2TF |
| Date First Available | May 13, 2024 |


