Introduction
Thank you for choosing the HIFIMAN GOLDENWAVE GA-10 Desktop Tube Headphone Amplifier. This manual provides essential information for the proper setup, operation, and maintenance of your device. Please read it thoroughly before use to ensure optimal performance and longevity.
The GA-10 is designed to deliver a delicate and clear sound experience, utilizing carefully selected vacuum tubes and components. It features a SEPP architecture and incorporates world-renowned ECC83/12AX7 and EL84 vacuum tubes. Its robust power supply, including a shielded 120W transformer and independent low-noise voltage regulator circuits, contributes to its exceptional clarity.
Important Safety Information
To prevent accidents and choking hazards, ensure that the product, accessories, and packaging parts are kept beyond the reach of children and pets.
This product contains magnetic components and generates magnetic fields which may interfere with pacemakers and implanted defibrillators. Consult a medical professional if you have such devices and concerns.
Always disconnect the power cord before cleaning or servicing the unit. Do not expose the unit to moisture or extreme temperatures.
Package Contents
Please check the package for the following items:
- HIFIMAN GOLDENWAVE GA-10 Headphone Amplifier
- Power Cable
- User Manual (this document)
If any items are missing or damaged, please contact your retailer or HIFIMAN customer support.
Product Overview
Front Panel
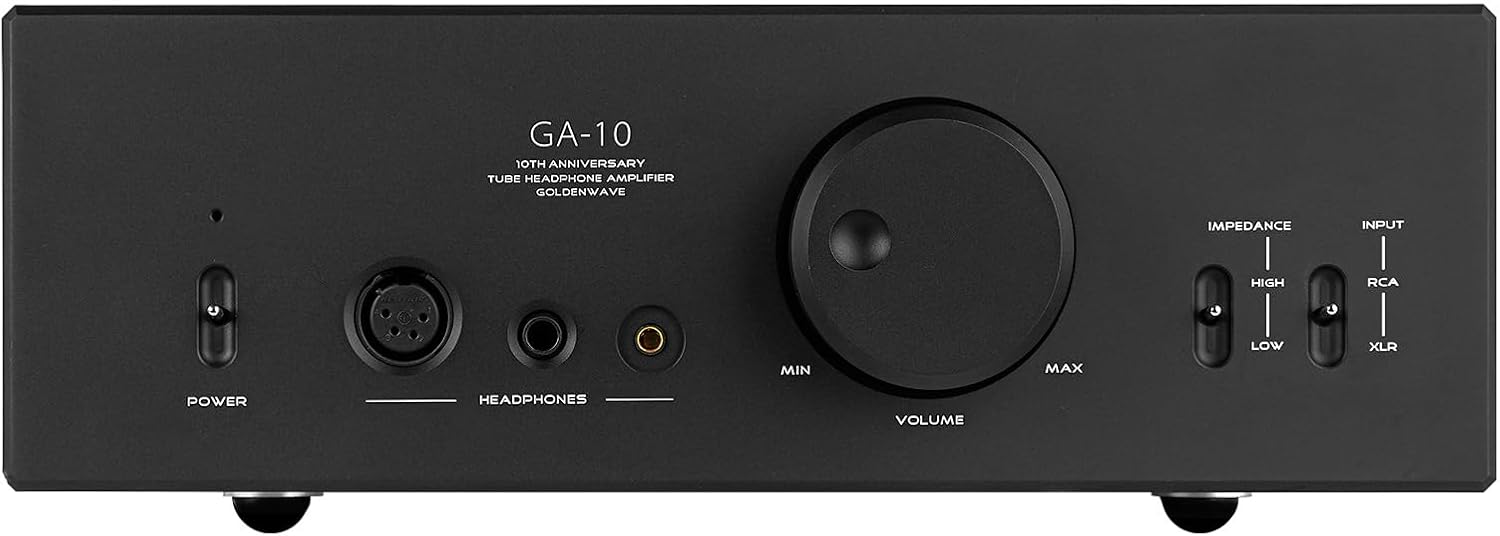
Image Description: A front view of the HIFIMAN GOLDENWAVE GA-10 desktop tube headphone amplifier. The front panel is black with white text. From left to right, it features a power toggle switch, an XLR 4-Pin balanced output, a 6.35mm single-ended output, a 4.4mm balanced output, a large central volume control knob, and two toggle switches on the right for impedance matching (High/Low) and input selection (RCA/XLR).
- Power Switch: Toggles the amplifier on or off.
- XLR 4-Pin Balanced Output: For connecting headphones with a 4-pin XLR balanced connector.
- 6.35mm Single-ended Output: For connecting headphones with a standard 6.35mm (1/4 inch) single-ended connector.
- 4.4mm Balanced Output: For connecting headphones with a 4.4mm balanced connector.
- Volume Control: Adjusts the output volume level.
- Output Impedance Matching Switch (High/Low): Selects the appropriate impedance setting for your headphones.
- Input Selector Switch (RCA/XLR): Selects between RCA and XLR input sources.
Rear Panel

Image Description: A rear view of the HIFIMAN GOLDENWAVE GA-10 desktop tube headphone amplifier. The rear panel is black. On the left, there are two XLR input ports (L and R) and two RCA input ports (L and R). On the right, there is an IEC power inlet with an integrated fuse holder and a main power rocker switch. Text indicates voltage selection (110-115V AC 50/60Hz and 220V AC 50/60Hz) and safety warnings.
- Signal Input (XLR L/R): Balanced audio input ports.
- Signal Input (RCA L/R): Unbalanced audio input ports.
- Power Plug/Switch: IEC power inlet for connecting the power cable and main power rocker switch.
- Voltage Selector: Allows selection between 110-115V and 220V AC power. Ensure this is set correctly for your region before connecting power.
Setup Instructions
- Unpacking: Carefully remove the GA-10 amplifier from its packaging. Retain all packaging materials for future transport or storage.
- Placement: Place the amplifier on a stable, level surface with adequate ventilation. Avoid placing it near heat sources or in direct sunlight.
- Voltage Selection: Before connecting the power cable, verify that the voltage selector on the rear panel is set to the correct voltage for your region (110-115V or 220V). Incorrect voltage selection can damage the unit.
- Connect Audio Source:
- For RCA input: Connect your audio source (e.g., DAC, preamplifier) to the RCA L/R input jacks on the rear panel using high-quality RCA cables.
- For XLR input: Connect your audio source to the XLR L/R input jacks on the rear panel using high-quality XLR cables.
- Connect Power: Insert the provided power cable into the IEC power inlet on the rear panel, then plug the other end into a suitable AC power outlet. Ensure the main power rocker switch on the rear is in the OFF position before plugging into the wall.
- Initial Power On: Flip the main power rocker switch on the rear panel to the ON position. Then, press the front panel power button. The amplifier will undergo a brief warm-up period.
Operating Instructions
- Connect Headphones: Plug your headphones into one of the front panel output jacks (XLR 4-Pin, 6.35mm, or 4.4mm balanced). Ensure the volume knob is set to minimum before connecting headphones.
- Select Input: Use the Input Selector switch on the front panel to choose between RCA or XLR input, matching your connected audio source.
- Set Impedance Matching: Use the Output Impedance Matching switch (High/Low) to select the appropriate setting for your headphones. Refer to your headphone's specifications for guidance. Generally, higher impedance headphones benefit from the "High" setting.
- Adjust Volume: Slowly turn the Volume Control knob clockwise to increase the sound level to your desired listening volume. Avoid excessively high volumes to prevent hearing damage.
- Warm-up Period: For optimal sound quality, allow the amplifier to warm up for approximately 15-30 minutes after powering on. Tube amplifiers often sound best after reaching their operating temperature.
- Power Off: When finished listening, turn the Volume Control knob to minimum, then press the front panel power button to turn off the amplifier. For extended periods of non-use, also flip the main power rocker switch on the rear panel to OFF and disconnect the power cable.
Maintenance
- Cleaning: Use a soft, dry cloth to clean the exterior of the amplifier. Do not use liquid cleaners, aerosols, or abrasive materials, as these can damage the finish or internal components.
- Tube Replacement: The vacuum tubes (ECC83/12AX7 and EL84) have a finite lifespan. If you notice a degradation in sound quality or tube failure, contact HIFIMAN support for guidance on replacement. Tube replacement should only be performed by qualified personnel or with explicit instructions from the manufacturer.
- Ventilation: Ensure that the ventilation slots on the amplifier are not obstructed to prevent overheating.
- Fuse Replacement: The power inlet on the rear panel contains a fuse. If the unit does not power on, check the fuse. Always replace with a fuse of the same type and rating (e.g., 2A). Disconnect power before attempting fuse replacement.
Troubleshooting
| Problem | Possible Cause | Solution |
|---|---|---|
| No power |
|
|
| No sound |
|
|
| Distorted sound |
|
|
Specifications
| Model | GA-10 |
| Frequency Response | 20-24KHz, ±0.5dB@1KHz |
| THD+N | 0.001%@1kHz/300Ω |
| Power Output | 3000mW/300Ω; 600mW/32Ω @1KHz |
| Total Power Consumption | 70W |
| Dimensions (L*H*W) | 330x110x380mm (protrusions not included) |
| Product Dimensions (US) | 12.99 x 14.96 x 4.33 inches |
| Item Weight | 26.2 pounds |
| Manufacturer | HIFIMAN |
Warranty and Support
For warranty information and technical support, please refer to the official HIFIMAN website or contact your local distributor. Keep your purchase receipt as proof of purchase for warranty claims.
Manufacturer: HIFIMAN ELECTRONICS CORPORATION
Address: 2602 Beltagh Ave, New York Bellmore 11710
Email: service@hifiman.com
Phone: +12014434626
For EU/UK support, please refer to the contact details provided on the product packaging or official website.


