1. Introduction
Thank you for choosing the Polibi 4-in-1 Hall Tree. This versatile furniture piece is designed to enhance your entryway or hallway with its integrated coat rack, shoe cabinet, hanging hooks, and seating bench. Its classic farmhouse style, complete with barn doors and black accents, offers both functionality and aesthetic appeal.
This manual provides detailed instructions for assembly, safe operation, maintenance, and troubleshooting to ensure you get the most out of your new hall tree.
2. Important Safety Information
Please read and understand all safety warnings and instructions before assembly and use. Failure to follow these instructions may result in injury or damage to the product.
- Tip-Over Prevention: This product includes an anti-tipping device. It is crucial to install this device securely to a wall to prevent accidental tipping, especially in households with children or pets.
- Weight Capacity: Do not exceed the specified weight capacities for the bench, hooks, and shelves. Overloading can cause structural failure and injury.
- Overall: 450 LBS
- Bench: 220 LBS
- Hook: 17 LBS (each)
- Top Compartment: 22 LBS
- Countertop: 110 LBS
- Assembly: Assemble the product on a soft, clean surface to prevent scratches. Ensure all parts are present and undamaged before beginning assembly. Do not use power tools for assembly unless specifically instructed, as overtightening screws can damage the material.
- Small Parts: Keep all small parts and packaging materials away from children and pets to prevent choking hazards.
- Sharp Edges: Be mindful of sharp edges during assembly and handling.
- Stability: Regularly check all connections and fasteners to ensure they remain tight and secure.

Figure 2.1: Anti-Tipping Device and Safety Warning. Always install the anti-tipping device for enhanced safety and stability.
3. Product Components and Features
The Polibi Hall Tree is designed with multiple functional elements to maximize storage and utility in your entryway.
3.1 Overall Design and Dimensions

Figure 3.1: Polibi 4-in-1 Hall Tree in White. This image displays the overall appearance of the hall tree with its barn doors, open shelving, and coat hooks.

Figure 3.2: Product Dimensions. This diagram provides precise measurements for the overall unit and its various compartments.
3.2 Key Features
Versatile 4-in-1 Design
This hall tree integrates a coat rack, shoe cabinet, hanging hooks, and a seating bench into one compact unit, providing a complete organization system for your entryway or hallway.

Figure 3.3: Versatile 4-in-1 Design. This image highlights the different functional areas of the hall tree.
Classic Farmhouse Style
Adorned with retro black handles, hinges, and hooks, along with gracefully curved boards and delicate barn doors, this hall tree brings a rustic charm suitable for farmhouse-inspired decor.

Figure 3.4: Farmhouse Style Accents. This image details the black handles, hinges, and hooks that contribute to the rustic aesthetic.
Convenient Mobile Bench Design
The hall tree features a removable bench equipped with six brake wheels, allowing for easy movement and versatile placement in various areas like entryways, mudrooms, or even bedside.

Figure 3.5: Mobile Bench Feature. This image highlights the mobility of the bench and its practical applications.
Ample and Practical Storage
The bottom cabinet includes nine small compartments of varying sizes for shoes or clutter. Additionally, seven hooks are provided on the front and sides for hanging umbrellas, hats, or coats.
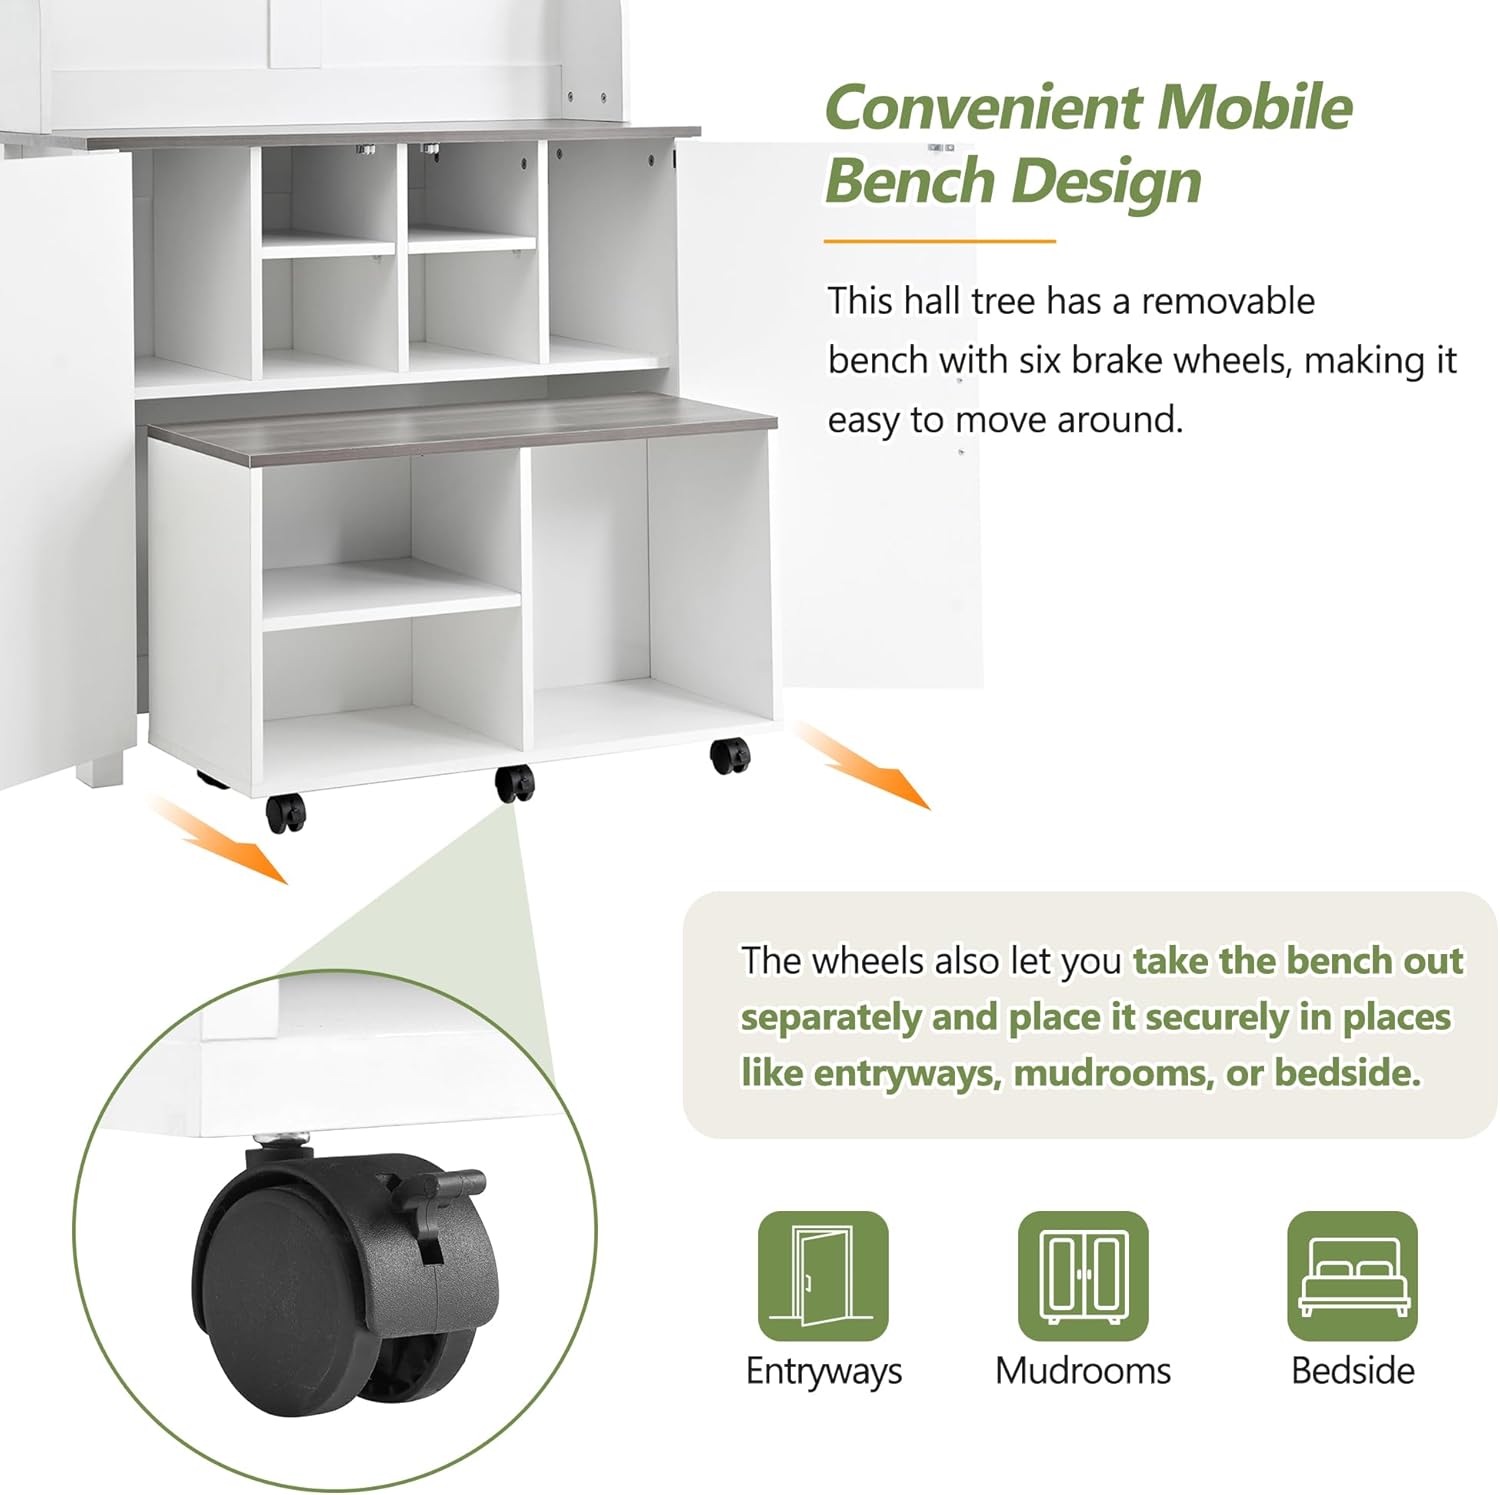
Figure 3.6: Storage Compartments and Hooks. This image illustrates the various storage options available.
4. Setup and Assembly
Assembly of the Polibi Hall Tree typically requires two adults. Please follow the step-by-step instructions provided in the separate assembly guide included with your product packaging. Ensure all components are accounted for before starting.
4.1 Before You Begin
- Unpack all components and lay them out on a soft, clean surface (e.g., a blanket or carpet) to prevent scratches.
- Verify that all parts listed in the assembly guide are present and undamaged.
- Gather necessary tools, which typically include a Phillips head screwdriver and possibly a hammer.
4.2 Assembly Steps (General Guidelines)
- Base Assembly: Begin by assembling the base frame of the shoe cabinet, ensuring all cam locks and dowels are securely fastened.
- Internal Shelving: Install the internal shelves and dividers within the shoe cabinet as per the diagram.
- Movable Bench: Assemble the movable bench, attaching the six brake wheels securely to its base. Ensure wheels can lock and unlock smoothly.
- Upper Section Assembly: Construct the upper coat rack section, including the top compartments and the back panel.
- Attaching Hooks: Securely attach the seven hanging hooks to the designated areas on the upper section.
- Connecting Sections: Carefully align and connect the upper coat rack section to the lower shoe cabinet base.
- Barn Doors: Install the barn doors onto the shoe cabinet using the provided hinges and handles. Adjust hinges for smooth operation.
- Anti-Tipping Device: Crucially, install the anti-tipping device. Secure one end to the top rear of the hall tree and the other end to a wall stud using appropriate hardware. This step is vital for safety.
- Final Check: Once assembled, gently shake the unit to ensure stability. Tighten any loose screws.
5. Operating and Usage
The Polibi Hall Tree is designed for intuitive use. Here’s how to best utilize its features:
- Coat Rack and Hooks: Use the sturdy hooks to hang coats, jackets, hats, scarves, and umbrellas. Distribute weight evenly and do not exceed the 17 LBS per hook capacity.
- Shoe Storage Cabinet: Open the barn doors to access the nine internal compartments. These are ideal for organizing various types and sizes of footwear.
- Movable Bench: The bench can be used for sitting while putting on or taking off shoes. To move the bench, unlock the brake wheels and roll it to your desired location. Lock the wheels once in position for stability.
- Top Compartments: The open shelves at the top are suitable for decorative items, small bags, or frequently used accessories. Do not exceed the 22 LBS capacity for these compartments.
6. Care and Maintenance
Proper care will extend the life and appearance of your Polibi Hall Tree.
- Cleaning: For general cleaning, wipe surfaces with a dry cloth. For more stubborn marks, use a slightly damp cloth and immediately dry with a clean, soft cloth. Avoid abrasive cleaners or harsh chemicals, as they can damage the finish.
- Spills: Wipe up spills immediately to prevent staining or damage to the engineered wood.
- Hardware Check: Periodically check all screws, bolts, and connections to ensure they are tight. Retighten as necessary to maintain stability and safety.
- Sunlight Exposure: Avoid prolonged exposure to direct sunlight, which can cause fading or discoloration of the finish.
- Humidity: Maintain a stable room temperature and humidity level to prevent warping or cracking of the wood.
7. Troubleshooting
If you encounter any issues with your hall tree, refer to the following common solutions:
| Problem | Possible Cause | Solution |
|---|---|---|
| Unit feels wobbly or unstable. | Loose fasteners; uneven floor; anti-tipping device not installed or improperly installed. | Check and tighten all screws and bolts. Ensure the unit is on a level surface. Install or re-secure the anti-tipping device to a wall stud. |
| Barn doors do not close properly or are misaligned. | Loose hinges; improper installation. | Check and tighten hinge screws. Adjust hinges if they are adjustable. Ensure the door panels are correctly oriented. |
| Movable bench wheels do not roll smoothly or lock. | Debris in wheels; brake mechanism stuck; loose wheel attachment. | Clean any debris from the wheels. Check the brake mechanism for obstructions. Ensure wheels are securely attached to the bench. |
| Scratches or minor surface damage. | Accidental impact; abrasive cleaning. | For minor scratches, a furniture repair pen or wax stick matching the color may be used. Avoid abrasive materials for cleaning. |
If you experience issues not covered here, please contact Polibi customer support for assistance.
8. Product Specifications
- Model: B0DMVZZN9M
- Brand: Polibi
- Material: Engineered Wood
- Color: White
- Overall Dimensions: 35.4"W x 14.9"D x 76.9"H
- Bottom Cabinet Dimensions: 27.5"W x 11.2"D x 14.4"H
- Top Compartment Dimensions: 16.5"W x 6.7"D x 8.6"H
- Weight Capacity (Overall): 450 LBS
- Weight Capacity (Bench): 220 LBS
- Weight Capacity (Hook): 17 LBS (each)
- Weight Capacity (Top Compartment): 22 LBS
- Weight Capacity (Countertop): 110 LBS
- Features: 4-in-1 Design (Coat Rack, Shoe Cabinet, Hanging Hooks, Seating Bench), Movable Bench with Brake Wheels, Barn Doors, Anti-Tipping Device.
- Product Care: Wipe with Dry Cloth, Wipe with Damp Cloth.
- First Available Date: November 13, 2024
9. Warranty and Support
For warranty information or customer support, please refer to the documentation included with your purchase or visit the official Polibi website. You may also contact Polibi customer service directly for assistance with parts, assembly, or product inquiries.
Polibi Store: Visit the Polibi Store on Amazon


