1. Introduction
This manual provides essential information for the safe and efficient installation, operation, and maintenance of your DOKIO 400W Mono Solar Panel. Please read this manual thoroughly before using the product to ensure optimal performance and longevity.
The DOKIO 400W Mono Solar Panel is designed for various off-grid applications, including garden/yard use, greenhouses, sheds, patios, and battery charging systems. It features a robust design with 3-meter MC4 leads for flexible connectivity.
2. Safety Information
WARNING: Electrical Hazard
- Always wear appropriate personal protective equipment (PPE) including insulated gloves and eye protection when handling solar panels.
- Do not attempt to disassemble or modify the solar panel. Unauthorized modifications can lead to electric shock, fire, or product damage.
- Ensure all wiring connections are secure and properly insulated to prevent short circuits.
- Avoid touching exposed wires or terminals when the panel is exposed to sunlight.
- Keep children and unauthorized personnel away from the solar panel during installation and operation.
- In case of damage, disconnect the panel from the system immediately and contact customer support.
3. Package Contents
Verify that all components are present and undamaged upon delivery:
- 1 x DOKIO 400W Mono Solar Panel
- Integrated 3-meter (9.84 ft) MC4 Leads
- User Manual (this document)
Note: Additional accessories such as charge controllers, batteries, and mounting hardware are typically sold separately unless specified in your purchase order.
4. Product Overview
The DOKIO 400W Mono Solar Panel is engineered for high efficiency and durability. Key features include:
- High Efficiency Mono Cells: Grade A+ monocrystalline cells with up to 22% conversion efficiency.
- Durable Construction: Tempered glass panel and corrosion-resistant aluminum frame, designed for outdoor use.
- Extended MC4 Leads: 3-meter (9.84 ft) MC4 cables for flexible installation and reduced need for extensions.
- Weather Resistance: Sealed junction box and robust design to withstand rain and splashes in outdoor environments.
- Mounting Friendly: Pre-drilled holes compatible with common Z-brackets, rails, and tilt mounts.

Figure 1: DOKIO 400W Mono Solar Panel. This image shows the full view of the solar panel with its black monocrystalline cells and aluminum frame.

Figure 2: Detailed view of DOKIO 400W Solar Panel components, highlighting Grade A+ monocrystalline cells, corrosion-resistant aluminum frame, waterproof MC4 cables, and 8 mounting holes for easy installation.
5. Setup and Installation
5.1 Site Selection
Choose a location that receives maximum direct sunlight throughout the day, free from shadows cast by trees, buildings, or other obstructions. Consider the angle and orientation for optimal solar exposure based on your geographical location and season.
5.2 Mounting the Solar Panel
The DOKIO 400W solar panel features pre-drilled holes for compatibility with standard mounting hardware. Common mounting options include:
- Z-brackets: Ideal for flat surfaces like RV roofs or small sheds.
- Rails: For larger installations on roofs or ground mounts, providing structural support.
- Tilt Mounts: Allow adjustment of the panel angle for seasonal optimization.
Ensure the mounting structure is robust enough to support the panel's weight (approximately 52.9 pounds) and withstand local wind and snow loads (up to 2400Pa wind load and 5400Pa snow load).

Figure 3: Various mounting options for solar panels, including railed/flat roof mounting, pole mounts, and foundation mounts, illustrating installation flexibility.
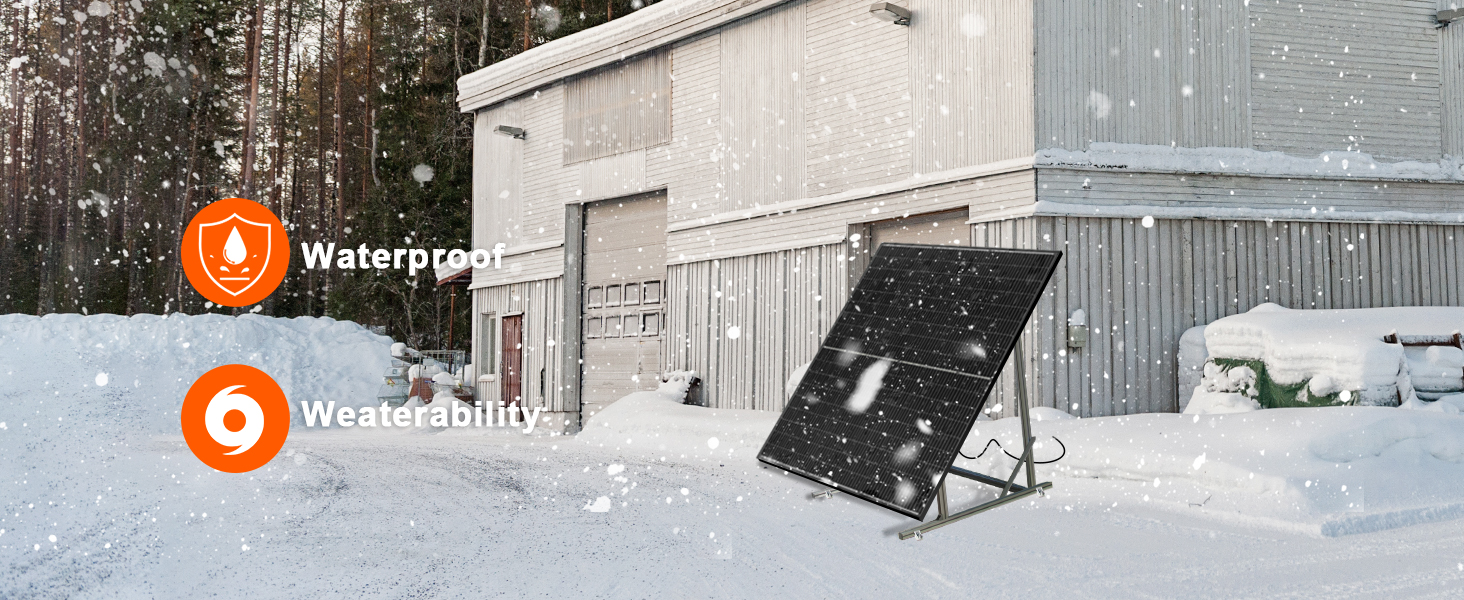
Figure 4: The DOKIO solar panel demonstrating its waterproof and weatherability features in a snowy environment, highlighting its robust construction.
5.3 Electrical Connection
The panel comes with 3-meter MC4 leads for connection to a charge controller. Follow these general guidelines:
- Connect to Charge Controller: Connect the MC4 connectors from the solar panel to the solar input terminals of your charge controller. Ensure correct polarity (positive to positive, negative to negative).
- Connect to Battery: Connect the charge controller's battery output terminals to your battery bank. Always connect the battery to the charge controller first, before connecting the solar panel.
- Connect to Inverter (Optional): If using an inverter, connect it to the battery bank.
Wiring Configuration for 12V Systems:
For 12V battery systems, parallel wiring is preferred for smoother charging and better stability. Series wiring should only be used with charge controllers specifically designed for high input voltages.

Figure 5: Diagram illustrating parallel wiring for solar panels to increase current, connecting to an MPPT charge controller, 24V battery, and power inverter. Note: MPPT controller should accept at least 24V input and handle at least 30A input current.
Important:
- Always consult the manual of your charge controller and battery for specific wiring requirements.
- Ensure all connections are tight and weatherproof.
- The 3-meter MC4 leads reduce the need for additional extensions, minimizing potential connection issues.
6. Operating Instructions
Once properly installed and connected, your DOKIO 400W Mono Solar Panel will begin generating electricity when exposed to sunlight.
- Power Output: The rated 400W is a laboratory rating (Standard Test Conditions - STC). Actual power output in real-world conditions will vary based on factors such as sunlight intensity, ambient temperature, shading, cable length and gauge, and the efficiency of your charge controller (MPPT controllers are recommended for optimal performance).
- Monitoring: Use your charge controller's display or a separate monitoring device to track the panel's output and battery charging status.
- Shading: Even partial shading can significantly reduce the panel's output. Position the panel to minimize shading throughout the day. The half-cut cell design helps mitigate the impact of partial shading compared to traditional full-cell panels.

Figure 6: Illustration of Grade A+ mono cells achieving 22% conversion efficiency, demonstrating the panel's high performance.
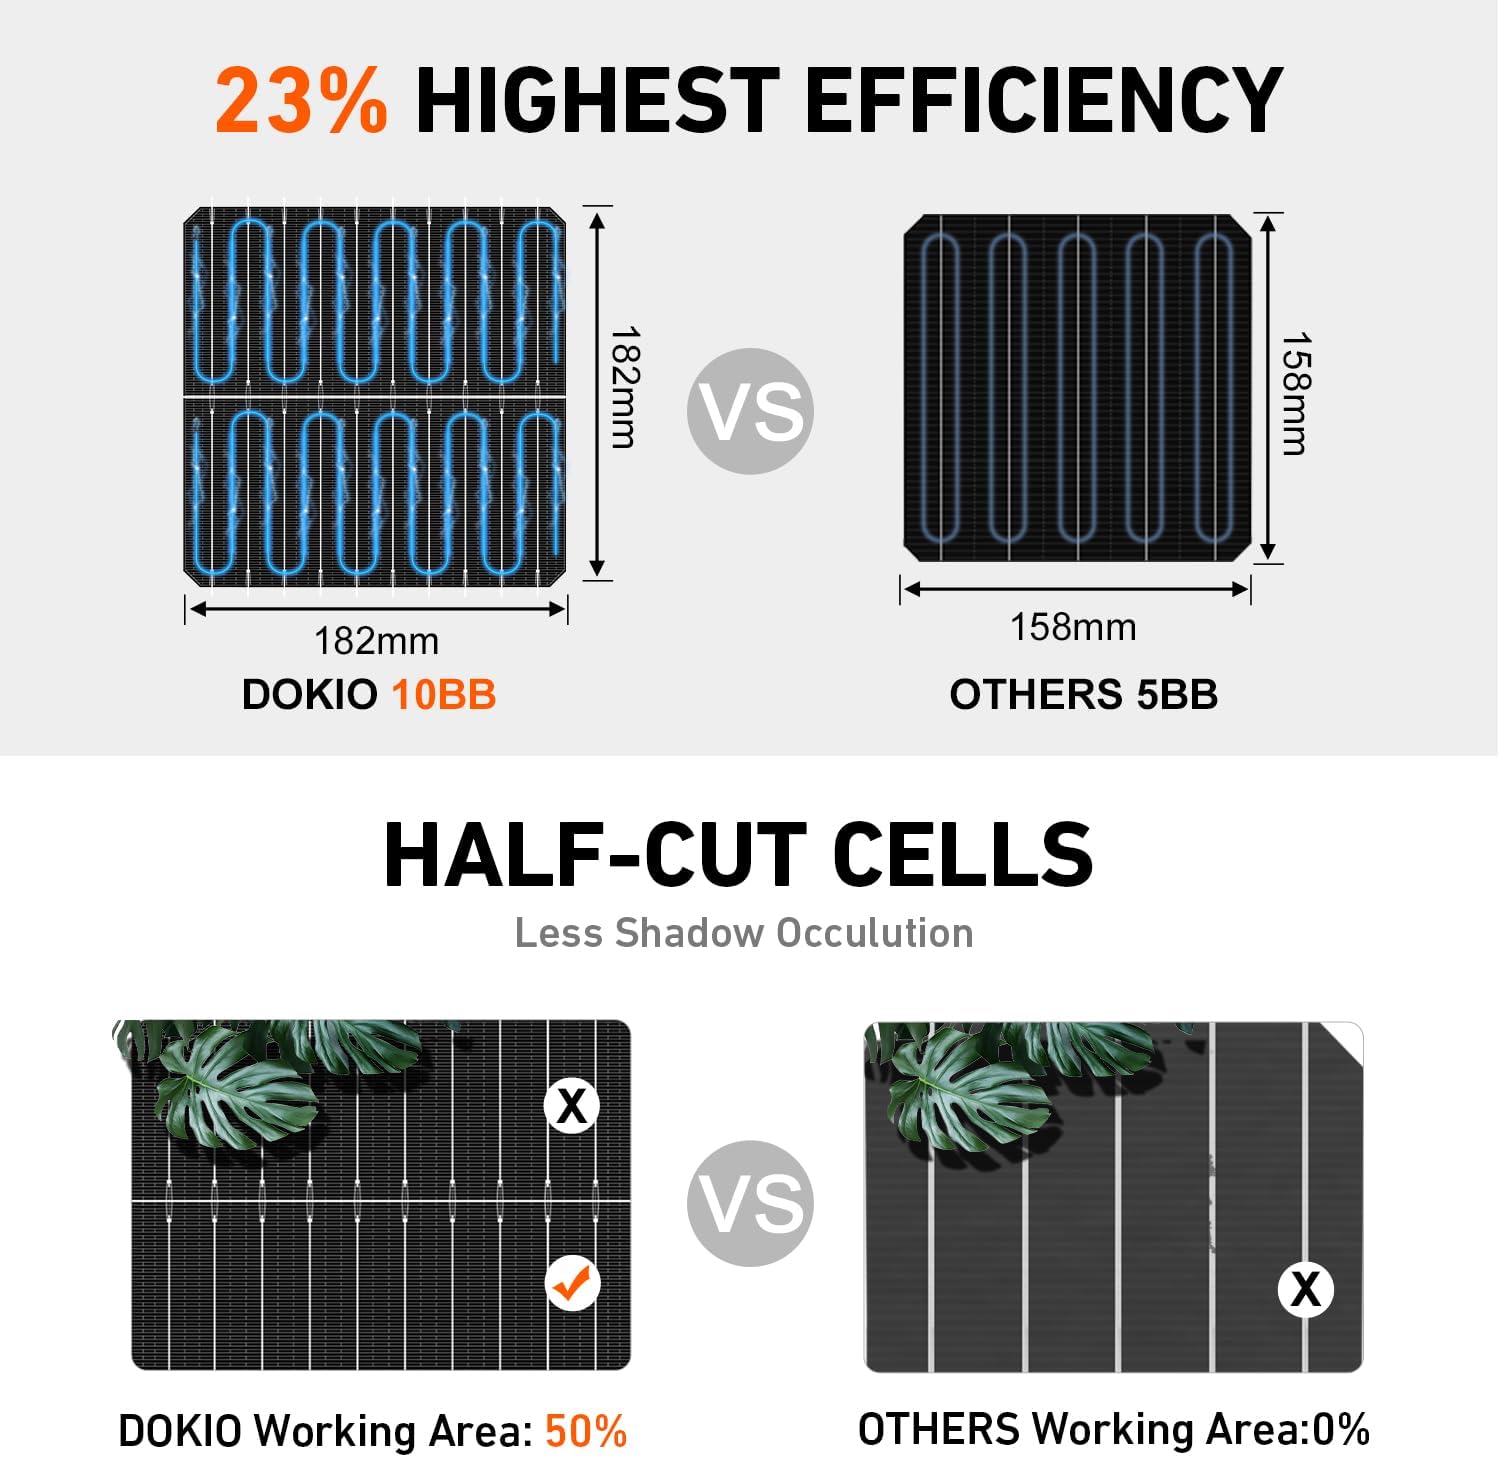
Figure 7: Comparison of DOKIO's 10BB half-cut cells (182mm) versus others' 5BB cells (158mm), highlighting the benefit of half-cut cells in reducing shadow occlusion and extending power generation time.
7. Maintenance
Regular maintenance ensures the long-term performance and efficiency of your solar panel.
- Cleaning: Periodically clean the surface of the solar panel with a soft cloth and water to remove dust, dirt, leaves, and other debris that can reduce efficiency. Avoid abrasive cleaners or harsh chemicals.
- Inspection: Regularly inspect the panel for any physical damage, such as cracks in the glass, bent frames, or loose connections. Check the MC4 connectors and cables for signs of wear or corrosion.
- Shading Check: Monitor the surrounding area for new obstructions (e.g., growing trees) that might cast shadows on the panel.
- Snow Removal: In snowy conditions, gently remove snow from the panel surface to restore power generation. Avoid using sharp tools that could scratch the glass.
8. Troubleshooting
If your solar panel is not performing as expected, consider the following common issues:
| Problem | Possible Cause | Solution |
|---|---|---|
| Low or no power output |
|
|
| Battery not charging |
|
|
| Physical damage to panel |
|
|
9. Specifications
| Attribute | Value |
|---|---|
| Brand | DOKIO |
| Model Number | FBA-DSP400M |
| Maximum Power (Pmax) | 400 Watts |
| Product Dimensions | 44.6 x 1.2 x 67.8 inches (113.28 x 3.05 x 172.21 cm) |
| Item Weight | 52.9 pounds (24 kg) |
| Cell Type | Monocrystalline (Grade A+) |
| Conversion Efficiency | Up to 22% |
| Cable Length | 3 meters (9.84 ft) MC4 Leads |
| Frame Material | Corrosion-resistant Aluminum |
| Weather Resistance | Tempered glass, sealed junction box, designed for outdoor use |
| Wind Load Resistance | 2400 Pa |
| Snow Load Resistance | 5400 Pa |
| Mounting | Pre-drilled holes for Z-brackets, rails, tilt mounts |
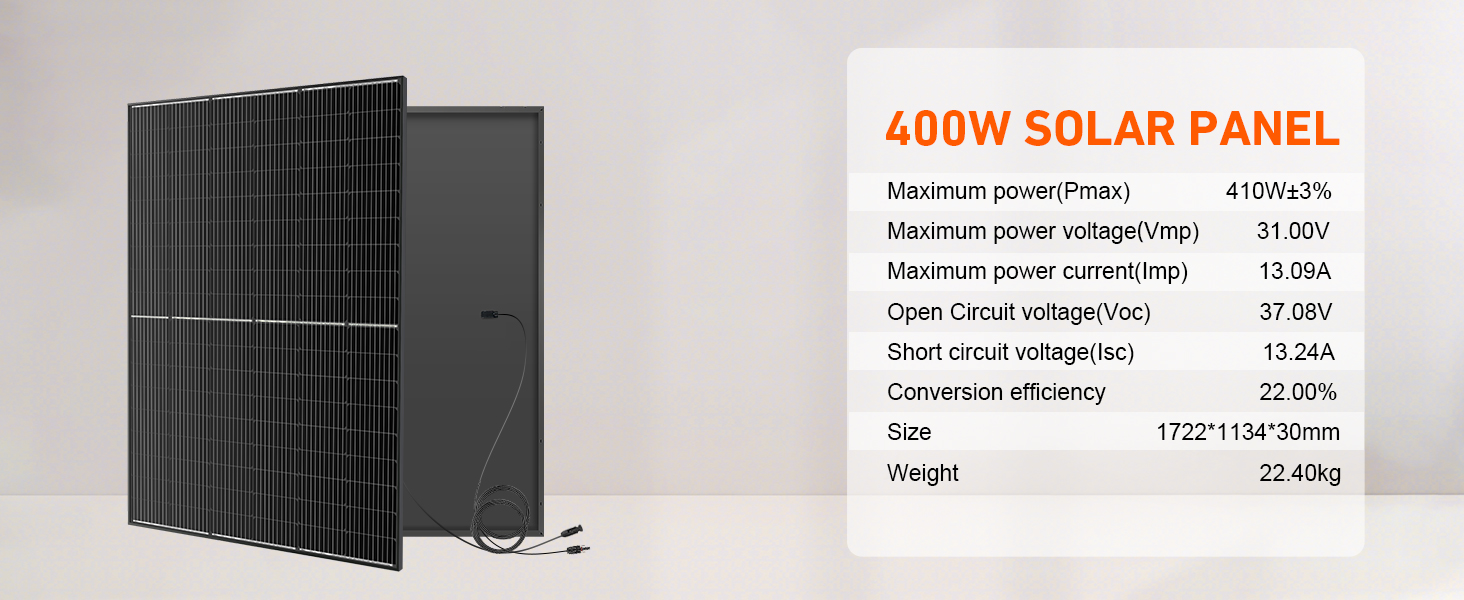
Figure 8: Detailed technical specifications for the DOKIO 400W solar panel, including maximum power, voltage, current, open circuit voltage, short circuit current, conversion efficiency, size, and weight.
10. Warranty and Support
DOKIO is committed to providing reliable solar solutions. If you encounter any issues with your solar panel, please refer to the following:
- Damage Upon Delivery: Check the product immediately upon delivery. If the panel arrives damaged, please contact DOKIO customer support via your order platform for a fast resolution.
- Returns: The product is eligible for 30-day easy returns.
- Customer Support: For any questions, technical assistance, or warranty claims, please contact DOKIO customer support. You can typically find contact information through the seller's page on the platform where you purchased the product.
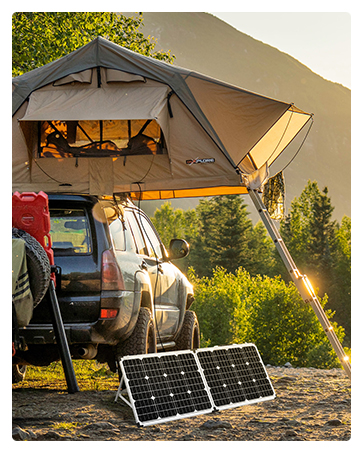
Figure 9: Image depicting customer support, emphasizing that damaged or faulty items can be resolved quickly by contacting support first, often without needing a return.


