1. Product Overview
The EXVIST H.265 1080P 60fps PoE VGA Encoder is a high-performance device designed for converting VGA video signals into H.265/H.264 encoded streams. It supports various streaming protocols, including RTMP, RTSP, HLS, and UDP, making it suitable for live broadcasting, video conferencing, CCTV, and digital signage applications. With Power over Ethernet (PoE) capability and a VGA loopout, this encoder offers flexible installation and real-time monitoring.
2. Key Features
- High-Quality H.264/H.265 Encoding: Supports 1080P resolution at 60fps with efficient compression for clear video and minimal bandwidth usage.
- Power Over Ethernet (PoE): Powers the encoder directly through the Ethernet connection, simplifying setup and reducing cable clutter.
- VGA Loopout for Local Display: Provides a VGA output for direct connection to a local monitor, enabling real-time video monitoring.
- Multiple Protocols Supported: Compatible with RTSP, RTMP, HLS, and UDP protocols for versatile integration with various streaming platforms and systems.
- Wide Range of Applications: Ideal for IP television systems, live event broadcasts, digital signage, and CCTV monitoring across diverse environments.
3. Package Contents
- EXVIST H.265 1080P 60fps PoE VGA Encoder (Model ON-VGA-16DP)
- User Manual
- Power Adapter (if PoE is not used)
4. Device Layout
Familiarize yourself with the ports and indicators on the encoder unit.

Figure 4.1: Front and Rear Panel of the EXVIST VGA Encoder. The front panel includes PWR (Power indicator), RUN (Operation indicator), Microphone input, VGA IN, and VGA OUT ports. The rear panel features a Reset button, DC12V power input, and a NETWORK port (supporting PoE).
- PWR Indicator: Illuminates when the device is powered on.
- RUN Indicator: Flashes during normal operation.
- Microphone Input: 3.5mm audio input for external microphone.
- VGA IN: Connects to the VGA video source.
- VGA OUT: VGA loopout for connecting to a local display.
- RESET Button: Press and hold to restore factory default settings.
- DC12V: Power input for standard power adapter (if PoE is not used).
- NETWORK: RJ45 Ethernet port for network connection and PoE power input.
5. Setup Instructions
5.1 Physical Connection
- Connect your VGA video source (e.g., computer, camcorder) to the VGA IN port on the encoder using a VGA cable.
- If local monitoring is required, connect a VGA display to the VGA OUT port on the encoder using a VGA cable.
- Connect an Ethernet cable from your network switch (preferably a PoE-enabled switch) to the NETWORK port on the encoder. If using a non-PoE switch, connect the provided DC12V power adapter to the DC12V port.
- Optionally, connect an external microphone to the Microphone Input port.
- Verify that the PWR indicator is illuminated and the RUN indicator is flashing, indicating the device is powered on and operating.
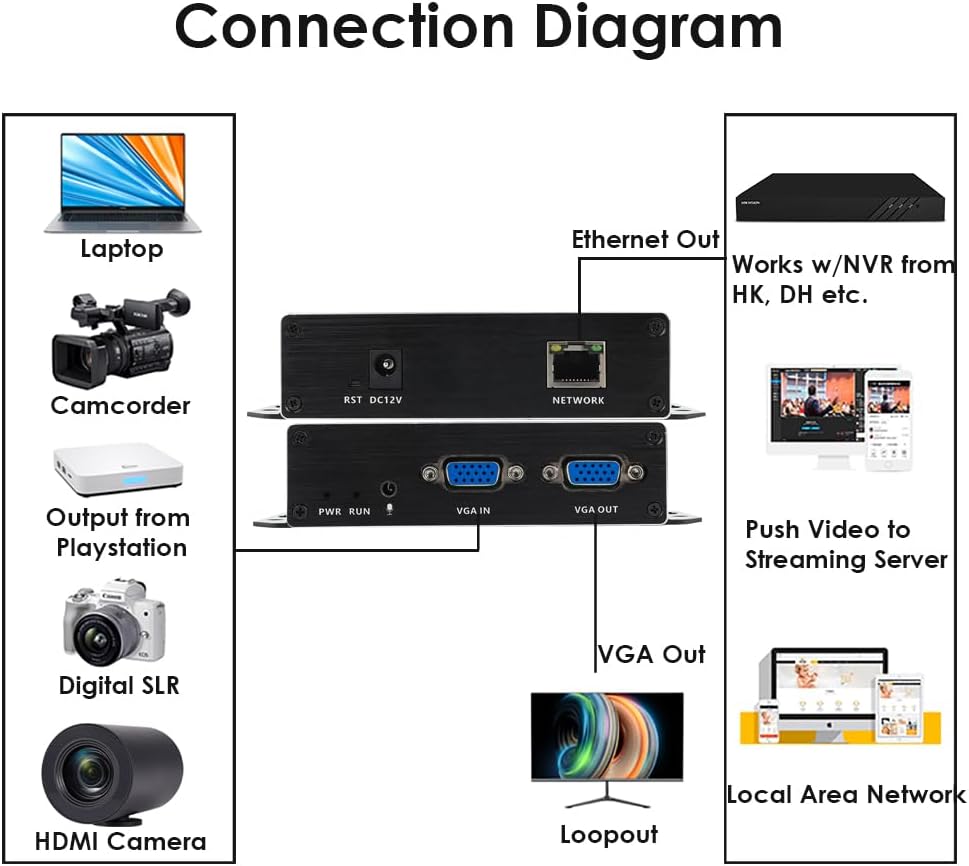
Figure 5.1: Typical Connection Diagram for the EXVIST VGA Encoder.
5.2 Network Configuration and Web Interface Access
The encoder typically has a default IP address (e.g., 192.168.1.168). To access the web interface:
- Ensure your computer is on the same network segment as the encoder. You may need to temporarily set your computer's IP address to be in the same subnet (e.g., 192.168.1.x).
- Open a web browser (e.g., Chrome, Firefox) and enter the encoder's default IP address (e.g., http://192.168.1.168) in the address bar.
- Log in using the default username and password (refer to the device label or included documentation for default credentials, commonly admin/admin or admin/123456).
- Once logged in, you can configure network settings (e.g., static IP, DHCP) to integrate the encoder into your existing network infrastructure.
6. Operating Instructions
6.1 Video and Audio Settings
Within the web interface, navigate to the Video/Audio settings to configure input and output parameters.

Figure 6.1: Audio Settings in the Web Interface.
- Audio Input: Select the desired audio source (e.g., VGA embedded audio, external microphone).
- Samples: Adjust audio sampling rate.
- Codec type: Choose the audio encoding format (e.g., AAC).
- Bitrate: Set the audio bitrate for quality and bandwidth control.
- Channel: Select audio channels (e.g., Stereo, Mono).
- Output volume: Adjust the output audio level.
- Remember to click Save after making changes.
6.2 Streaming Configuration (RTMP, RTSP, HLS, UDP)
The encoder supports various streaming protocols. Configure them under the 'Push' or 'Network' sections of the web interface.

Figure 6.2: RTMP Streaming Settings in the Web Interface.
- RTMP: For live streaming to platforms like YouTube, Facebook Live, Twitch. Enter the Stream Server URL and Stream Key in the 'Video push' field (e.g.,
rtmp://a.rtmp.youtube.com/live2/streamkey). Enable the stream and select the push mode. - RTSP: For surveillance systems or media servers. Configure the RTSP URL and stream mode (Complex, Video, Audio).
- HLS/UDP: Configure as per your specific application requirements.
- Always click Save after modifying streaming settings.

Figure 6.3: Supported Protocols by the EXVIST VGA Encoder.
7. Maintenance
- Cleaning: Use a soft, dry cloth to clean the device. Avoid liquid cleaners or solvents.
- Ventilation: Ensure the encoder is placed in a well-ventilated area to prevent overheating. Do not block ventilation openings.
- Firmware Updates: Periodically check the EXVIST official website for firmware updates to ensure optimal performance and access to new features.
- Cable Management: Ensure all cables are securely connected and not under strain.
8. Troubleshooting
- No Power: Check power connections. If using PoE, ensure the network switch port provides power. If using a power adapter, ensure it is correctly connected and the outlet is functional.
- No Video Output (Loopout): Verify VGA cable connections. Ensure the video source is active and outputting a signal.
- No Network Connection: Check Ethernet cable. Verify network settings (IP address, subnet mask, gateway) in the encoder's web interface. Ensure your computer is on the same subnet for initial access.
- Streaming Issues: Double-check streaming protocol settings (RTMP URL, RTSP URL, etc.). Ensure internet connectivity and sufficient bandwidth. Verify firewall settings on your network.
- Forgot Password/Settings: Use the RESET button on the rear panel to restore factory default settings. Note that this will erase all custom configurations.
9. Specifications
| Feature | Specification |
|---|---|
| Model Number | ON-VGA-16DP |
| Video Input | 1x VGA |
| Video Output | 1x VGA Loopout |
| Video Encoding | H.265 / H.264 |
| Resolution | Up to 1080P @ 60fps |
| Audio Input | 3.5mm Microphone, VGA Embedded Audio |
| Streaming Protocols | RTMP, RTSP, HLS, UDP, HTTP, Multicast, TS/SRT, ONVIF |
| Network Interface | 1x RJ45 Ethernet (PoE supported) |
| Power Supply | DC 12V or Power over Ethernet (PoE) |
| Product Dimensions | 4.33 x 2.95 x 0.98 inches (110 x 75 x 25 mm) |
| Item Weight | 6.1 ounces (173 grams) |
| Operating Temperature | 0°C to 50°C (32°F to 122°F) |
10. Warranty Information
This EXVIST product comes with a Limited Warranty. Please refer to the warranty card included with your product or visit the official EXVIST website for detailed terms and conditions regarding warranty coverage and duration.
11. Customer Support
For technical assistance, troubleshooting, or product inquiries, please contact EXVIST customer support through their official website or the contact information provided in your product packaging. When contacting support, please have your product model number (ON-VGA-16DP) and purchase details ready.


