1. Introduction
This manual provides detailed instructions for the assembly, installation, and maintenance of your NEWWAY NW1 PC Case. Designed for versatility and aesthetics, the NW1 supports ATX, Micro-ATX, and ITX motherboards, features a distinctive wooden front panel, and includes efficient cooling solutions. Please read this manual thoroughly before beginning installation to ensure proper setup and optimal performance.

Image 1.1: Angled front view of the NEWWAY NW1 PC Case, showcasing the wooden front panel and tempered glass side panel.
2. Key Features
- Motherboard Compatibility: Supports ATX, Micro-ATX, and ITX form factors.
- Elegant Design: Features a genuine wooden front panel and a tempered glass side panel.
- Advanced Cooling: Compatible with watercooling systems up to 360mm. Includes three 140mm PWM fans for enhanced airflow.
- Component Clearance: Accommodates CPU coolers up to 181mm in height and graphics cards up to 410mm in length.
- Flexible Storage: Offers three dedicated slots for 3.5" HDDs or 2.5" SSDs.
- Front I/O Ports: Equipped with USB Type-C, USB 3.0, and audio ports for convenient connectivity.
- Dimensions: L430mm x W235mm x H430mm.
- Weight: 6.8 kg.
3. Setup and Component Installation
Before installing any components, ensure the PC case is placed on a stable, flat surface.
3.1. Preparing the Case
- Carefully remove the tempered glass side panel by unscrewing the thumb screws at the rear of the case and sliding the panel off.
- Remove the rear panel if necessary for cable management access.
3.2. Motherboard Installation
The NW1 case supports ATX, Micro-ATX, and ITX motherboards.
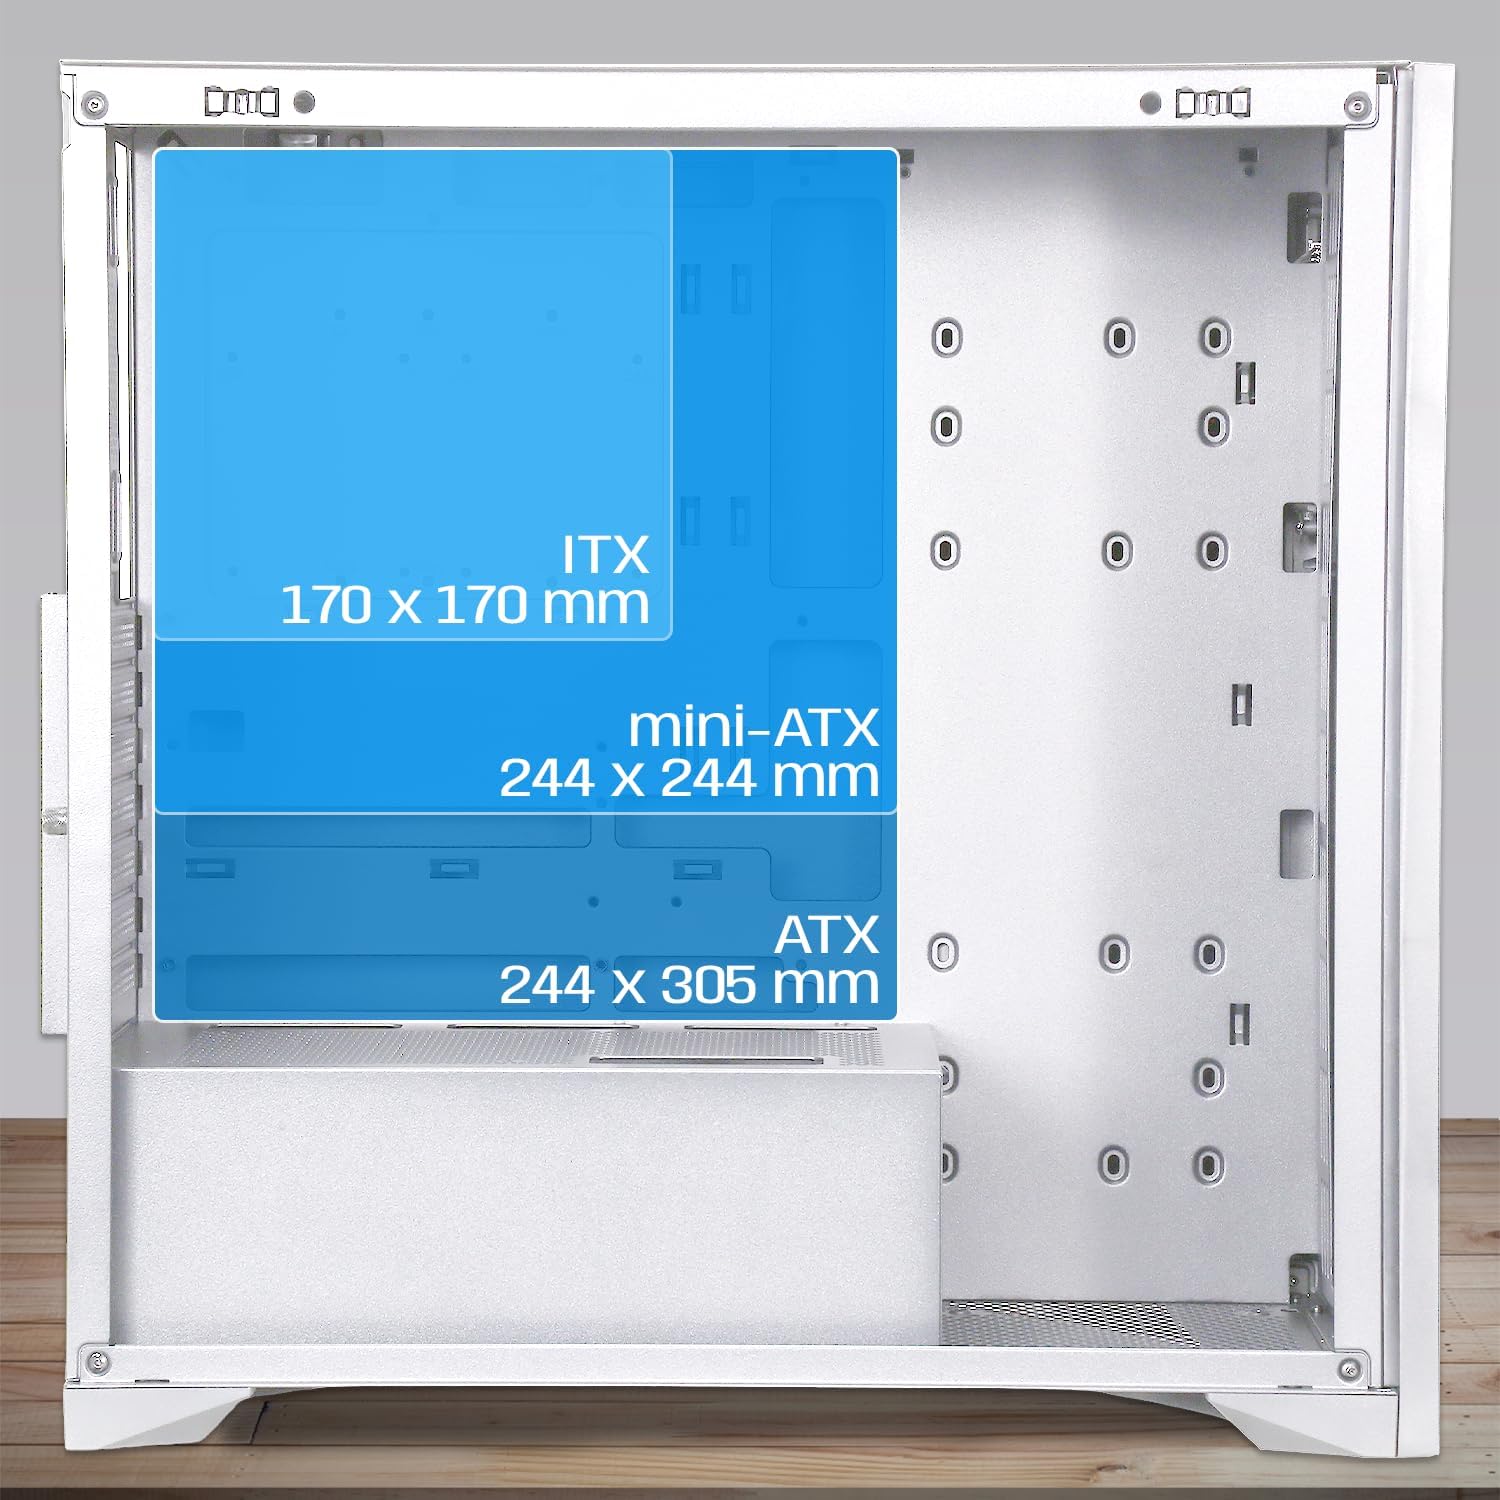
Image 3.1: Diagram illustrating motherboard compatibility and maximum dimensions for ATX, Micro-ATX, and ITX form factors within the case.
- Install the I/O shield into the designated slot at the rear of the case.
- Align your motherboard with the pre-installed standoffs. Ensure the standoffs match your motherboard's form factor.
- Secure the motherboard with the provided screws.
3.3. CPU Cooler and Graphics Card Installation
The case provides ample space for large components.
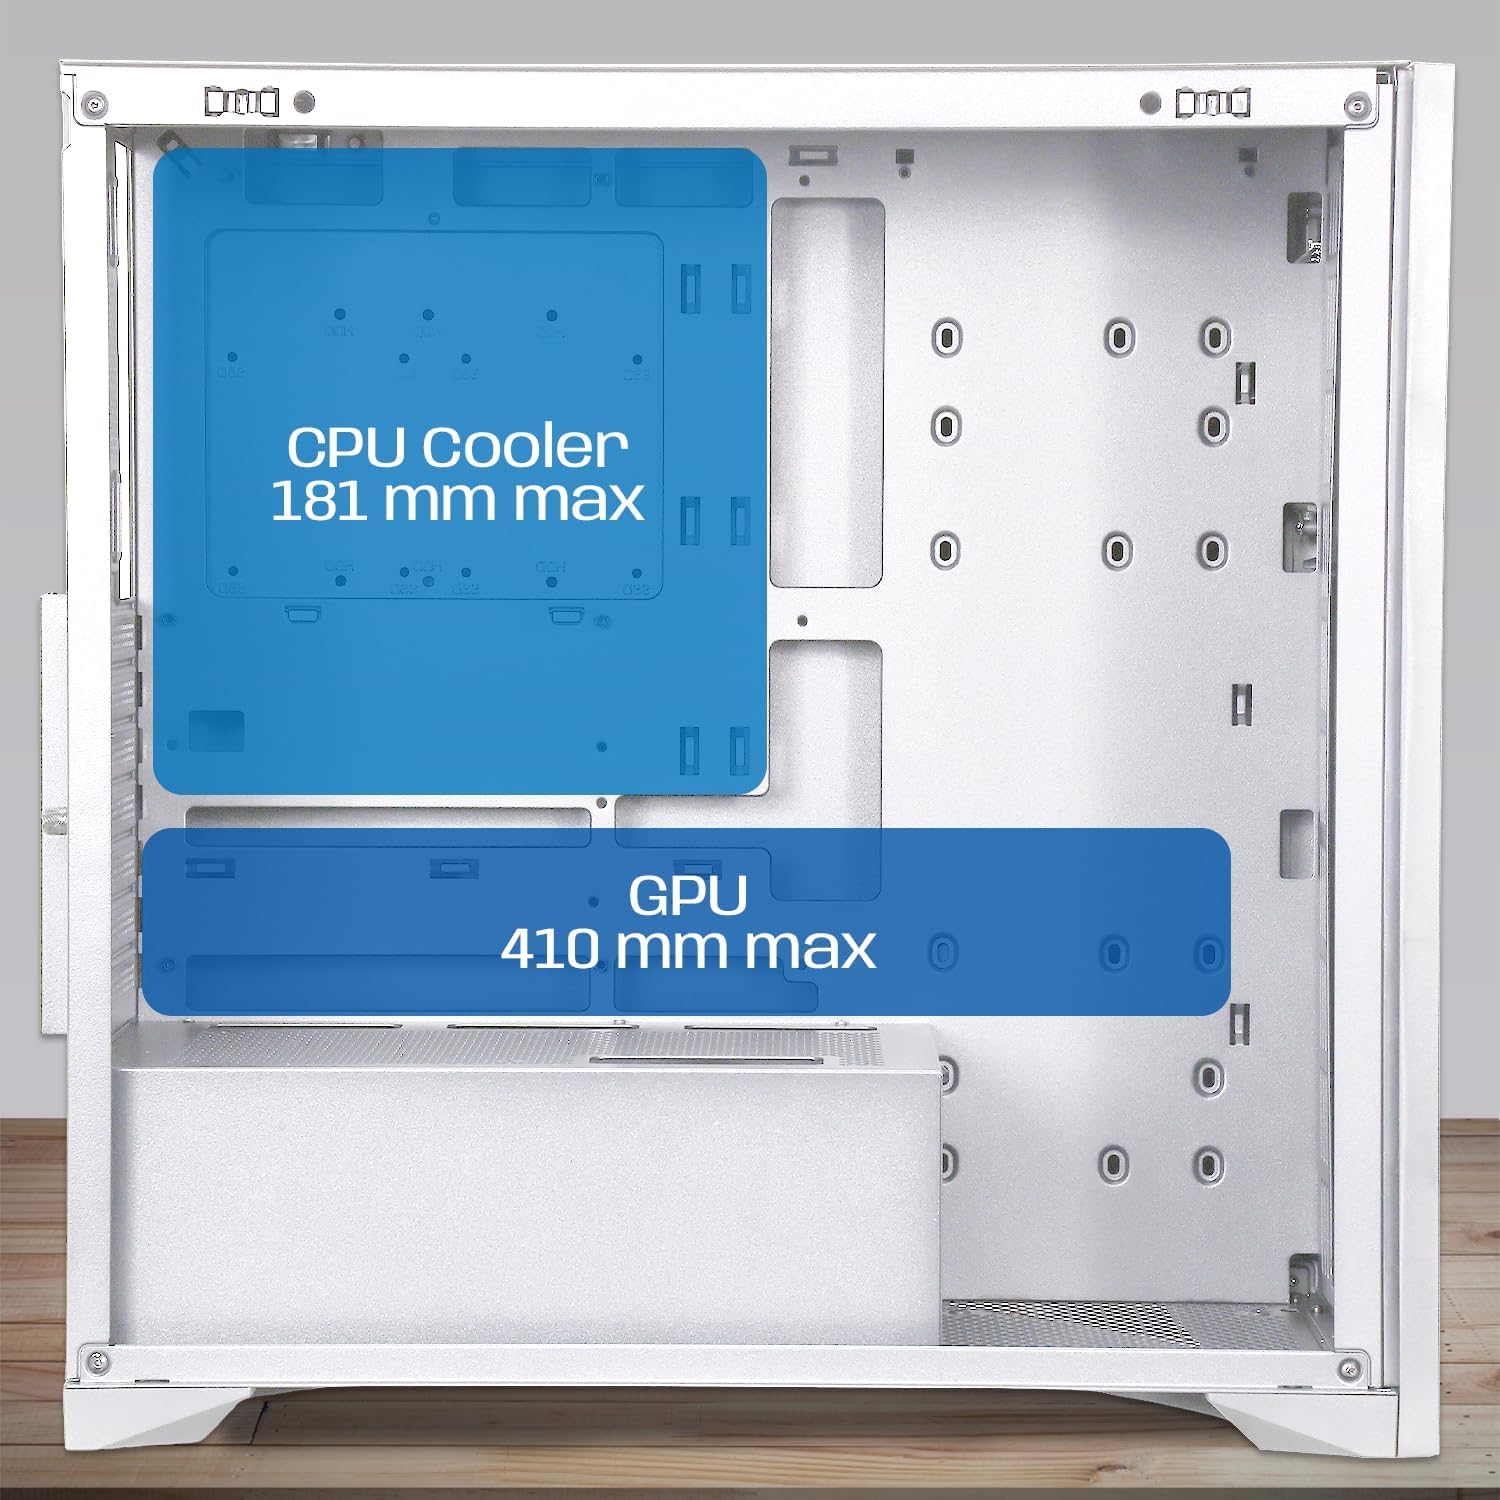
Image 3.2: Diagram showing maximum clearance for CPU coolers (181mm) and graphics cards (410mm) inside the NEWWAY NW1 case.
- CPU Cooler: Install your CPU cooler according to its manufacturer's instructions. The case supports coolers up to 181mm in height.
- Graphics Card (GPU): Remove the necessary expansion slot covers at the rear. Insert your graphics card into the PCIe slot on your motherboard and secure it with screws. The case supports GPUs up to 410mm in length.
3.4. Storage Device Installation
The NW1 offers multiple storage options.

Image 3.3: Diagram illustrating the various mounting points for 2.5" SSDs and 3.5" HDDs within the case.
- Locate the 3.5" HDD/2.5" SSD drive bays.
- Mount your drives using the provided screws.
3.5. Power Supply Unit (PSU) Installation
The PSU mounts at the bottom of the case.
- Slide the PSU into its designated compartment at the bottom rear of the case.
- Secure the PSU with screws from the rear of the case.
3.6. Fan and Radiator Installation
The case comes with three 140mm PWM fans pre-installed. Additional cooling can be added.

Image 3.4: Diagram indicating potential fan mounting locations, including the pre-installed front fans and a rear exhaust fan.
- Connect the pre-installed 140mm PWM fans to your motherboard's fan headers.
- For watercooling, install radiators up to 360mm in the designated mounting points (e.g., front or top, depending on size).
3.7. Connecting Front Panel I/O
Connect the front panel cables to the corresponding headers on your motherboard.
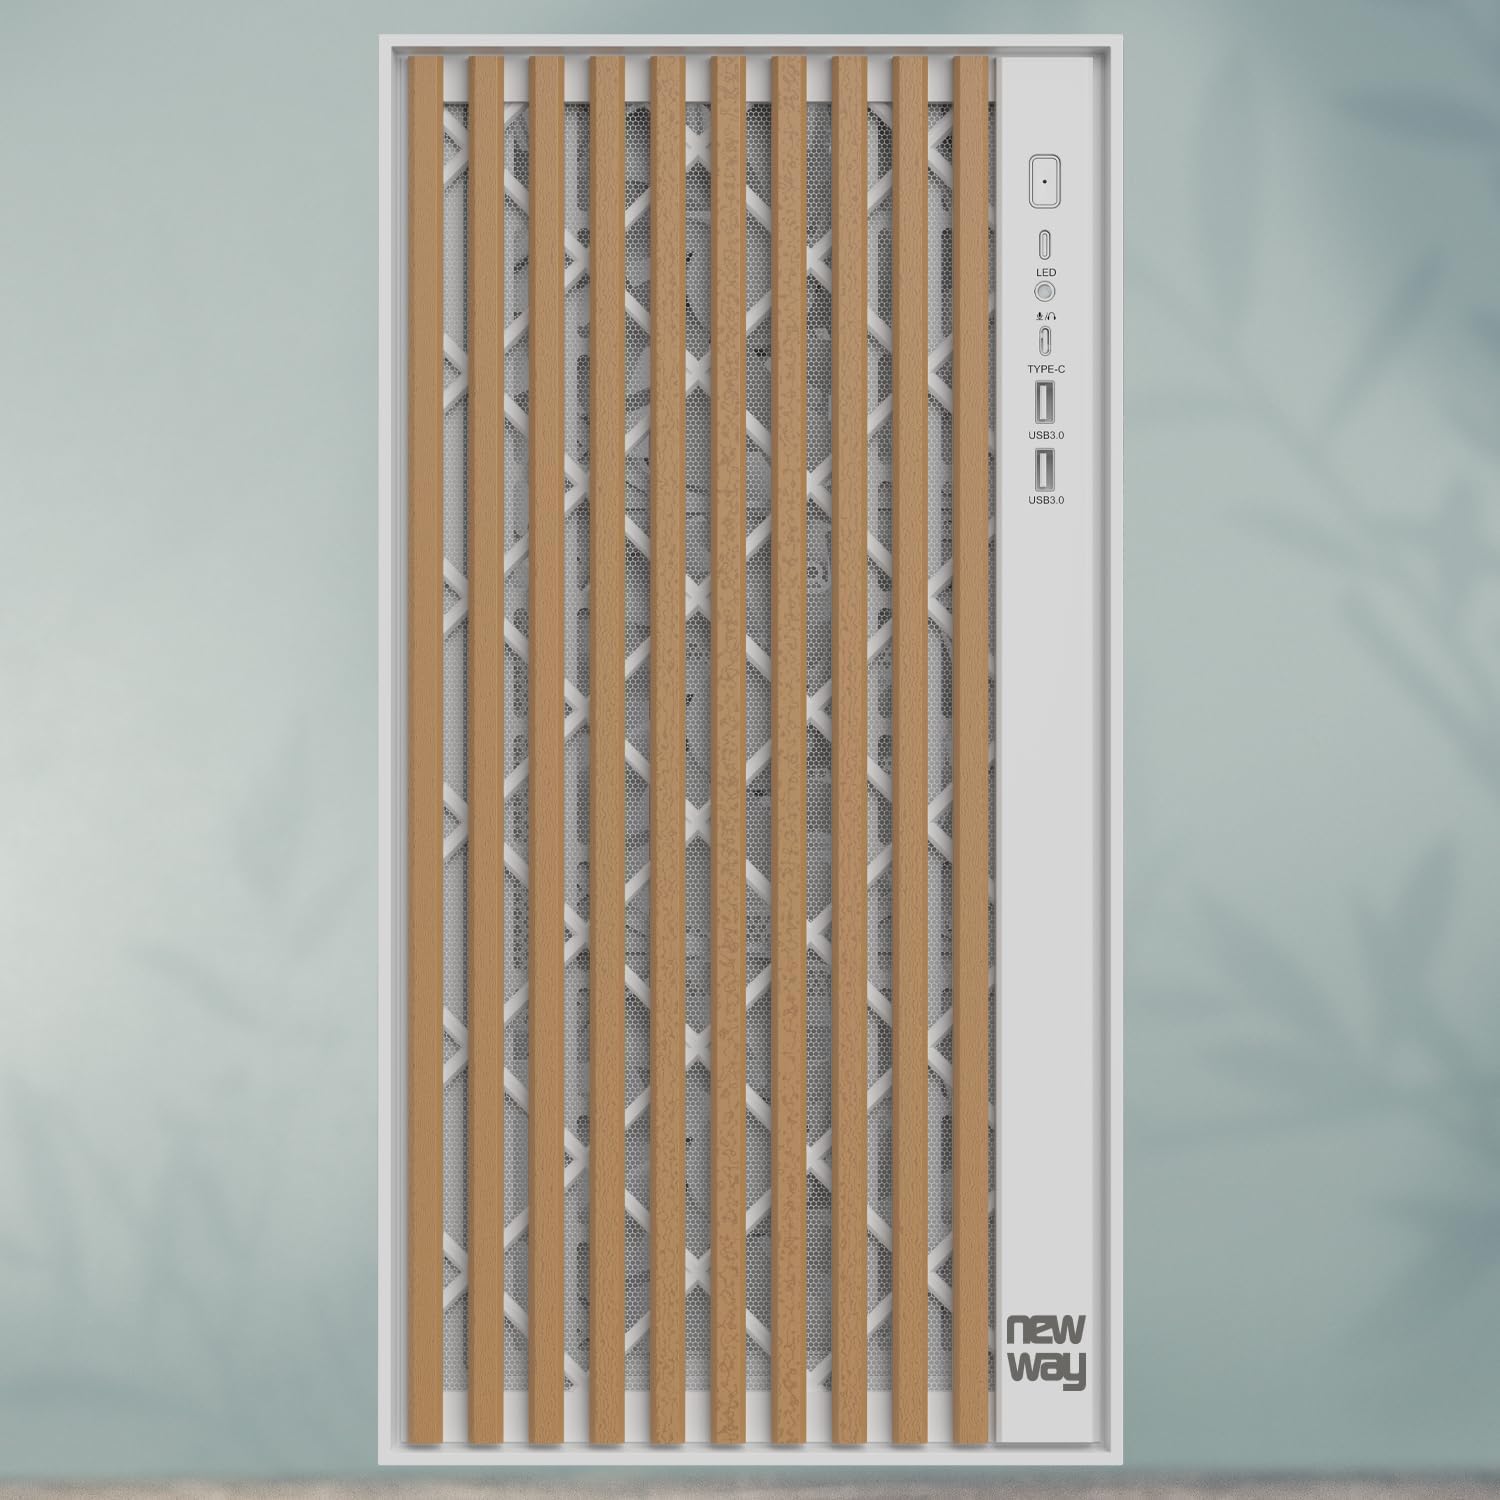
Image 3.5: Close-up view of the front panel I/O, showing the LED indicator, USB Type-C port, and USB 3.0 ports.
- Connect the USB Type-C cable to the motherboard's Type-C header.
- Connect the USB 3.0 cables to the motherboard's USB 3.0 headers.
- Connect the HD Audio cable to the motherboard's audio header.
- Connect the Power SW, Reset SW, HDD LED, and Power LED cables to the motherboard's front panel headers, ensuring correct polarity for LEDs.
3.8. Cable Management
Utilize the cable routing cutouts and tie-down points behind the motherboard tray to manage cables neatly. This improves airflow and aesthetics.
3.9. Final Assembly
- Once all components are installed and cables are managed, reattach the rear panel (if removed).
- Carefully reattach the tempered glass side panel and secure it with the thumb screws.
4. Operating Instructions
After completing the assembly, connect your peripherals (monitor, keyboard, mouse, power cable) to your system.
- Ensure all cables are securely connected.
- Press the power button on the front panel to turn on your computer.
- The LED indicator on the front panel will illuminate when the system is powered on.
- To restart the system, press the reset button on the front panel.
5. Maintenance
Regular maintenance helps ensure optimal performance and longevity of your PC components.
- Dust Filters: The NW1 case is equipped with dust filters. Regularly clean these filters to maintain good airflow and prevent dust buildup inside the case. Gently remove the filters and clean them with compressed air or by rinsing with water (ensure they are completely dry before reinstallation).
- Exterior Cleaning: Wipe the exterior surfaces, including the wooden front panel and tempered glass, with a soft, damp cloth. Avoid abrasive cleaners or solvents.
- Interior Cleaning: Periodically open the case and use compressed air to remove dust from internal components and fans.
6. Troubleshooting
If you encounter issues, refer to the following common troubleshooting steps:
- System Not Powering On:
- Check if the power supply unit (PSU) is switched on at the back.
- Ensure all power cables (24-pin ATX, 8-pin CPU, PCIe for GPU) are securely connected to the motherboard and components.
- Verify that the front panel power switch cable is correctly connected to the motherboard header.
- Fans Not Spinning:
- Ensure fan cables are properly connected to the motherboard fan headers.
- Check BIOS/UEFI settings for fan control.
- No Display Output:
- Confirm your monitor cable is connected to the graphics card (not the motherboard, unless using integrated graphics).
- Reseat the graphics card in its PCIe slot.
- Check if the graphics card requires additional power cables from the PSU.
- USB Ports Not Working:
- Ensure the front panel USB cables are correctly connected to the motherboard's USB headers.
- Check motherboard drivers.
For further assistance, please contact NEWWAY customer support.
7. Technical Specifications
| Model Name | NW1 |
| Product Number | ON-CA-2403 |
| Case Type | Mid-Tower |
| Motherboard Compatibility | ATX, Micro ATX, ITX |
| Material | Tempered Glass, Metal, Wood |
| Color | White |
| Dimensions (L x W x H) | 430mm x 235mm x 430mm |
| Weight | 6.8 kg |
| CPU Cooler Clearance | Up to 181mm |
| GPU Length Clearance | Up to 410mm |
| Watercooling Support | Up to 360mm radiators |
| Included Fans | 3 x 140mm PWM fans |
| Storage Bays | 3 x 3.5" HDD / 2.5" SSD |
| Front I/O Ports | USB Type-C, USB 3.0, Audio |
| PSU Mounting | Bottom Mount |
8. Warranty and Support
The NEWWAY NW1 PC Case comes with a 2-year manufacturer's warranty. This warranty covers defects in materials and workmanship under normal use.
For warranty claims, technical support, or any inquiries, please contact NEWWAY customer service through their official website or the retailer where the product was purchased.
Manufacturer: OPTIMUM WAY
Country of Origin: China