Introduction
The Neoteck ZT-FS1 Anemometer Wind Meter is a multifunctional digital instrument designed for measuring wind speed, air volume, temperature, and humidity. It is suitable for various applications including HVAC system testing, outdoor activities, and environmental monitoring. This manual provides detailed instructions for the proper use and maintenance of your device.
What's in the Box
- 1 x Neoteck ZT-FS1 Wind Speed Gauge
- 2 x AAA Batteries
- 1 x User Manual
- 1 x Screwdriver
Product Overview
Familiarize yourself with the components and controls of your Neoteck ZT-FS1 Anemometer.

Figure 1: Front and Back View of the Neoteck ZT-FS1 Anemometer with labeled components.
- Fan Blades: Rotates to measure wind speed and airflow.
- Temperature and Humidity Sensor: Detects ambient temperature and relative humidity.
- Anti-slip Design: Provides a secure grip.
- LCD Screen: Displays measurement readings and unit indicators.
- Power Button (U): Turns the device on or off.
- Backlight Button (BL): Activates or deactivates the LCD backlight.
- UNIT Button: Cycles through different measurement units.
- HOLD MAX/MIN Button: Toggles between data hold, maximum value, and minimum value display.
- VEL FLOW/AREA Button: Switches between wind speed (VEL) and air volume (FLOW/AREA) measurement modes.
- Battery Cover: Protects the battery compartment.
Setup
Battery Installation
- Locate the battery cover on the back of the device.
- Use the provided screwdriver to open the battery cover.
- Insert two AAA batteries, ensuring correct polarity (+/-).
- Replace the battery cover and secure it with the screw.
Operating Instructions
Power On/Off and Backlight
- Press the Power Button (U) to turn the device on.
- Press and hold the Power Button (U) to turn the device off.
- Press the Backlight Button (BL) to activate the LCD backlight for low-light conditions. Press again to turn it off.

Figure 2: The backlit LCD screen provides clear readings in various lighting conditions.
Wind Speed Measurement
To measure wind speed:
- Ensure the device is powered on.
- Press the VEL FLOW/AREA button until 'VEL' is displayed on the screen, indicating wind speed mode.
- Point the fan blades directly into the wind. The display will show the current wind speed.
- Press the UNIT button to cycle through the available wind speed units: Knots, km/h, mph, m/s, ft/s, ft/min.

Figure 3: Measuring wind speed with the anemometer. The display shows current speed and unit options.
Air Volume Measurement (CFM/CMM/CMS)
To measure air volume:
- Ensure the device is powered on.
- Press the VEL FLOW/AREA button until 'FLOW' is displayed on the screen, indicating air volume mode.
- Before measurement, you must input the cross-sectional area of the duct or vent. Refer to the full manual for detailed instructions on entering area values.
- Align the fan of the instrument vertically with the air outlet. The display will show the air volume.
- Press the UNIT button to cycle through the available air volume units: CMM (Cubic meter/minute), CFM (Cubic inch/minute), CMS (Cubic meter per second).
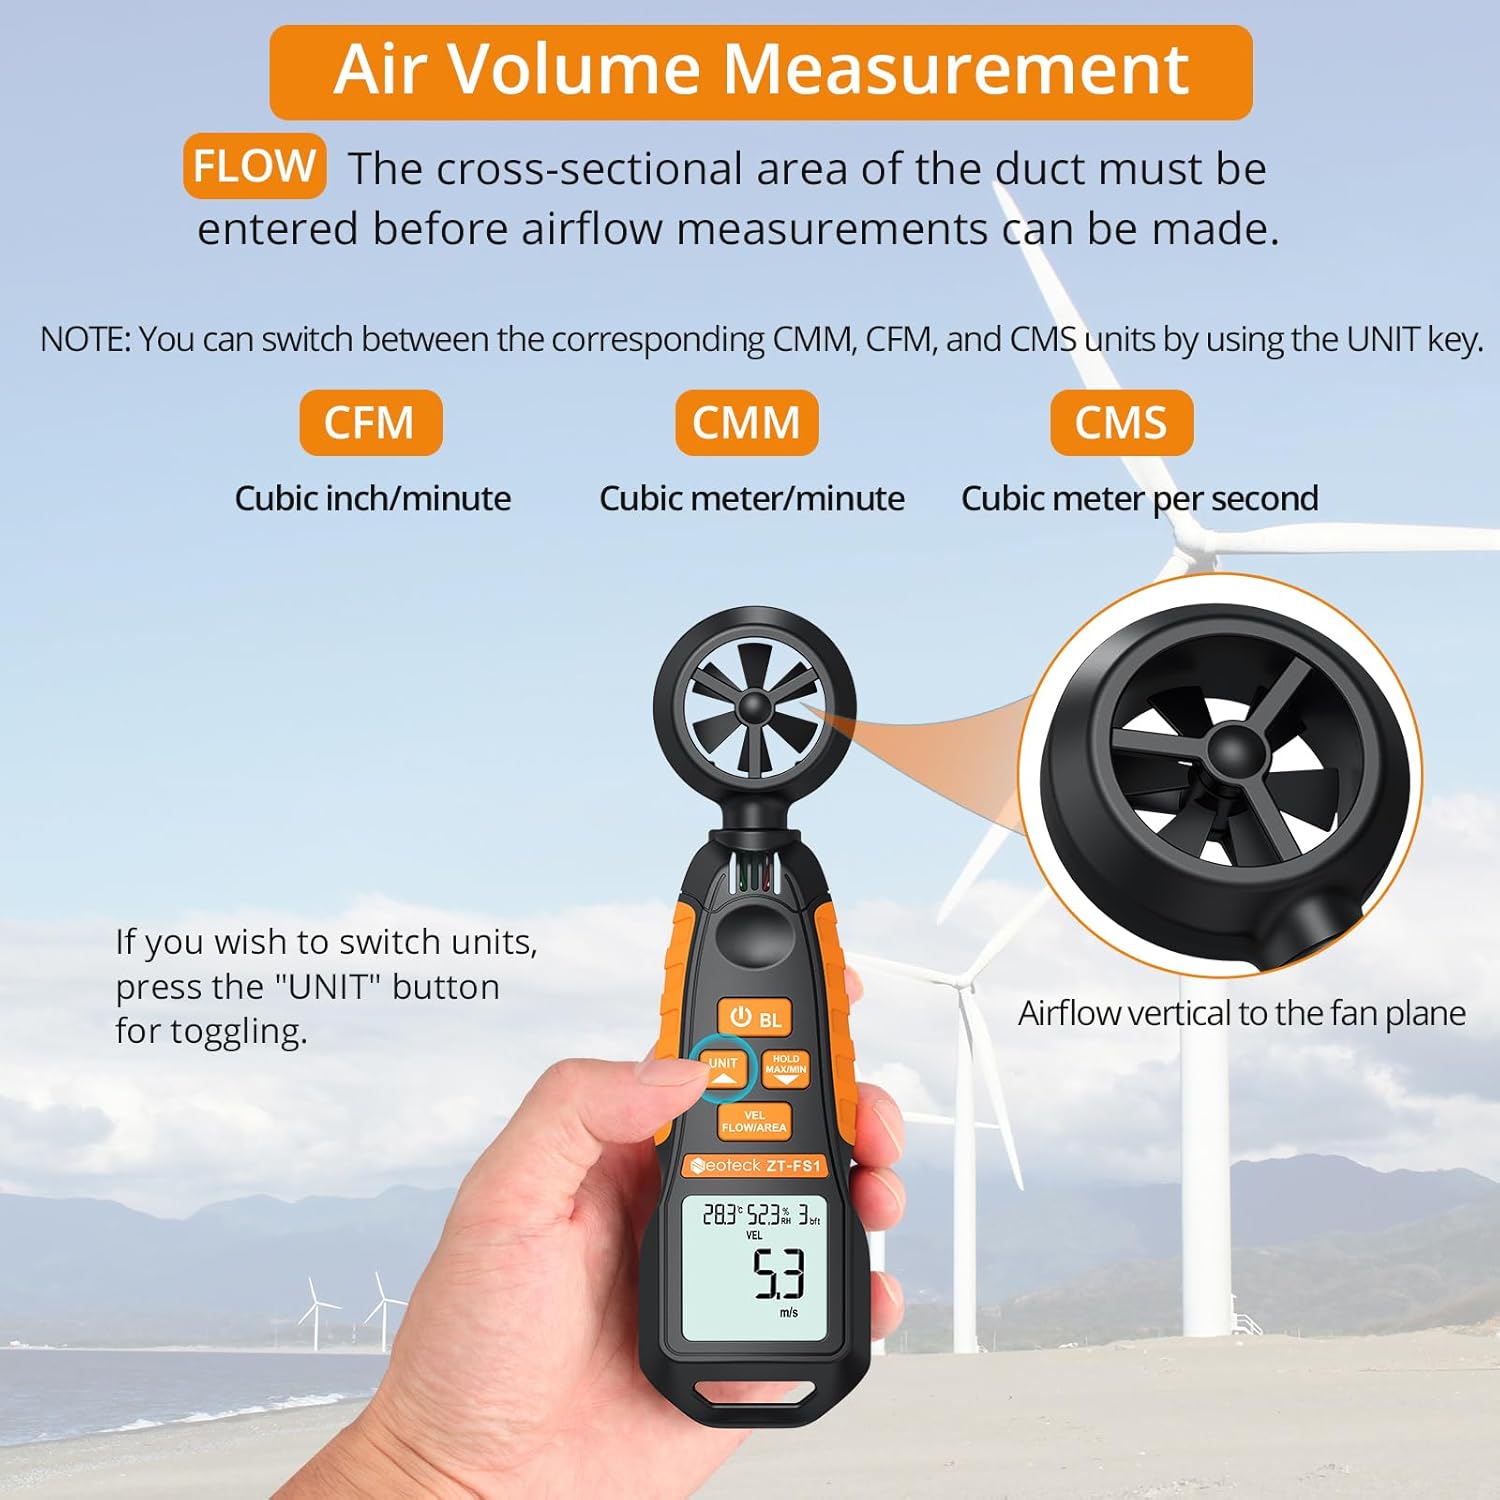
Figure 4: Measuring air volume from a duct. Ensure the cross-sectional area is correctly entered.
Temperature and Humidity Measurement
The device continuously measures ambient temperature and relative humidity. These readings are displayed on the upper part of the LCD screen. Note that the temperature and humidity sensor may require at least 30 minutes to adapt to a new environment for accurate readings.
Data Hold and Max/Min Functions
- Press the HOLD MAX/MIN button once to activate the Data Hold function. The current reading will be frozen on the display. Press again to exit.
- Press and hold the HOLD MAX/MIN button for more than 2 seconds to enter the Maximum/Minimum measurement mode. The display will cycle between the maximum (MAX) and minimum (MIN) values recorded since entering this mode. Press and hold again to exit.
Auto-Shutdown Function
The device features an auto-shutdown function to conserve battery power. If no button is pressed for a certain period (typically 15 minutes), the device will automatically turn off.
- To disable auto-shutdown: While the device is off, hold the HOLD MAX/MIN button and then press the Power Button (U) for 2 or more seconds. Five beeps will confirm that auto-shutdown is disabled.
Media Resources
Official Product Video
Video 1: An official product video demonstrating the Neoteck Anemometer's functions for testing wind speed and airflow.
Specifications
| Feature | Detail |
|---|---|
| Brand | Neoteck |
| Model Number | NTK259 |
| Material | Glass, Metal, Plastic |
| Dimensions (L x W x H) | 6.97 x 1.97 x 1.18 inches |
| Item Weight | 85 Grams (3 ounces) |
| Wind Speed Range | 0.4-30 m/s (0.895-67.11 mph) |
| Wind Speed Accuracy | ± 2% |
| Wind Speed Resolution | 0.1 m/s |
| Temperature Range | -20.0℃ to 60.0℃ |
| Temperature Accuracy | ± 2℃ |
| Humidity Range | 0.0% to 99.9% RH |
| Humidity Accuracy | ± 2% RH |
| Sampling Rate | Every 5 seconds |
| Power Source | 2 x AAA Batteries (included) |
| Display | LCD with Backlight |
| Auto-Shutdown | Yes (can be disabled) |
Maintenance
- Keep the device clean and dry. Use a soft, damp cloth for cleaning. Do not use abrasive cleaners or solvents.
- Avoid exposing the device to extreme temperatures, humidity, or direct sunlight for prolonged periods.
- If the device will not be used for an extended period, remove the batteries to prevent leakage.
- Handle the fan blades carefully to prevent damage, as this can affect measurement accuracy.
Troubleshooting
- Device does not power on: Check if the batteries are installed correctly and have sufficient charge. Replace batteries if necessary.
- Inaccurate readings: Ensure the fan blades are clean and unobstructed. Allow the temperature/humidity sensor sufficient time (approx. 30 minutes) to adapt to the environment.
- Display is dim or flickering: Replace the batteries.
- Auto-shutdown occurs too quickly: Verify if the auto-shutdown feature is enabled or disabled as desired (refer to Auto-Shutdown Function section).
Warranty and Support
For warranty information, technical support, or service inquiries, please refer to the product packaging or contact Neoteck customer service directly. Contact details can typically be found on the manufacturer's official website.


