Introduction
Thank you for choosing the Tilstongy Digital Kitchen Timer. This versatile timer is designed to assist you with various timing needs, from cooking and studying to workouts and meetings. Featuring a large 5-inch LED display, adjustable brightness, multiple volume settings, and convenient placement options, it is user-friendly for all ages. This manual provides detailed instructions on how to set up, operate, maintain, and troubleshoot your new timer.
1. Setup
1.1 Initial Charging
Before first use, fully charge the timer using the included Type-C charging cable. Connect the cable to the timer's charging port and a compatible USB power source (e.g., power bank, laptop, USB charger). A low battery indicator will appear on the display when charging is needed. The built-in battery supports at least 5 hours of operation in high light mode after a full charge.

Figure 1.1: Charging the Tilstongy Digital Kitchen Timer via USB-C.
1.2 Placement Options
The Tilstongy Digital Kitchen Timer offers multiple convenient placement options:
- Magnetic Attachment: The timer features four strong magnets on its back, allowing it to be easily attached to metal surfaces such as refrigerators or whiteboards.
- Hanging Hook: A built-in hook allows you to hang the timer on a wall hook or similar fixture.
- Fold-out Stand: A retractable bracket on the back enables the timer to stand upright on any flat surface like a countertop or desk. Push the bracket twice consecutively until it clicks open completely.

Figure 1.2: Various placement options for the timer, including magnetic, hanging, and stand modes.
2. Operating Instructions
2.1 Basic Button Functions
The timer is designed for easy operation with clearly labeled buttons:
- H (Hour), M (Minute), S (Second) Buttons: Use these buttons to set the desired hours, minutes, and seconds for your timer. Press and hold to quickly adjust the time.
- ST/SP (Start/Stop) Button: Press to start or pause the timer. When a countdown is complete, pressing this button will return the display to the last set time.
- CLEAR Button: Resets the timer to 0:00:00.

Figure 2.1: Overview of timer buttons and their functions.
2.2 Countdown and Count-up Modes
The timer supports both countdown and count-up (stopwatch) functions:
- Countdown: Set your desired time (up to 9 hours, 59 minutes, 59 seconds) using the H, M, and S buttons, then press ST/SP to begin the countdown.
- Count-up (Stopwatch): From 0:00:00, press ST/SP to start counting up. The timer can count up to 9 hours, 59 minutes, 59 seconds.

Figure 2.2: Timer displaying both countdown and count-up modes.
2.3 Brightness Adjustment
The timer features three brightness levels to suit different environments and conserve battery:
- High Light: For maximum visibility.
- Low Light: For reduced brightness, suitable for darker environments.
- Energy Saving Mode: The display will turn off after 10 seconds of no operation to conserve power. It will light up again when a button is pressed or the timer finishes.
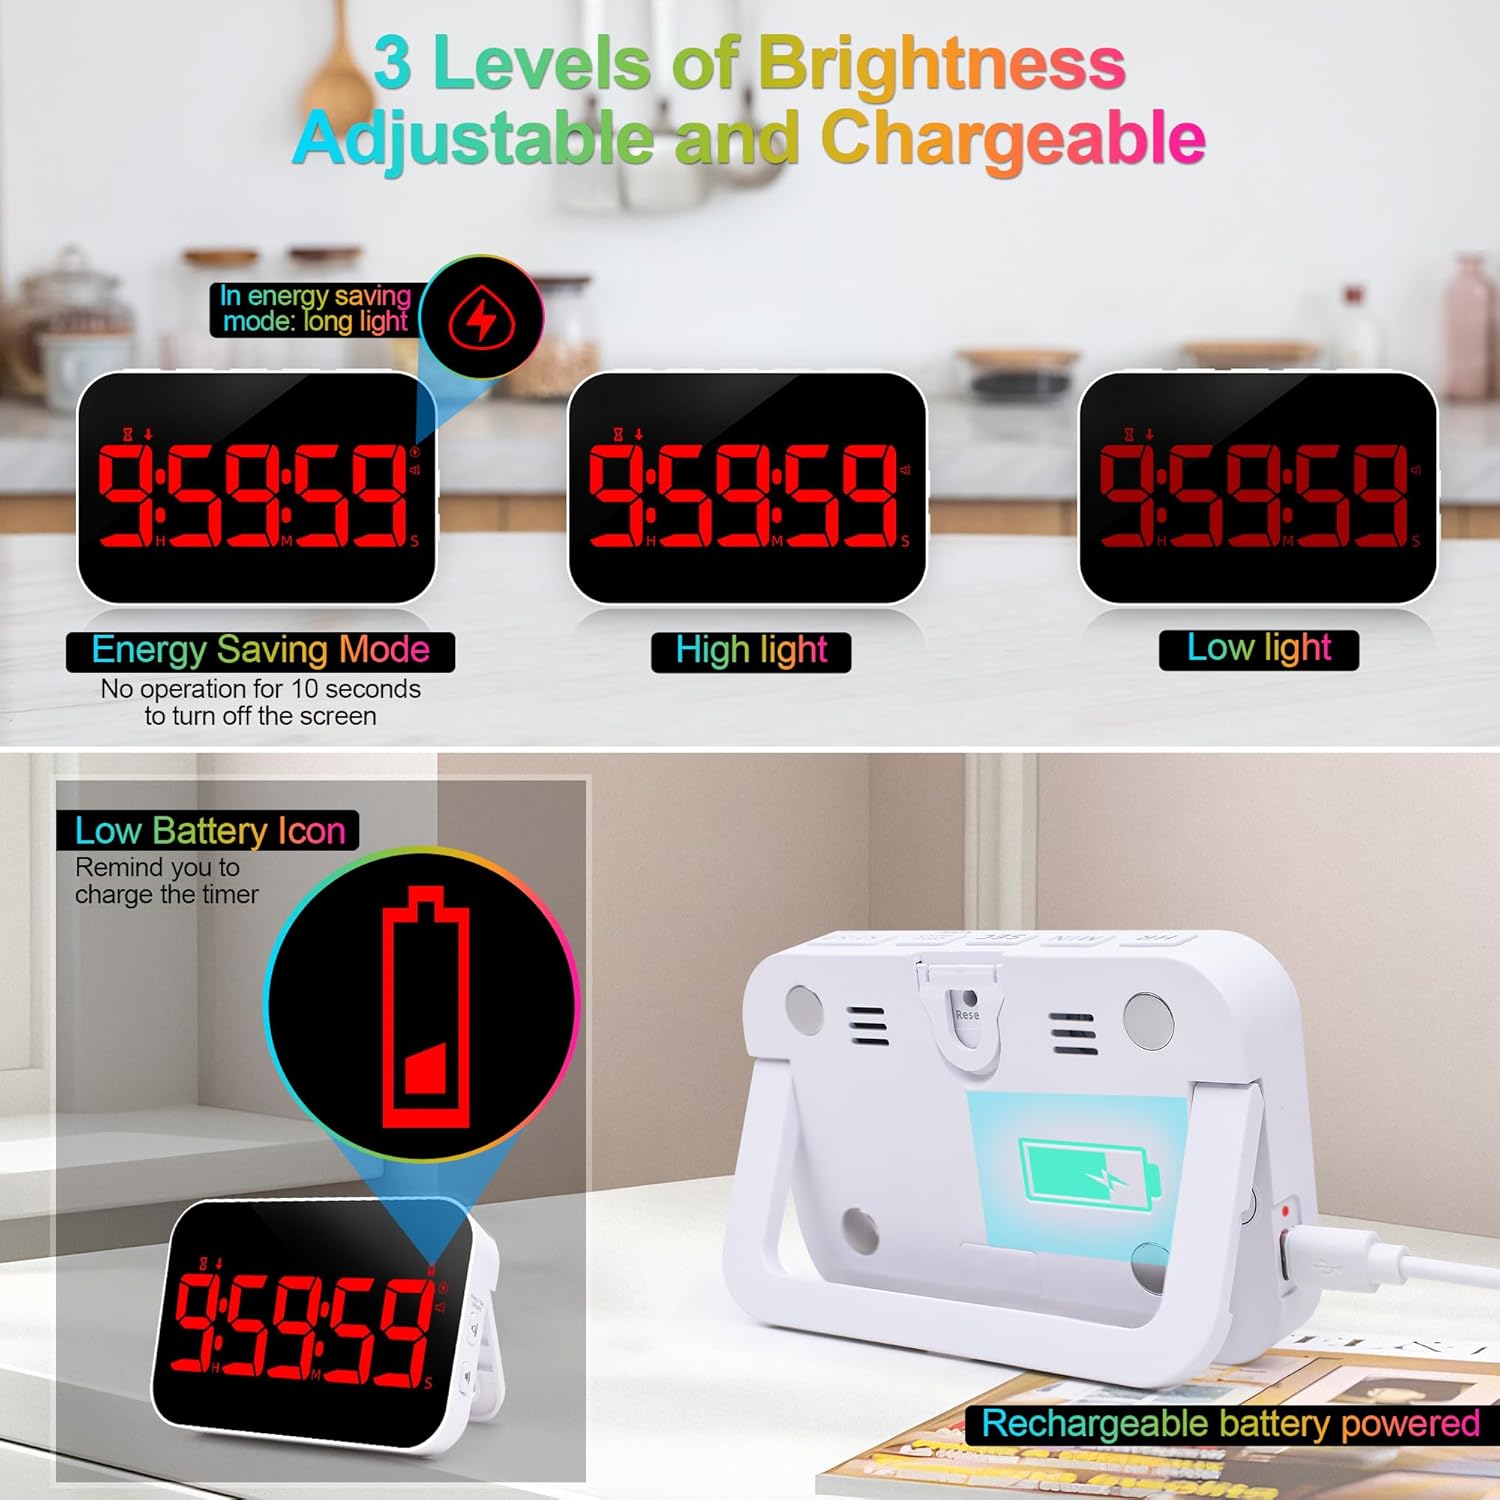
Figure 2.3: Brightness settings of the timer.
2.4 Volume and Vibration Settings
Adjust the reminder mode to fit your needs:
- High Volume (85-98 dB): Ideal for noisy environments like kitchens or sports activities.
- Medium Volume (60-75 dB): Suitable for daily use in classrooms or general learning environments.
- Mute (0 dB) & Flashes: For quiet areas such as libraries or self-study rooms, the display will flash when the timer ends.
- Vibration Mode: Provides a silent alert, perfect for meetings or personal work.

Figure 2.4: Adjustable volume and vibration modes.
3. Maintenance
3.1 Cleaning
To clean your timer, gently wipe the surface with a soft, dry, or slightly damp cloth. Do not use abrasive cleaners, solvents, or immerse the timer in water, as this can damage the electronic components.
3.2 Battery Care
To prolong battery life, avoid fully discharging the timer frequently. Recharge the timer when the low battery indicator appears. Store the timer in a cool, dry place when not in use for extended periods.
4. Troubleshooting
| Problem | Possible Cause | Solution |
|---|---|---|
| Timer does not turn on or display is blank. | Battery is depleted. | Charge the timer using the provided Type-C cable. Ensure the charging cable and power source are working correctly. |
| Display is dim. | Brightness setting is too low or in energy-saving mode. | Adjust the brightness setting to High Light. If in energy-saving mode, press any button to reactivate the display. |
| Alarm sound is not audible. | Volume is set to Mute or Vibration mode. | Adjust the volume setting to Medium or High. Ensure the timer is not in vibration-only mode if an audible alarm is desired. |
| Buttons are unresponsive. | Temporary software glitch. | Try resetting the timer by pressing the reset button (if available, usually a small pinhole) or allowing the battery to fully discharge and then recharging. |
5. Specifications
| Feature | Detail |
|---|---|
| Model Number | Timer - Red |
| Display Type | 5-inch LED |
| Dimensions (L x W x H) | 4.61"D x 1.06"W x 3.7"H |
| Weight | 5.3 ounces |
| Material | Plastic |
| Power Source | Rechargeable (Type-C USB) |
| Brightness Levels | 3 (High, Low, Energy Saving) |
| Volume Levels | 4 (Mute, Medium, High, Vibration) |
| Max Time Setting | 9 hours, 59 minutes, 59 seconds |
| Placement | Magnetic, Hanging, Stand |
6. Warranty and Support
For warranty information or technical support, please refer to the product packaging or contact Tilstongy customer service directly. Keep your purchase receipt for any warranty claims.
We are committed to providing high-quality products and excellent customer service.


